

Valentine’s Day deserves a truly special dinner. Of course you can go out to a restaurant—but why subject yourselves to crowded dining rooms, harried servers, and high prices? Yet the prospect of making a restaurant-quality, three-course meal may seem daunting. But here’s where the PrepHoldCook strategy is invaluable. You can divide up the tasks and prep ahead so that on the special day you can put a romantic dinner on the table with minimal time and effort.
Our three-course menu features an appetizer and dessert that are almost totally make-ahead, leaving only the main course to finish at dinnertime. Set a festive table, buy some bubbly and a better-than-usual red, and let the evening begin!
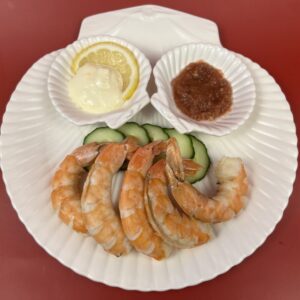
Chilled Shrimp
with Lemon Mayo and Fresh Tomato Cocktail Sauce
______________________

Roast Rack of Lamb
with Red Wine-Shallot Jus, Twice-Baked Potatoes, and “Heartbeet” Salad
______________________

Julia's Chocolate Mousse
with Chantilly Cream and Strawberries
Your Cooking Lesson
Advice, explanation, and in-depth information to help you achieve recipe success.
Chilled Shrimp with Lemon Mayo and Fresh Tomato Cocktail Sauce

What’s more luxurious than a plateful of big, plump, chilled shrimp accompanied by two sumptuous dipping sauces? Start your Valentine’s Day dinner with this prep-ahead appetizer.
The success of this elevated shrimp cocktail depends on sourcing the best ingredients and preparing them with care. I always recommend purchasing domestic, wild-caught shrimp from the Gulf of Mexico or the US southern Atlantic coast, as opposed to Asian or Central American shrimp, of which most are farmed. In addition to having better texture and flavor, they’re far better for the environment and for your health. https://oceana.org/blog/5-facts-will-make-you-think-twice-about-eating-imported-farm-raised-shrimp/
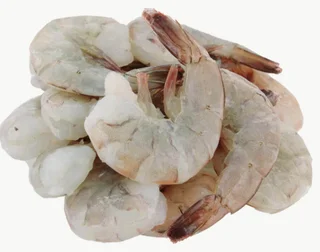
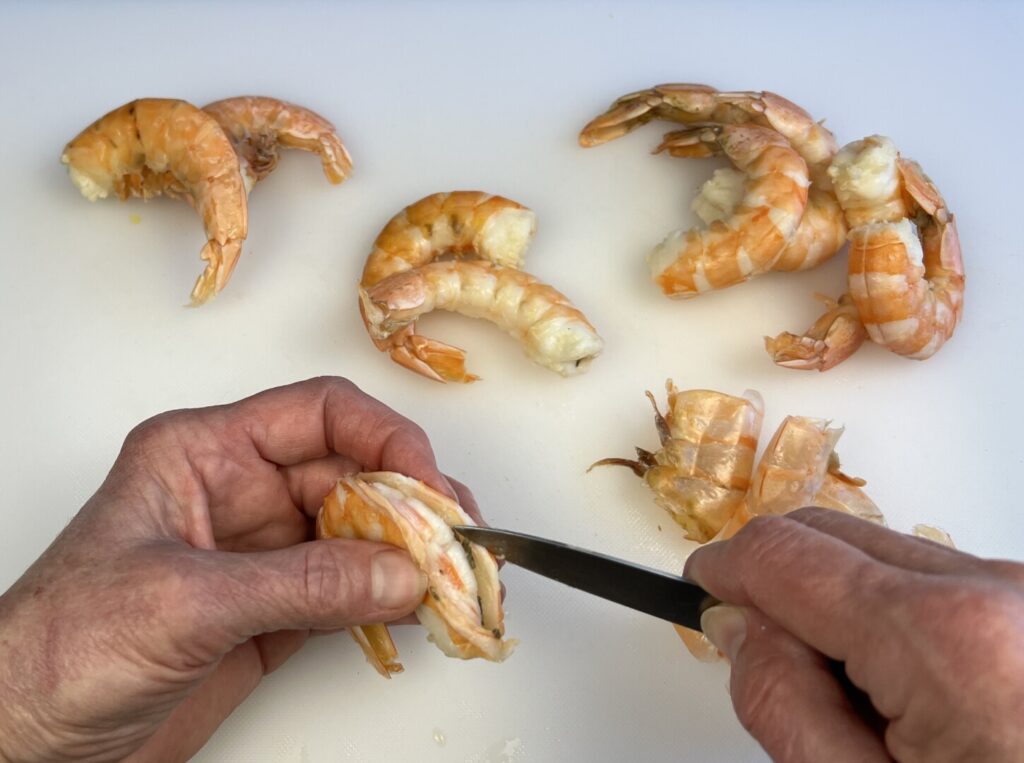
For your special dinner, splurge on big ones: 16-20 count-per-pound. Don’t be tempted to purchase pre-shelled shrimp. Shrimp shells contain natural sugars, proteins, and water-soluble flavor compounds that release into the shrimp when cooked, deepening their flavor. Poaching shrimp in their shells also protects the flesh from over-cooking.
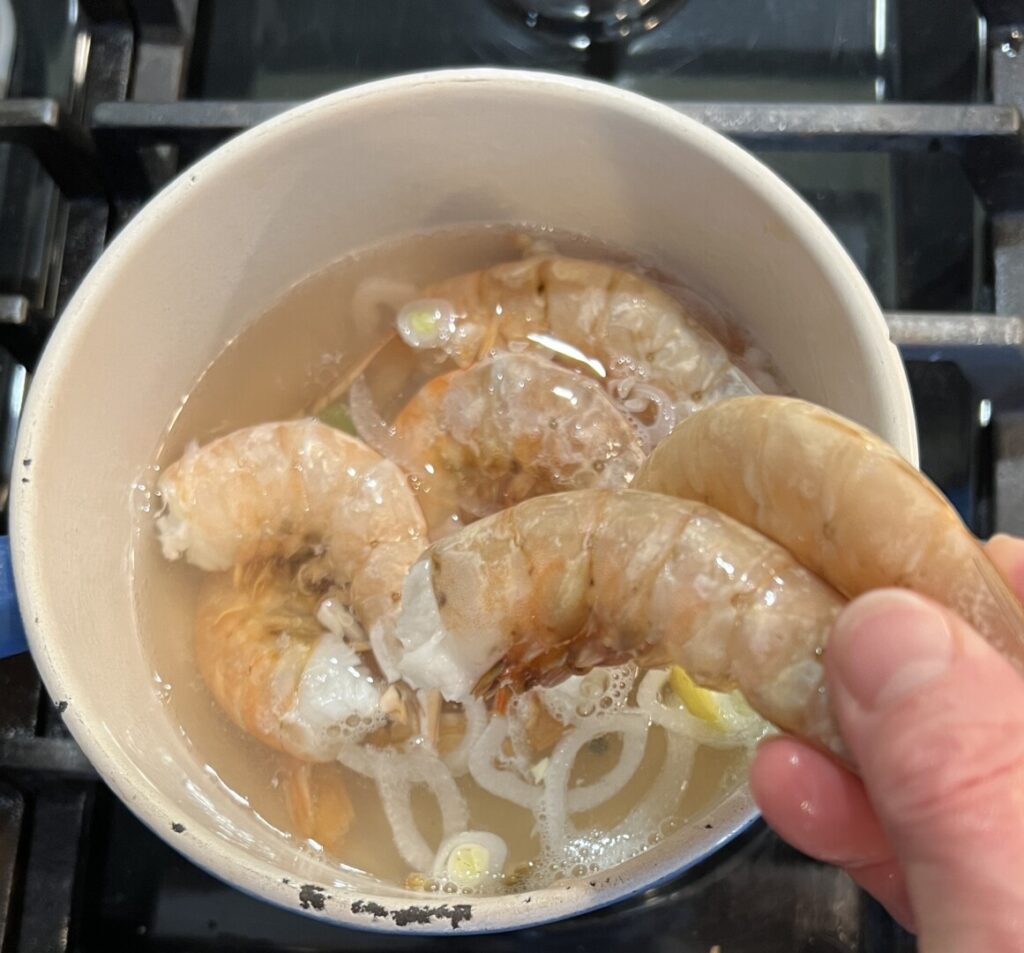
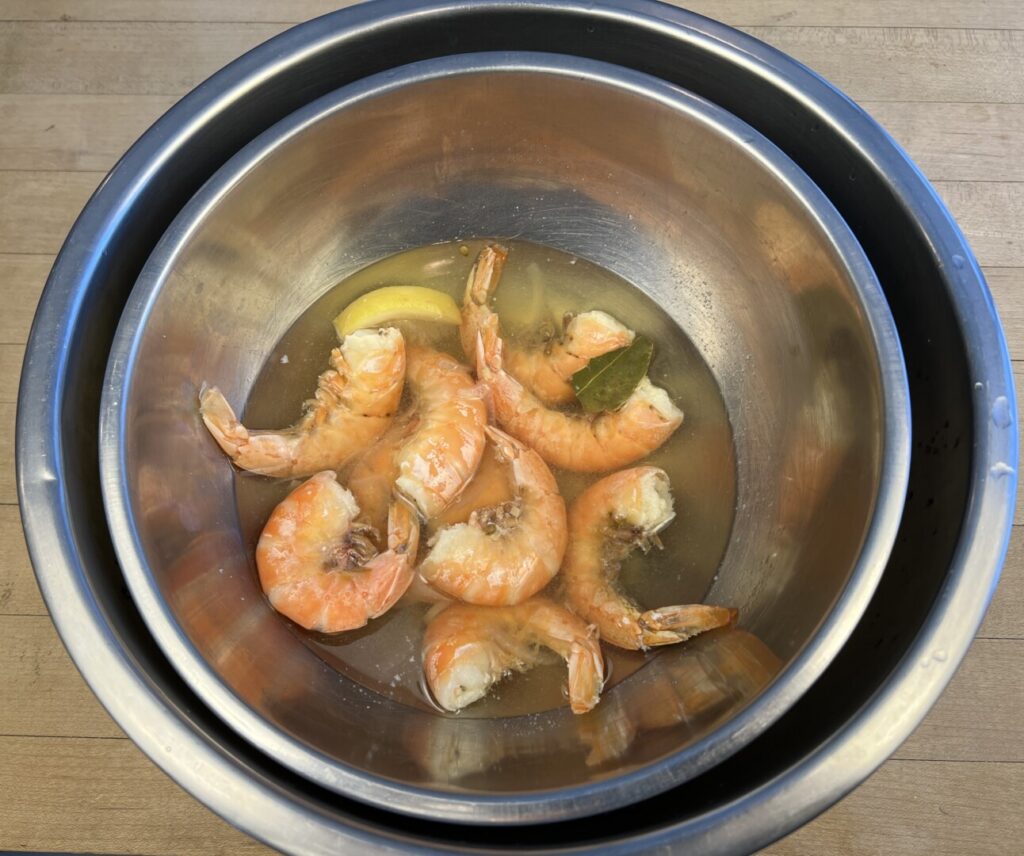
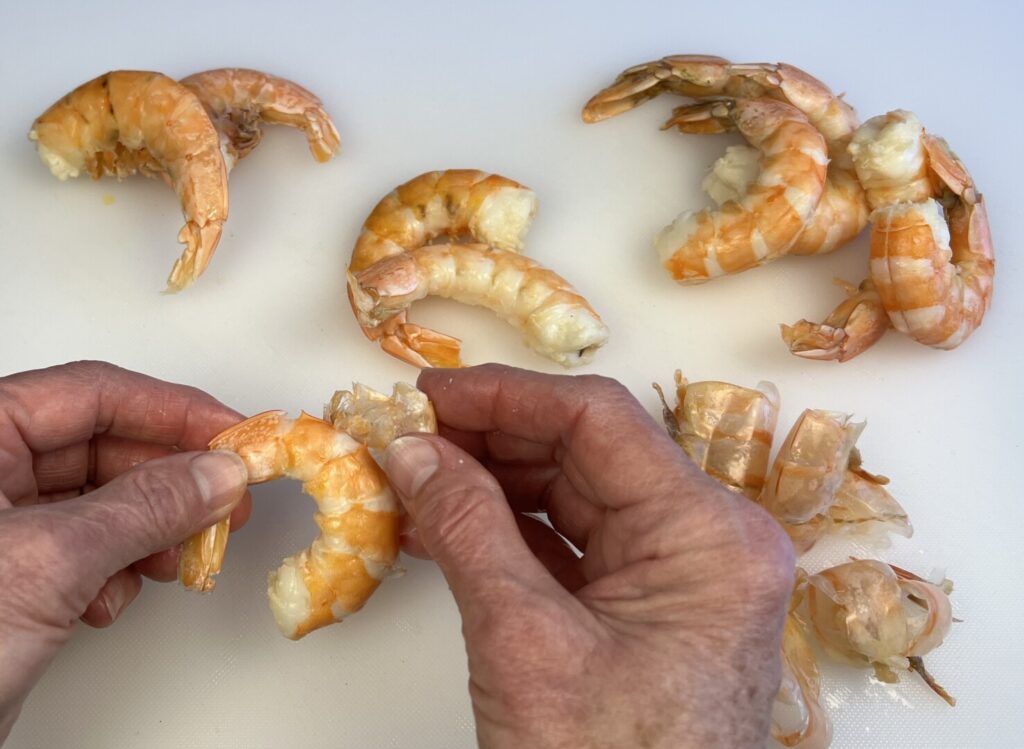
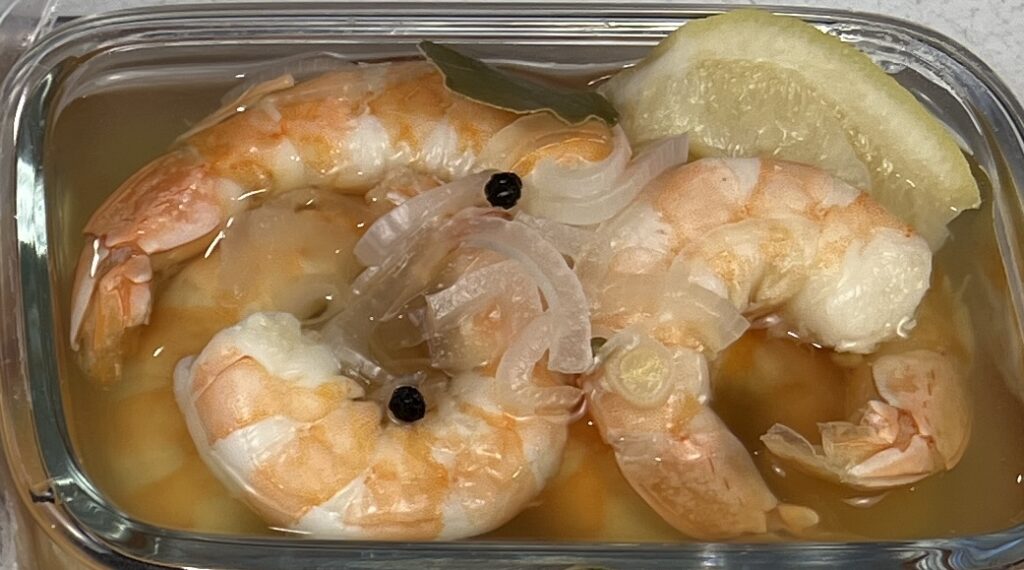
Poaching is a moist-heat cooking method that involves cooking food completely submerged in a flavorful liquid—called a cuisson—at a low simmer. The cuisson for this dish is a blend of water, white wine, lemon, and seasonings. Cook the shrimp until they acquire a vivid pink or coral color, and cook them only until they just begin to curl. Shrimp cooked until they form tight rings are over-cooked, and have a tough, dry mouthfeel. Stop the cooking by placing the saucepan in an ice water bath. Peel them, leaving the tails on “cocktail-style” as convenient handles for eating with your fingers. Refrigerating the shrimp in their cuisson helps them remain moist and further develops their flavor.
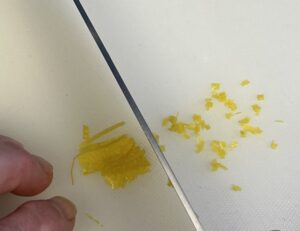
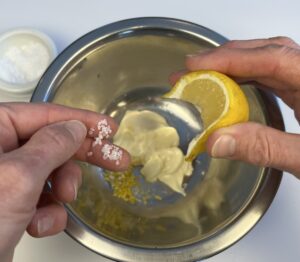
Serving the shrimp with two sauces doubles the pleasure of eating them. Lemon mayo acquires piquant flavor from both lemon juice and lemon zest, and provides a rich mouthfeel.

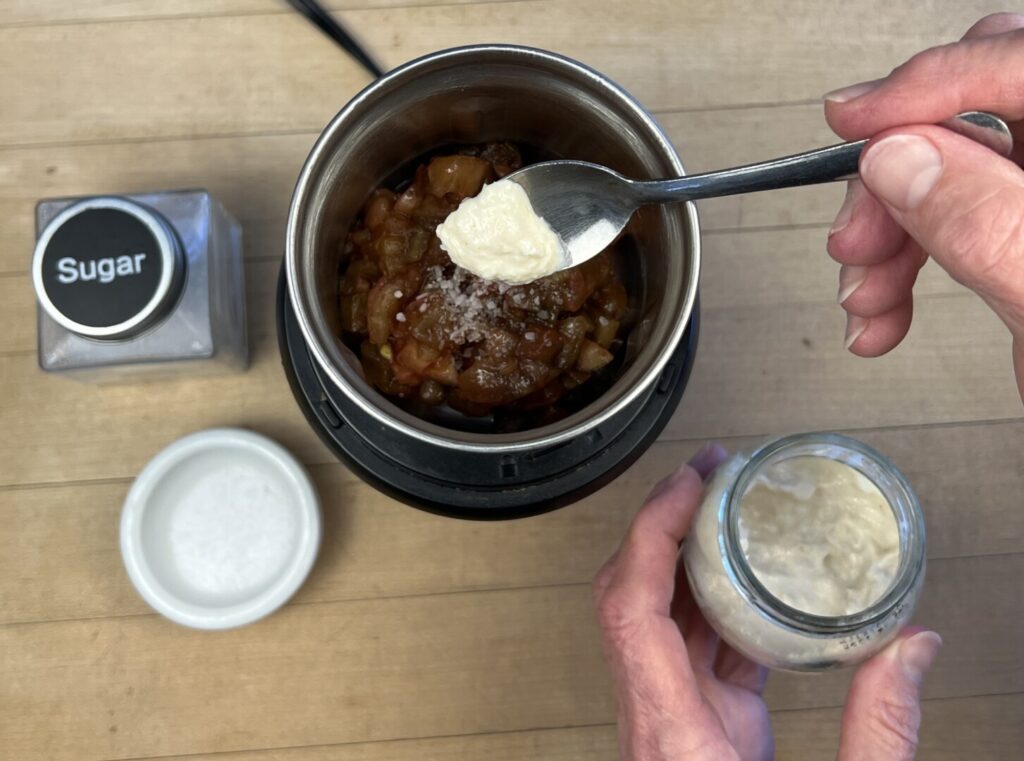
Traditional cocktail sauce, made with ketchup, always seems too sweet and thick. Try making your own by blending a peeled, seeded, ripe tomato with cream-style horseradish and just a pinch of sugar.
It’s Valentine’s Day—time to COOK!
With all your prep done ahead of time, it takes mere minutes to plate this dish.
Chilled Shrimp with Lemon Mayo and Fresh Tomato Cocktail Sauce
Ingredients
step 1 ingredients
- 1/8 yellow onion
- 1/2 c white wine
- 1 1/4 c water
- 1/8 tsp kosher salt
- 1 bay leaf
- 6 black peppercorns
- 6 coriander seeds
- 1/8 lemon, wedge
step 2 ingredients
- 12 oz Gulf shrimp, 16-20 count size (5 per person)
step 3 ingredients
- 1/4 c mayonnaise, preferably Duke's brand
- 1/8 lemon, wedge
- pinch sugar
- pinch kosher salt
step 4 ingredients
- 1 Kumato or other small vine-ripe tomato
- 1/2 tsp cream-style horseradish, preferably Inglehoffer brand
- 1/4 tsp sugar
- to taste kosher salt
step 6 ingredients
- 1/5 English cucumber
Instructions
PREP: Mise the recipe ahead of time.
1. Make the cuisson:
- Cut the onion into very fine slices.
- Combine the onion, wine, water, salt, bay leaf, peppercorns, and coriander seeds in a saucepan just large enough to accommodate the shrimp. Squeeze in the juice of the lemon wedge and drop it into the saucepan. Cover the pan and simmer over low heat for about 15 minutes.
2. Poach and peel the shrimp:
- Prepare a bowl of ice water large enough to hold the cuisson saucepan.
- Rinse the shrimp under cold water, shake them dry, and add to the cuisson in the saucepan. If the shrimp aren’t completely submerged, add more water.
- Cover the pan and bring the cuisson to a gentle simmer. Poach about 3 minutes until the shrimp turn pink in color and begin to curl.
- Place the saucepan in the ice water to cool the cuisson to room temperature.
- Remove the shrimp from the cuisson and peel them, leaving the tails on. Devein the shrimp.
- Place the shrimp in a container just large enough to accommodate them, and pour the cuisson over them.
3. Make the lemon mayo:
- Use a swivel peeler to peel off a strip of lemon zest. (Don’t press too deeply into the bitter white pith). Mince the zest very fine.
- Place the mayonnaise in a small bowl and stir in the zest.
- Squeeze in some of the juice from the lemon wedge.
- Stir in sugar and salt. Evaluate the seasoning and correct if necessary.
4. Make the cocktail sauce:
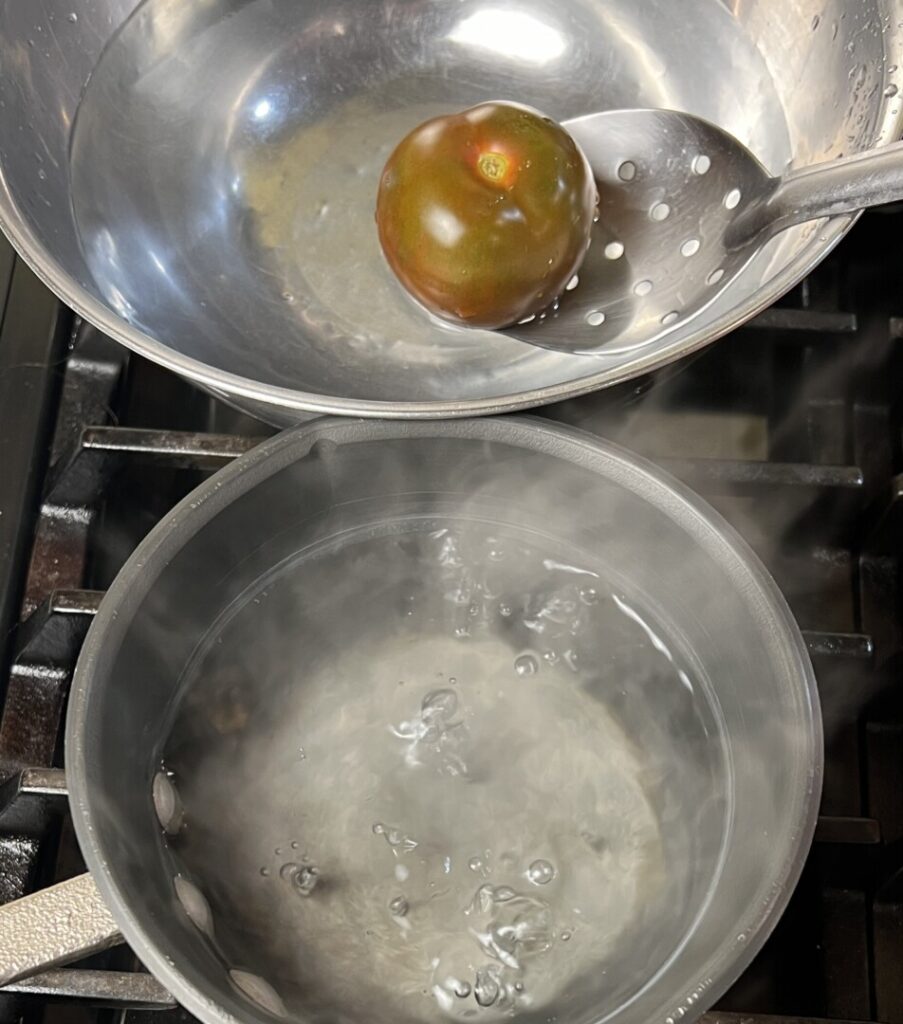
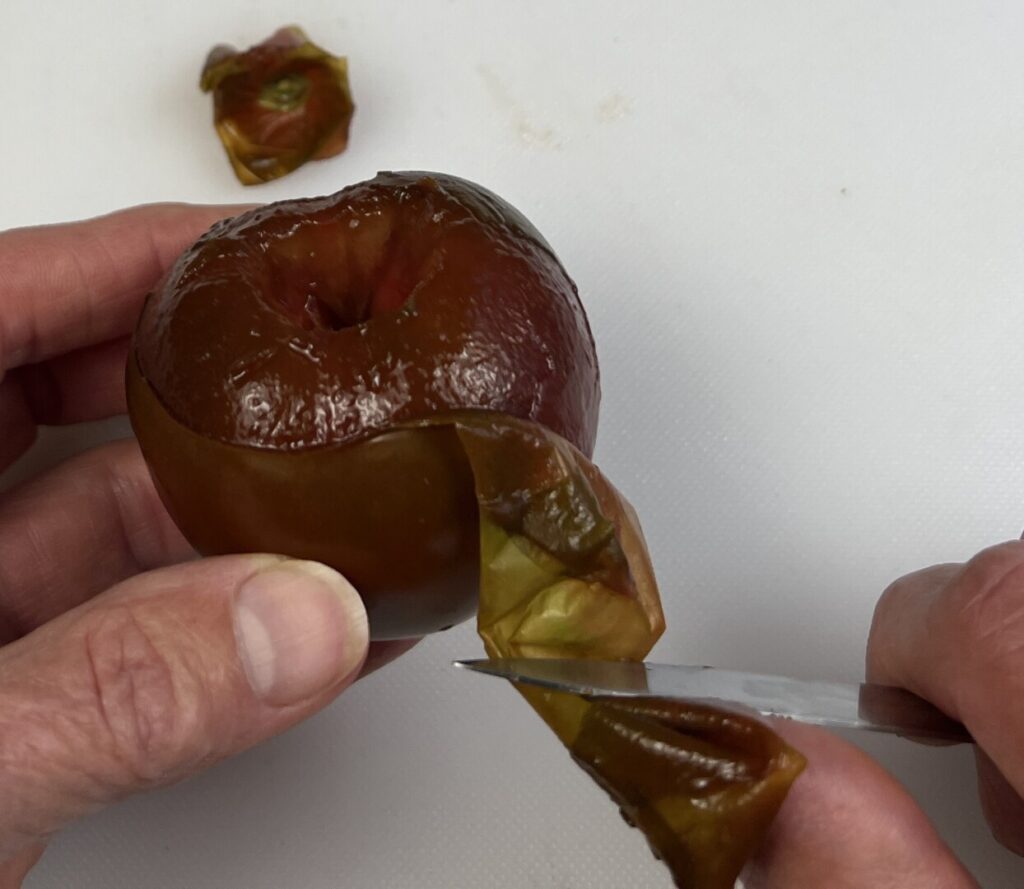
- Blanch the tomato in boiling water for a second or two, refresh it under cold water, remove the core, and slip off the skin.
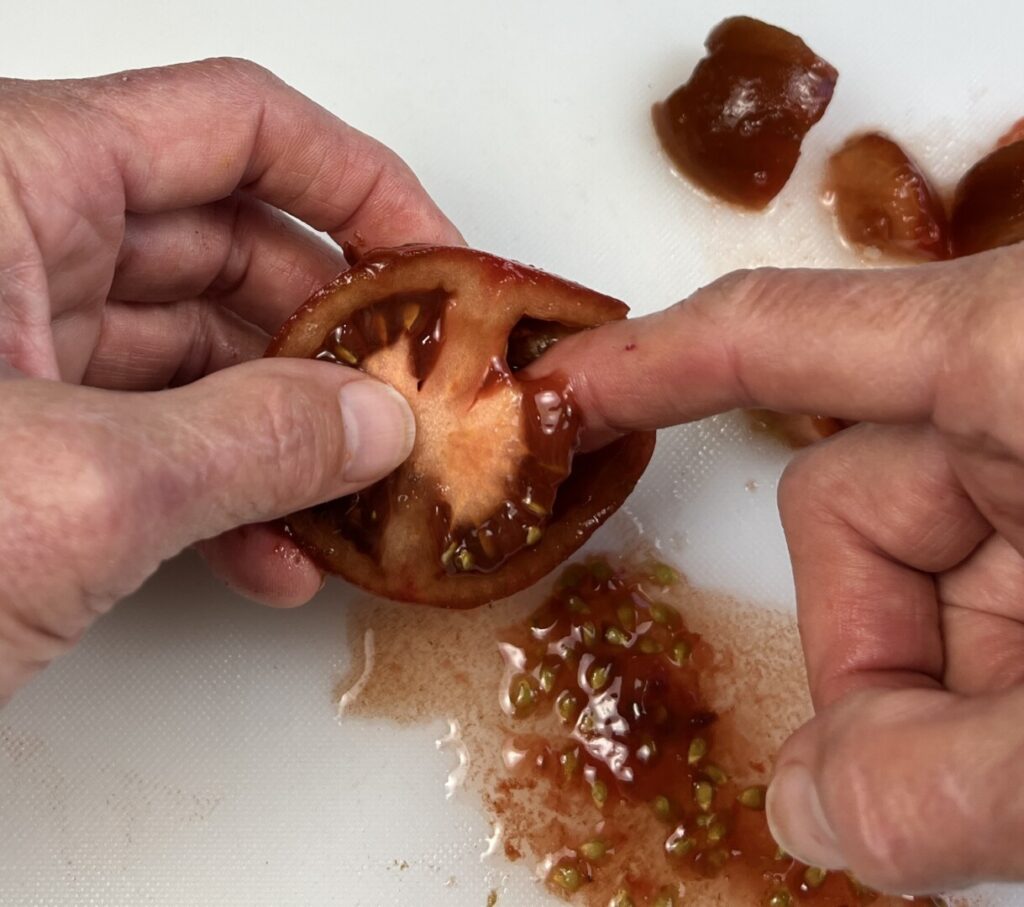
- Cut the tomato in half widthwise and remove most of the seeds.
- Chop the tomato and add it to a wet-dry spice grinder or mortar. Add the horseradish, sugar, and salt. Purée very briefly, without incorporating much air. (Alternatively, mash together in a small bowl.)
- Evaluate the seasoning and correct if necessary.
5. Assemble your prepped ingredients and the cucumber on the mise-en-place tray along with the Roast Rack of Lamb entrée ingredients.
HOLD: Refrigerate all ingredients up to 5 days.
6. Cut the cucumber into 5 round slices per person.
7. Drain the shrimp and blot dry on paper towels.
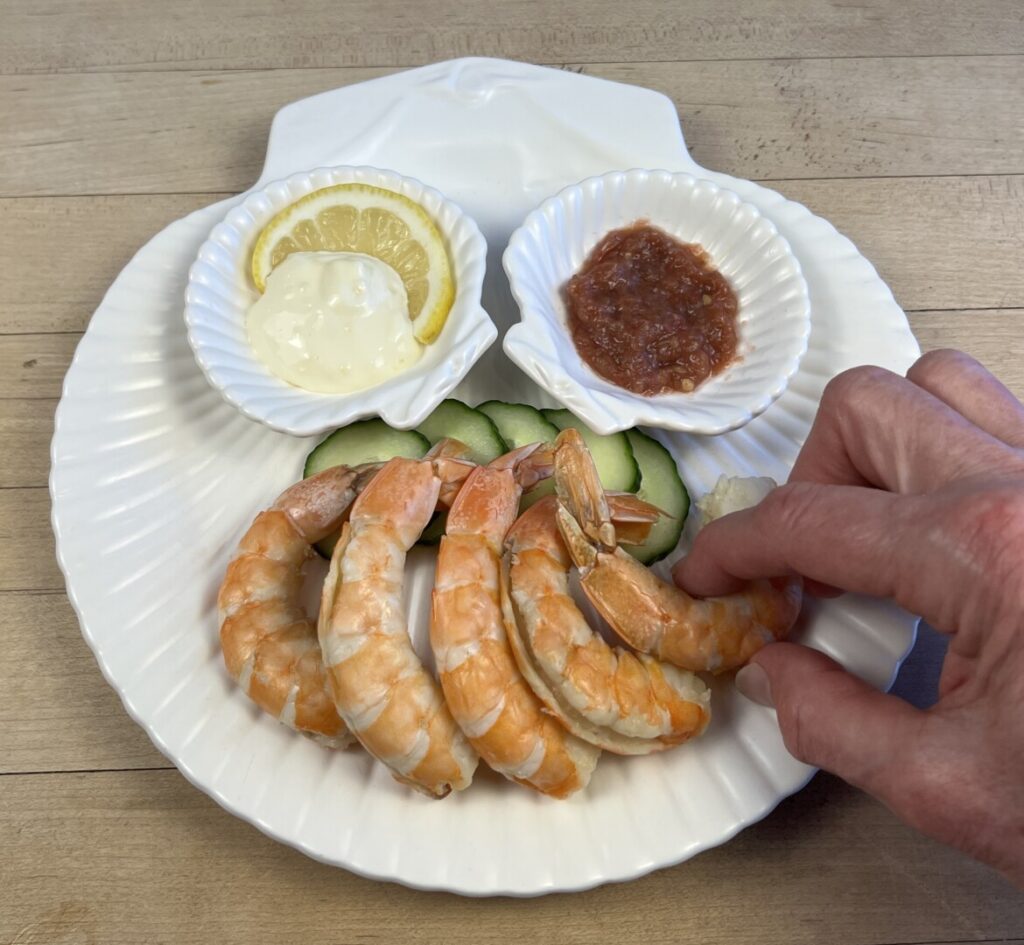
8. Plate:
- Spoon the lemon mayo into 1 small dip dish per person.
- Spoon the fresh tomato cocktail sauce into 1 small dip dish per person.
- Place dishes of each sauce side-by-side on the back of each plate.
- Arrange 5 cucumber slices on each plate in front of the dip dishes, in an arc configuration.
- Arrange 5 shrimp across the front of the plate, partially on the cucumbers.
Nutrition
Roast Rack of Lamb with Red Wine-Shallot Jus, Twice-Baked Potato, and “Heartbeet” Salad
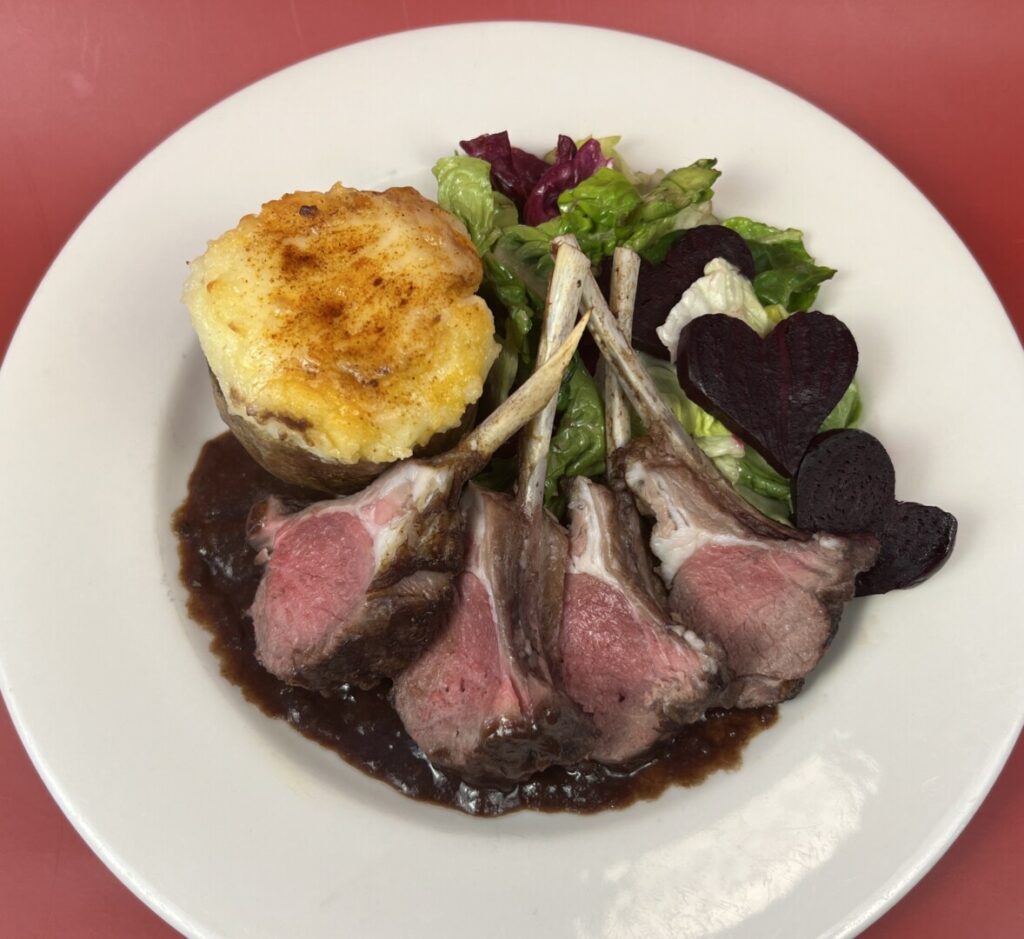
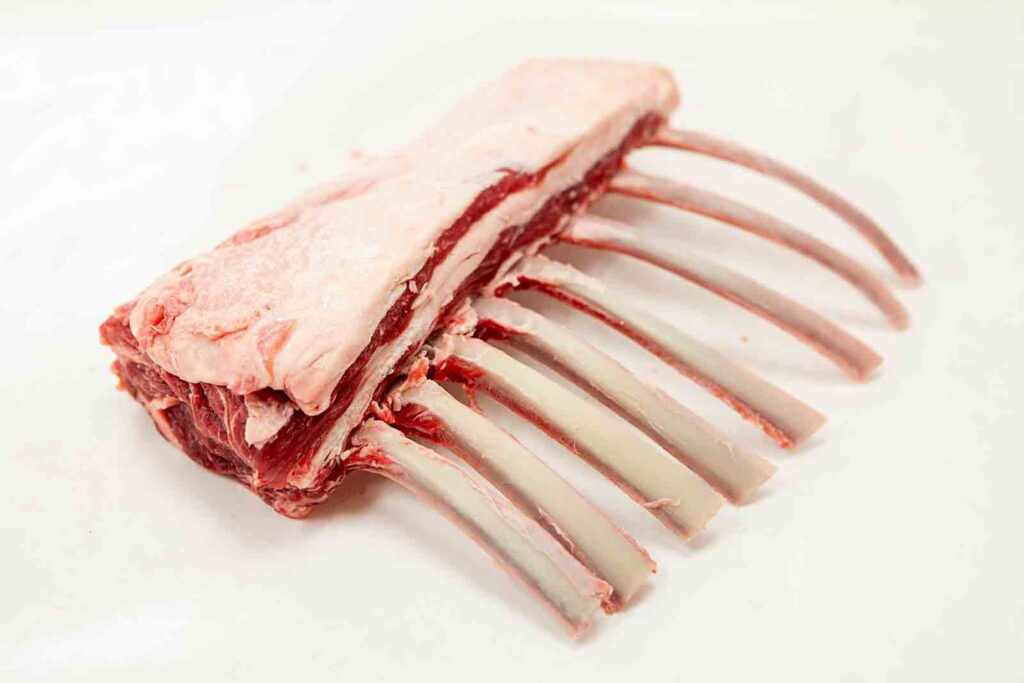
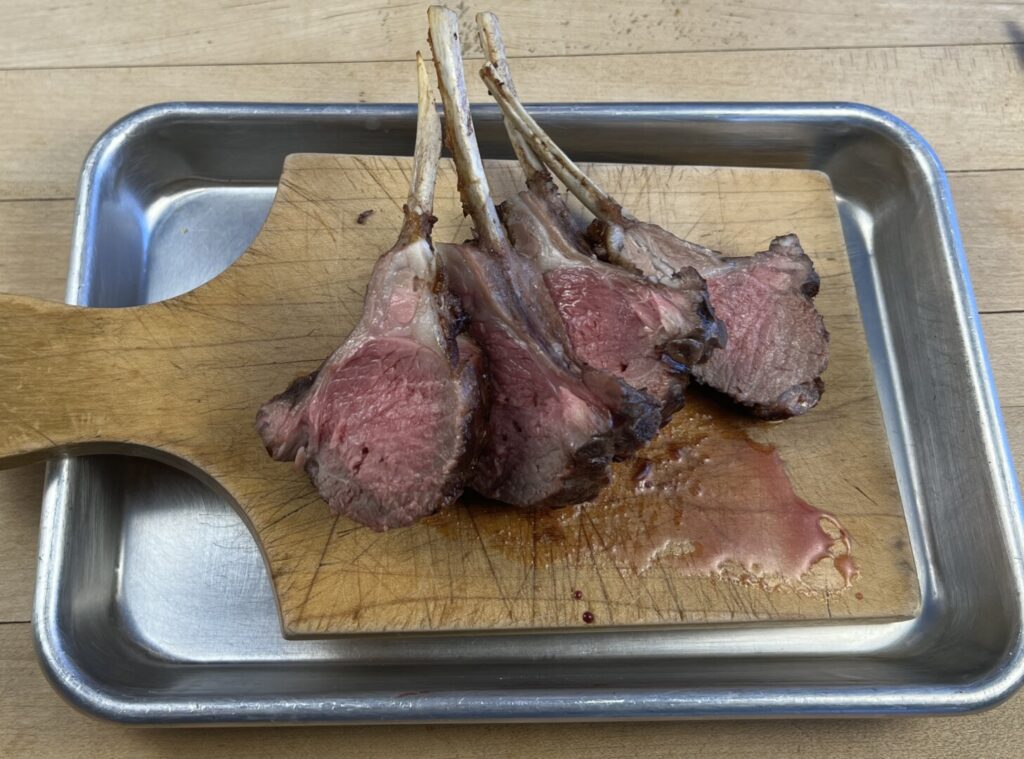
The rack is undoubtably the most glamorous cut of lamb. Tender, juicy, with just enough crispy fat, a halved single rack provides eight petite rib chops that perfectly serve two. Teamed with a rich, cheesy stuffed potato and a crisp salad, roast rack of lamb is an entrée worthy of celebration.
The classic fabrication method, called “Frenching,” leaves clean ribs as handles for nibbling the rosy eye meat off the bone. Traditionally, the ability to French a rack was an important skill for aspiring chefs; today, lamb racks are Frenched during processing and require only a little trimming.
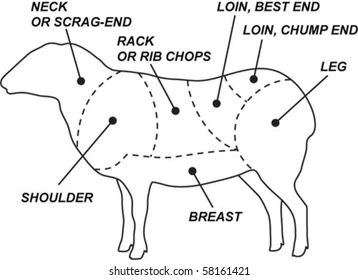
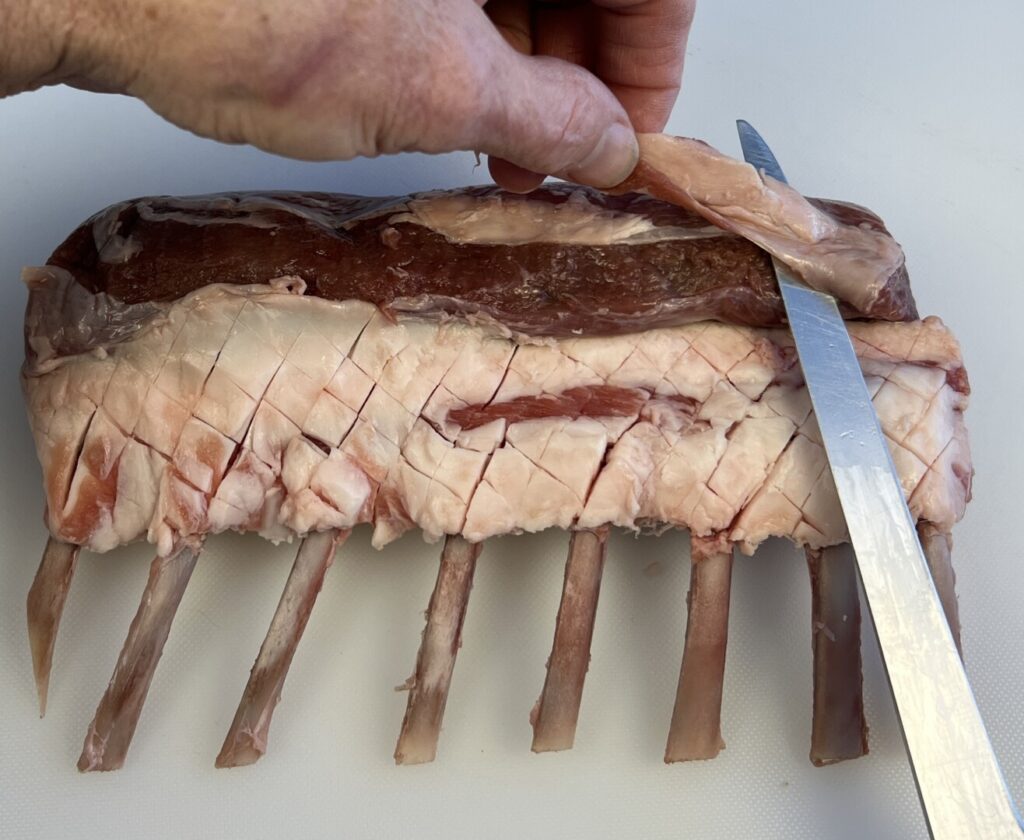
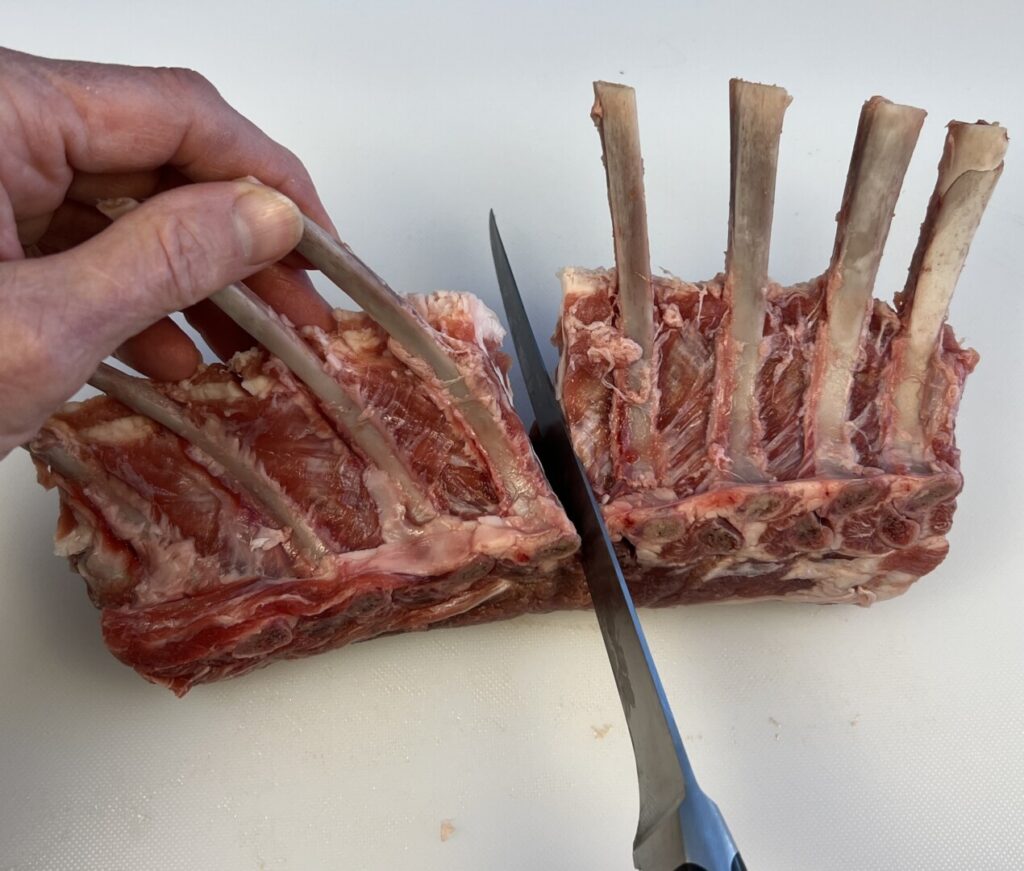
If necessary, you may have to trim off some of the thick fat cap remaining on the meaty side of the rack, as shown in the photo above. But most lamb racks available to consumers already have had this removed. You’ll likely need to trim away some of the thicker connective tissue that remains, and clean up the rib bones if any of the connective tissue sheath remains clinging to them. Scoring the surface fat by cutting a cross-hatch pattern into it allows the excess fat to render out from underneath, leaving a crispy crust and creating an attractive appearance. Although you can pan-roast a whole rack, dividing it into two portions makes it easier to handle.
Although lamb rack doesn’t require tenderization, a short marination makes it tastier. Marinate your rack in a mixture of red wine, garlic, olive oil, and Dijon mustard in the refrigerator for up to 24 hours. Don’t leave it in the marinade any longer than that, or the acidity will break down the meat fibers, resulting in a “cottony” mouthfeel. Be sure to save the marinade for basting during roasting.
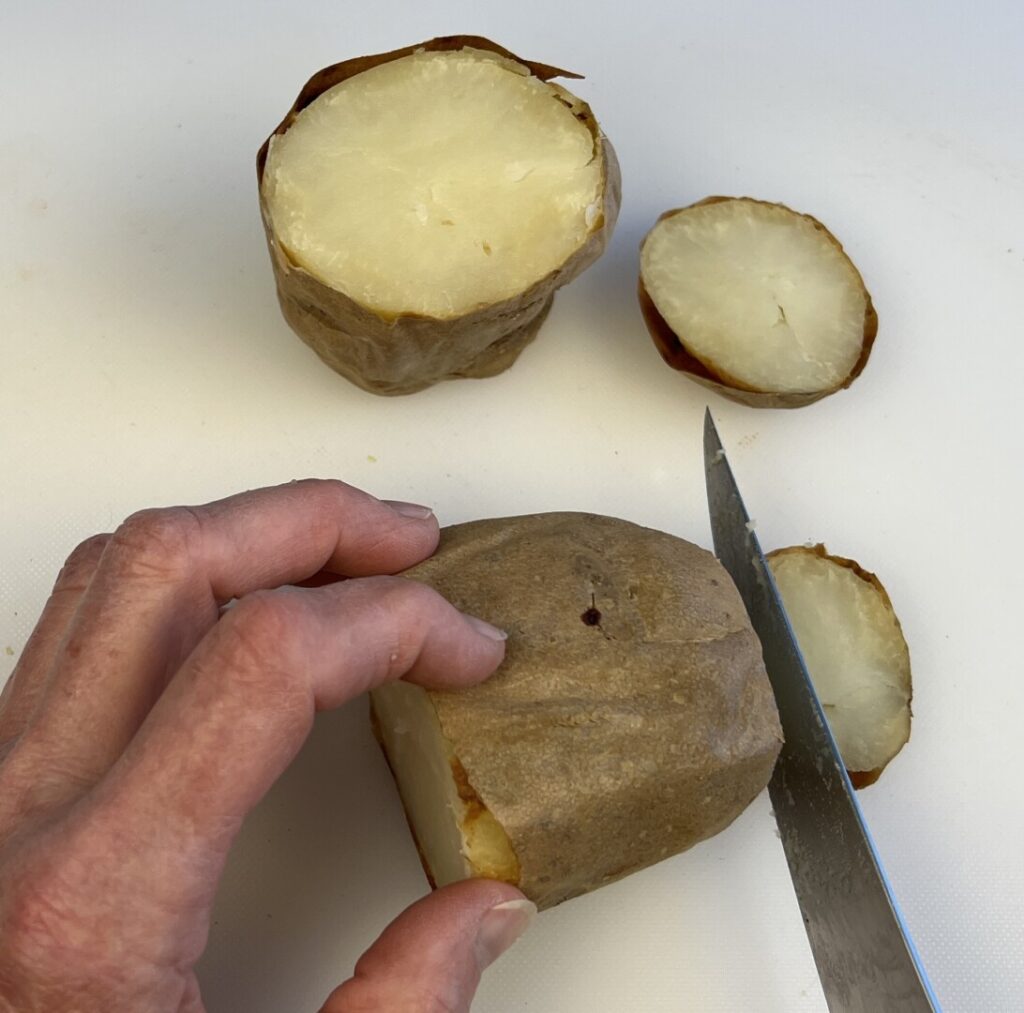
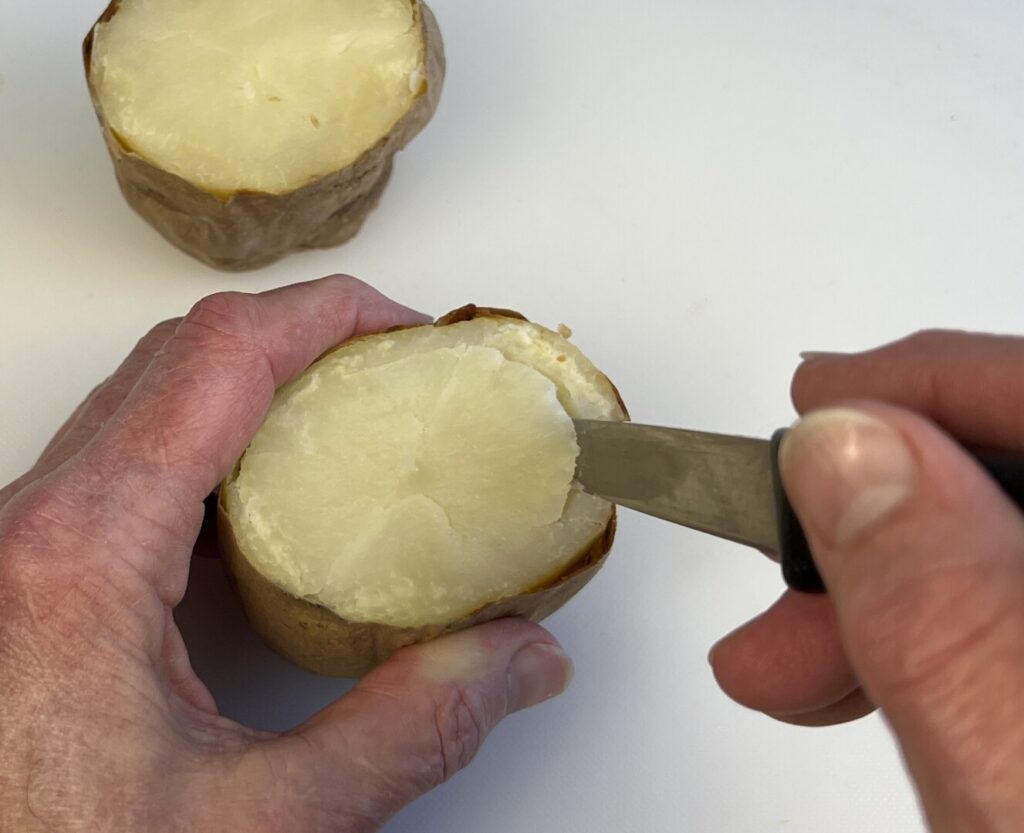
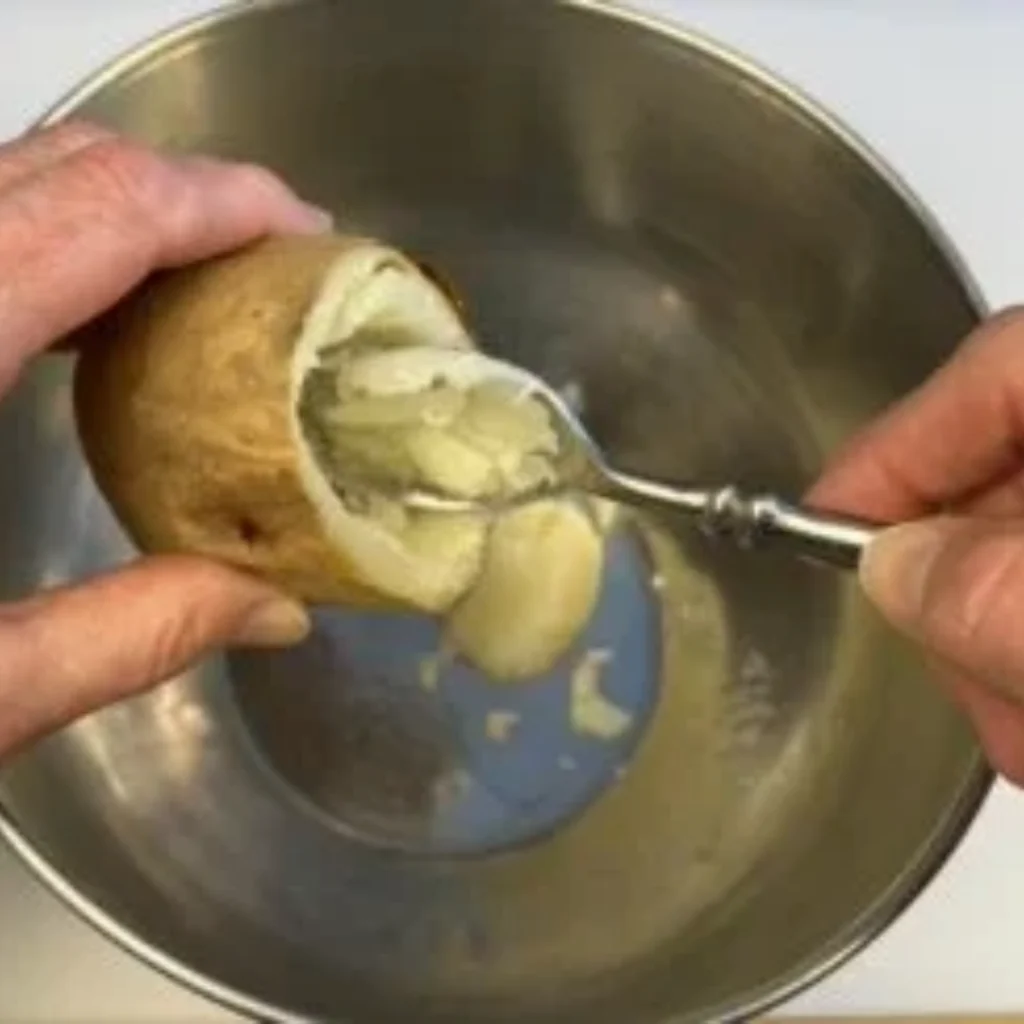
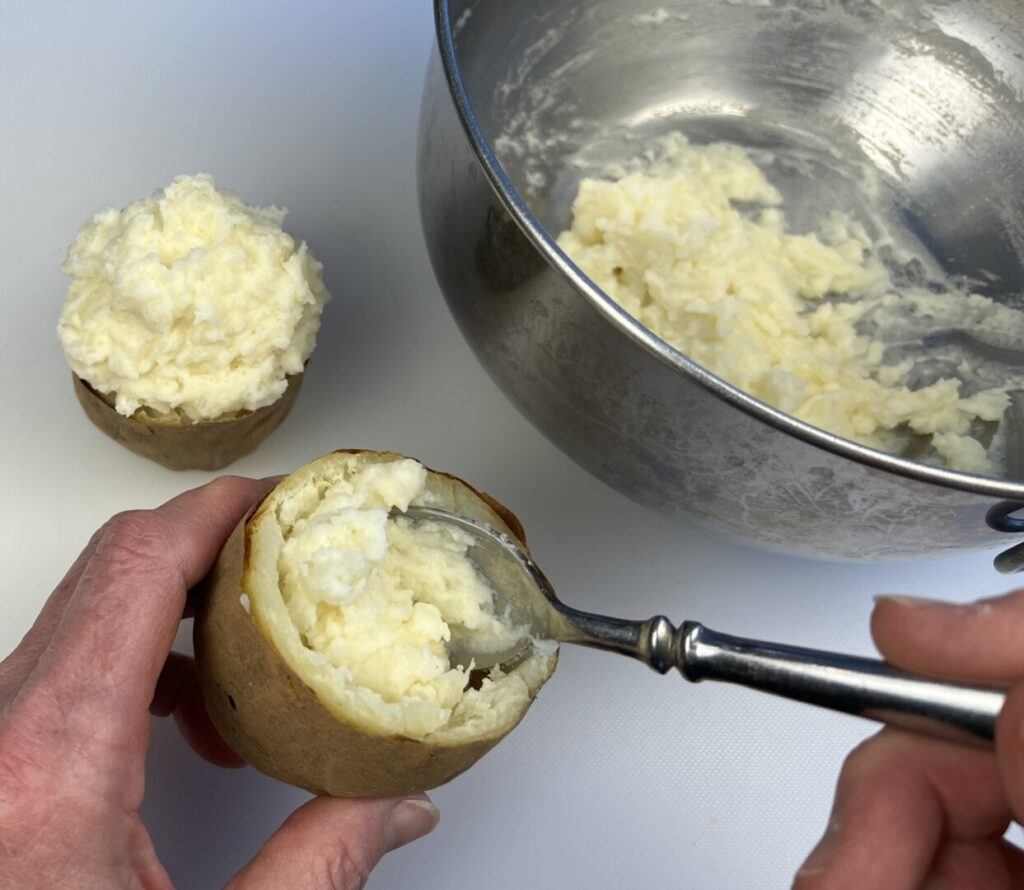
Although we typically focus first on the protein, your actual first step is to start the twice-baked potatoes (and the roasted beets), because they’ll need lengthy time in the oven. To achieve the right portion size, use medium-size russets. (If only large, long potatoes are available, you can use just one and split it in half.) Russet potatoes are a type of “mealy” potato, high in starch and low in moisture. This makes them a good candidate for making a light, fluffy purée. Make sure to scrub the skins thoroughly, because you’ll likely want to eat the delicious twice-baked skins as well as the filling. Poking holes in the skins allows steam to escape, making the interior flesh lighter and fluffier. Once the potatoes are baked, it’s important to make the whipped potato stuffing while they’re still warm. (If you get interrupted, you can reheat them gently in a microwave oven.) Cut off 1/3 of the potato tops, and shave off just a bit of the bottoms so that the potatoes will sit upright. Start hollowing by cutting a neat rim around the top opening, and then scoop out the flesh, leaving a thin but sturdy shell.

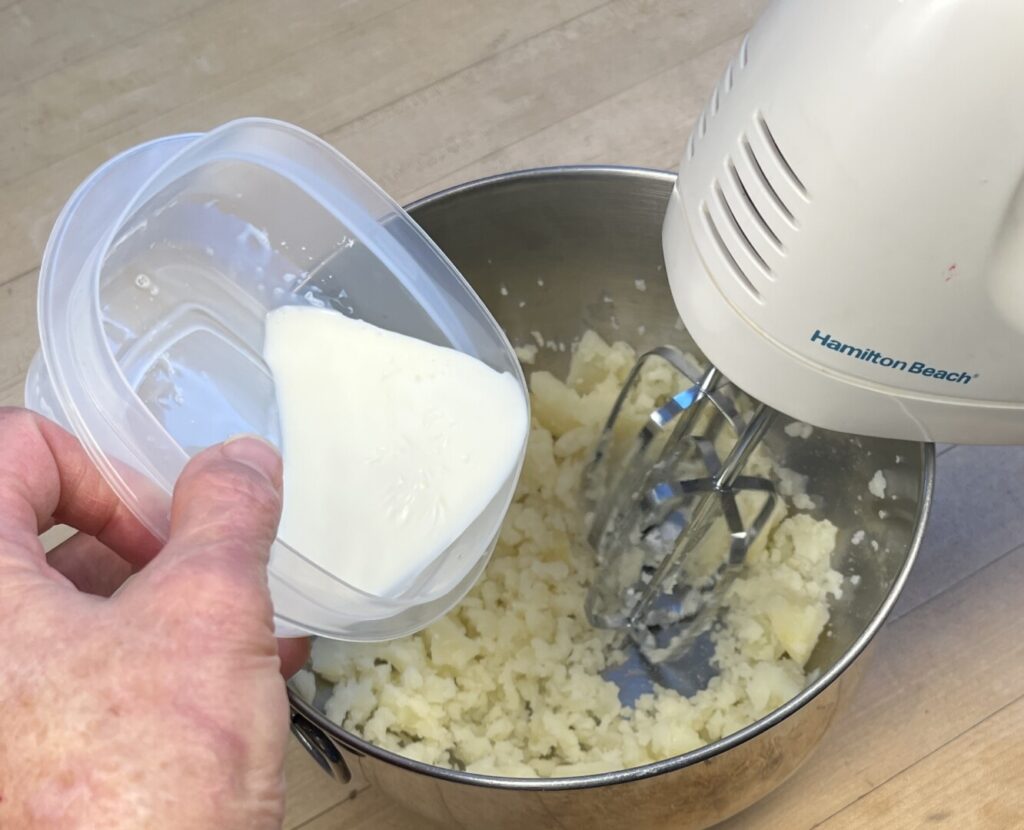
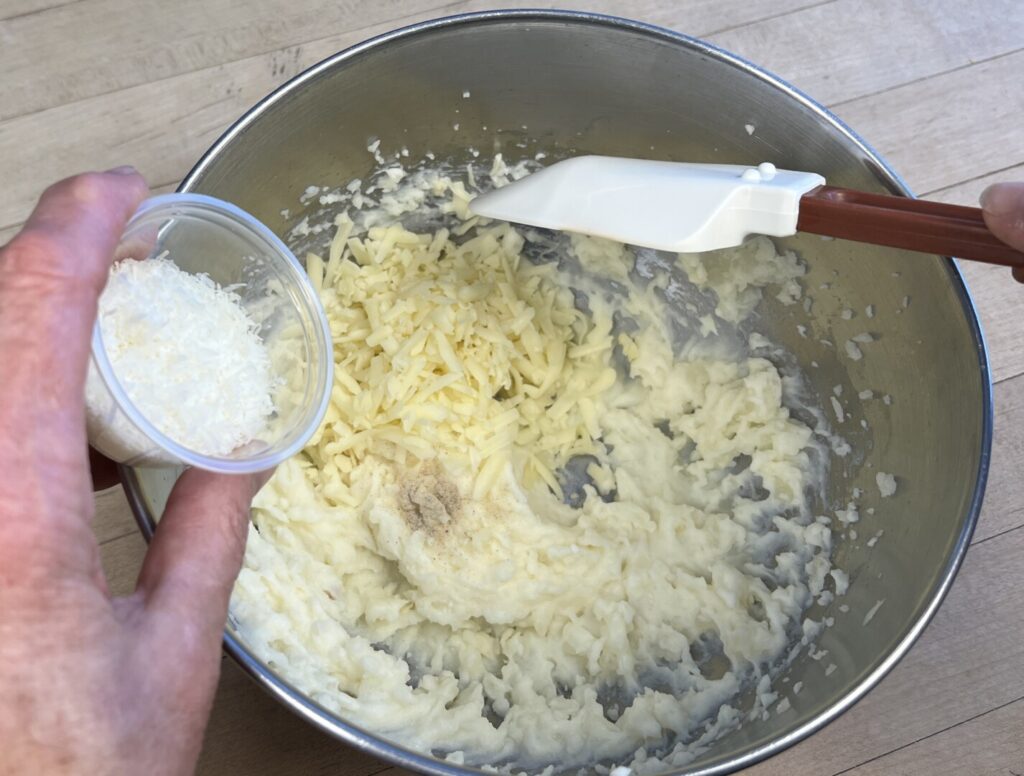
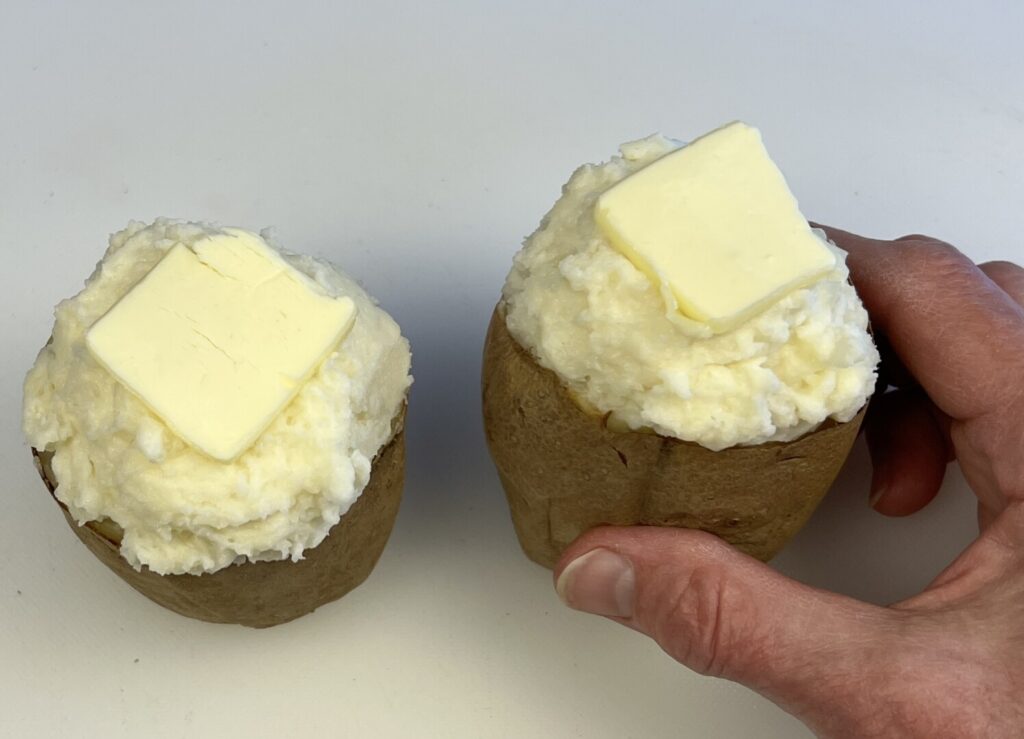
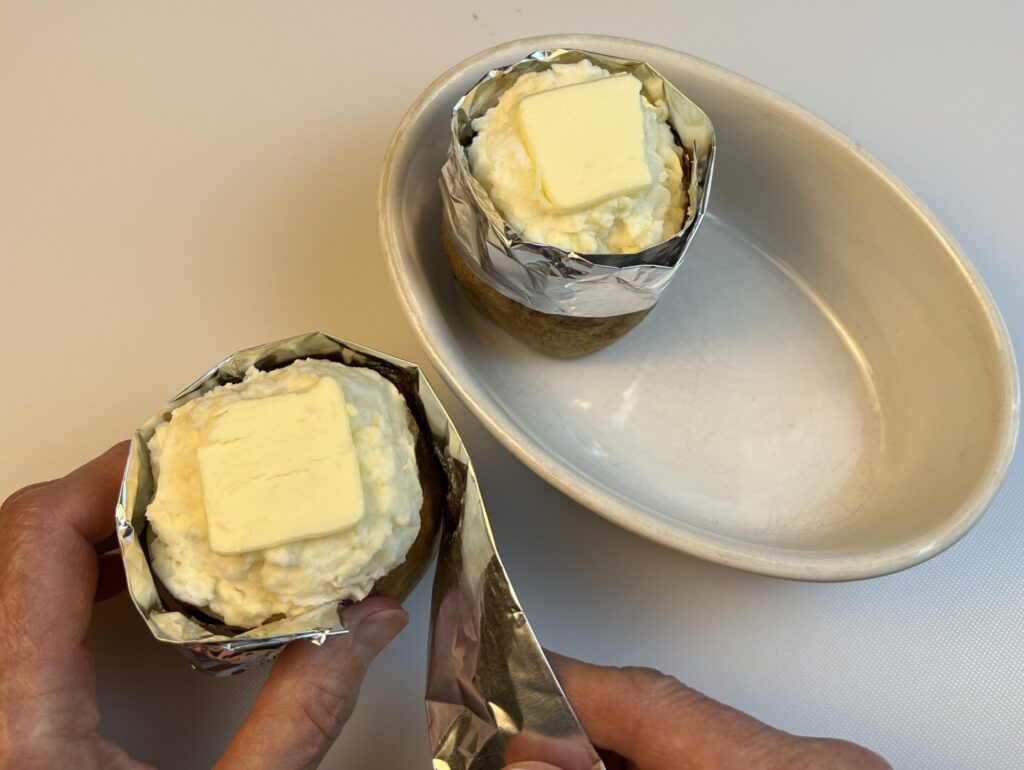
Break up the warm potato flesh using an electric hand mixer; alternatively (but less effectively), you can use a whisk. Quickly beat in the hot half-and-half and soft butter. Don’t over-mix! If you whip potatoes for too long a time you activate amylase, an enzyme that breaks down the starches in the potatoes, causing an unappealing, gluey texture. Better to have a few lumps than a bowlful of glue! Fold in the cheeses and check the seasoning. Stuff the potatoes, gently packing in the filling and forming a mounded top, and then top with a thin pat of butter. An aluminum foil “collar” will keep the filling in place while baking.
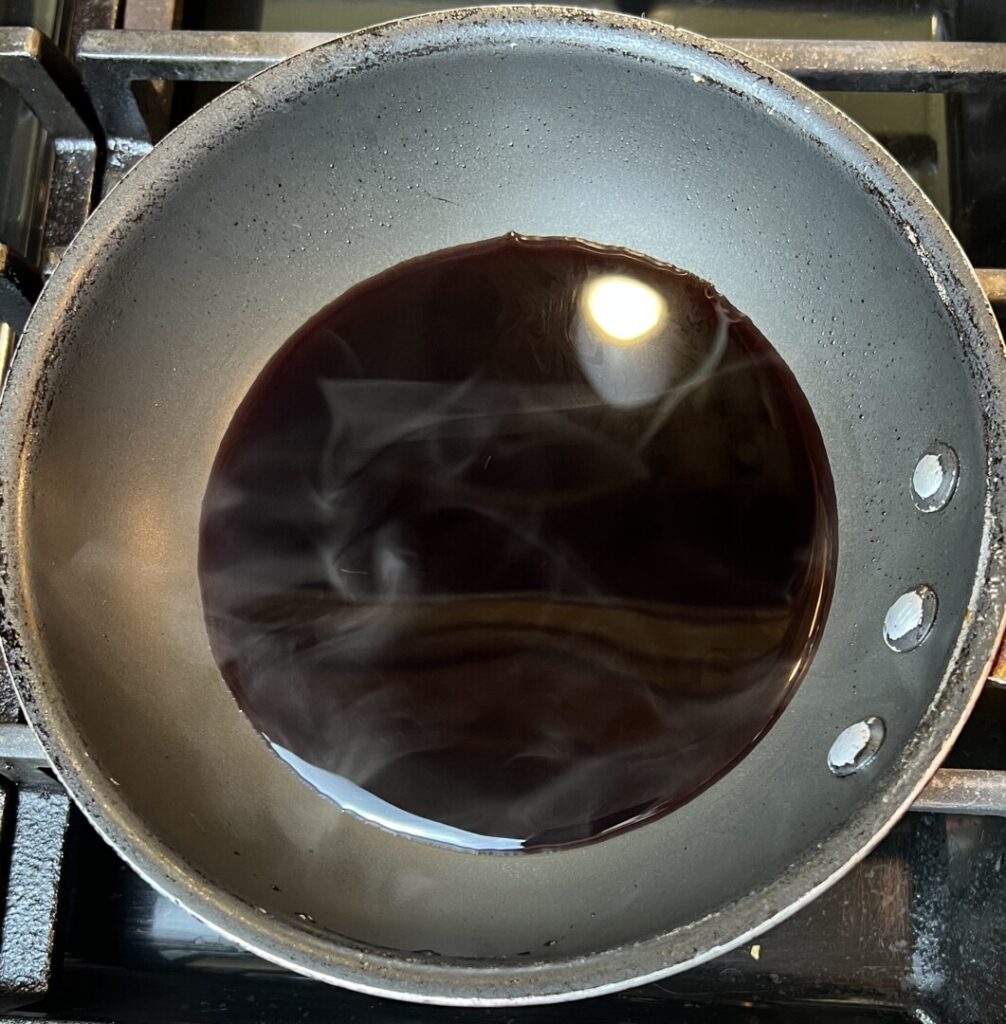
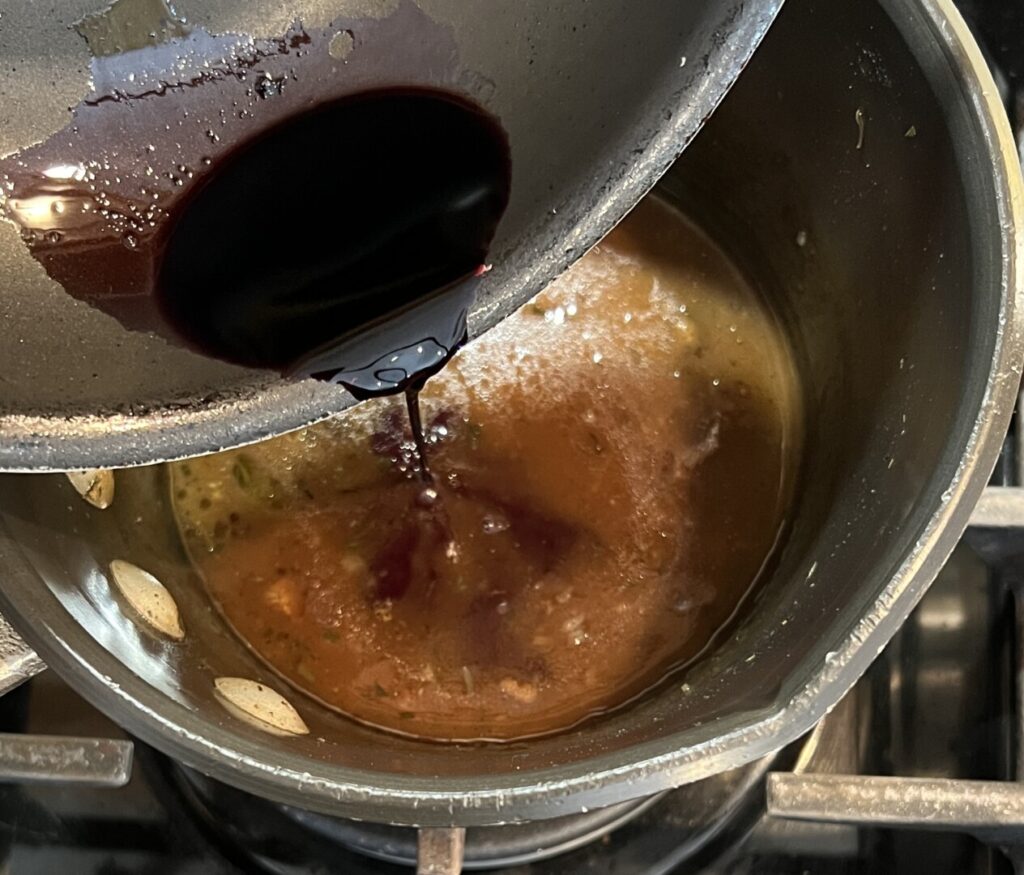
To make the sauce base, you’ll start by slowly reducing some red wine. This extra step is really worth the time! When you reduce red wine separately from the sauce, its flavor concentrates and mellows, losing some of its acidity and the raw alcohol taste, while its color deepens to an appealing brick red. Do this very slowly, over the lowest heat possible; the reducing wine should steam, but not simmer.
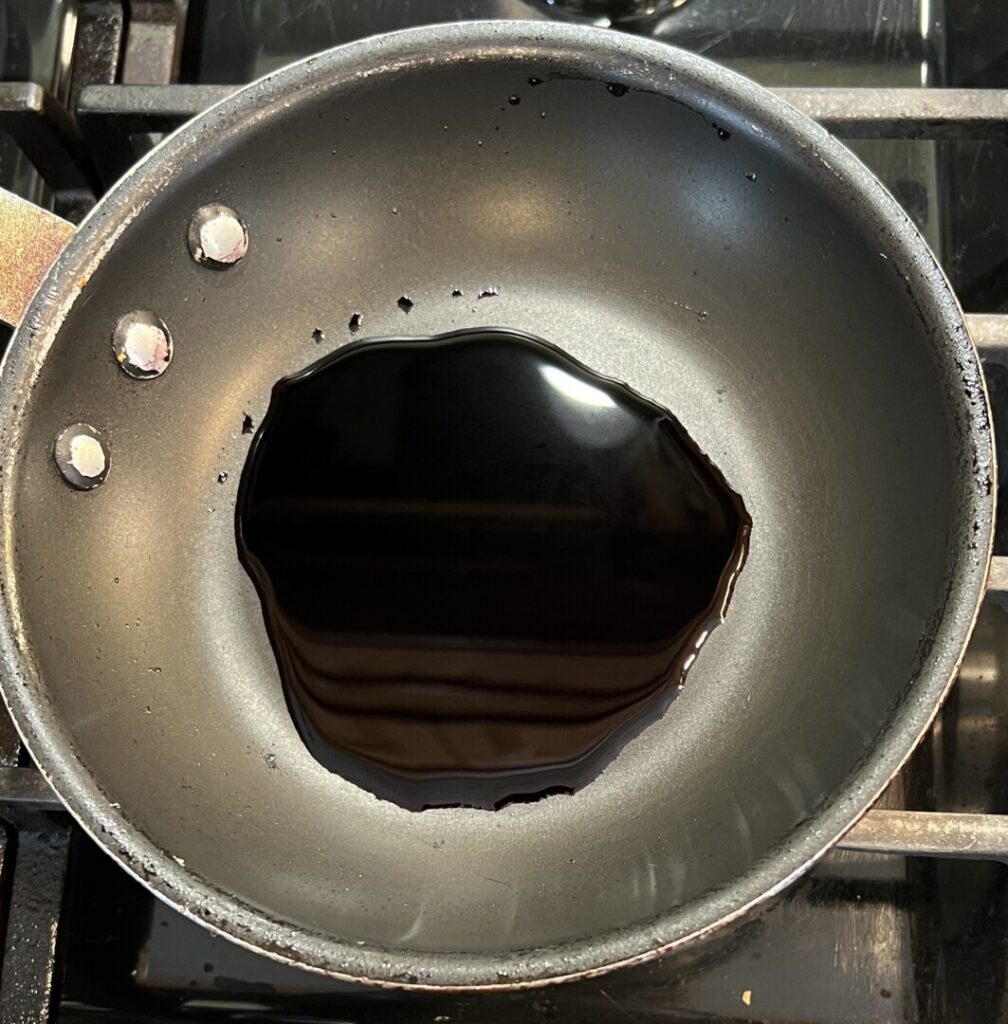
When done, the wine should be less than half of its original volume, and deeply fragrant.
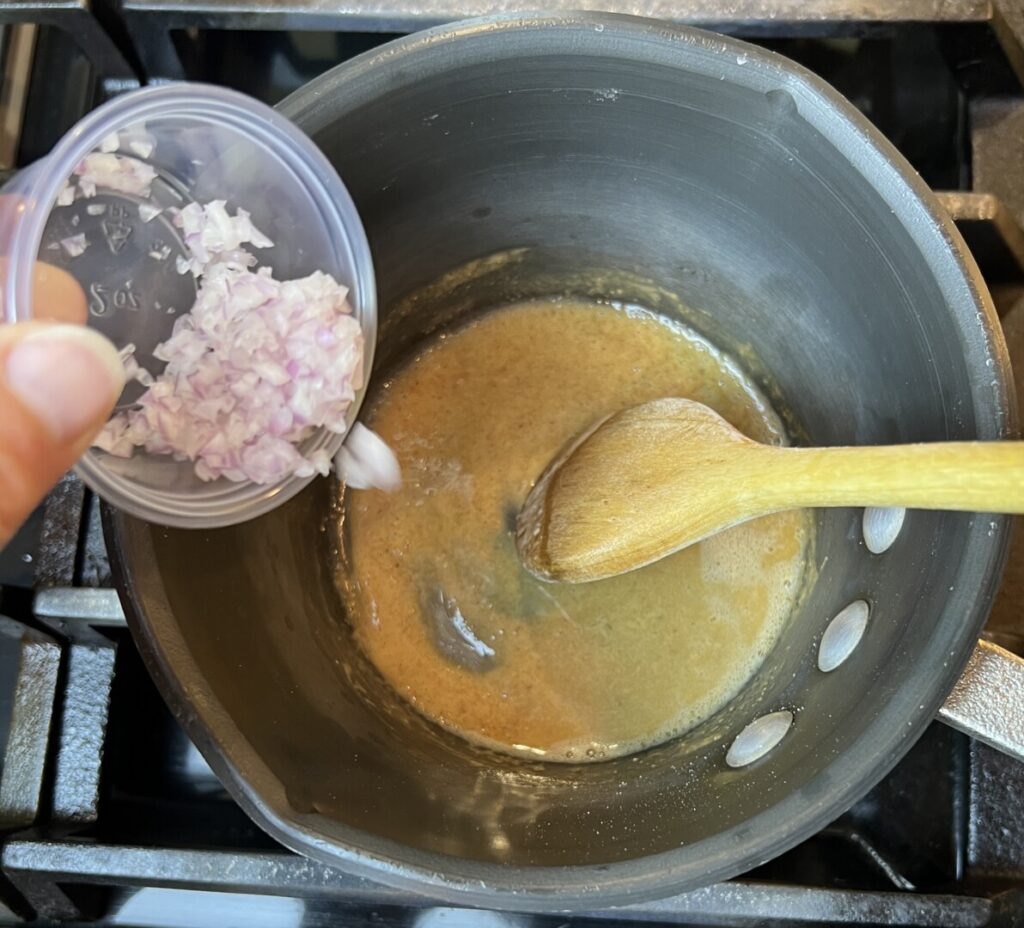
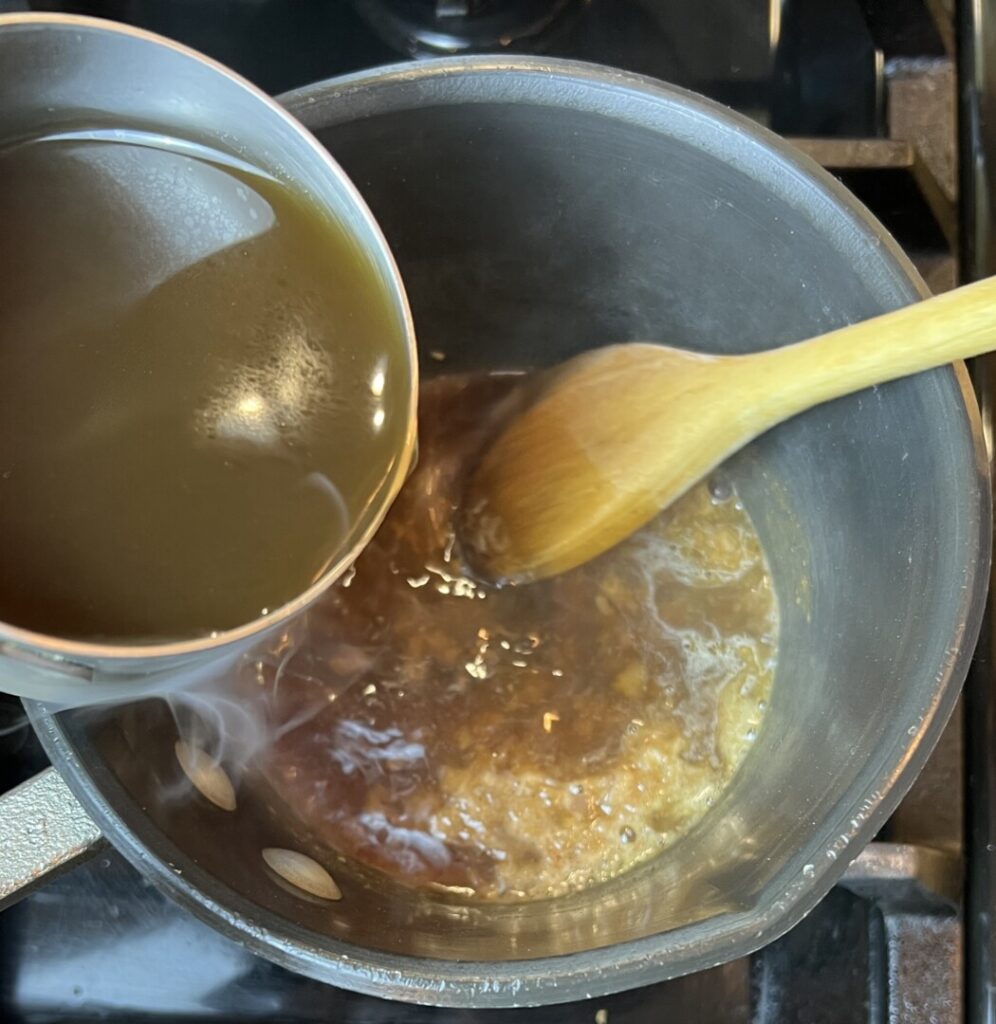
The sauce base starts with a brown roux: butter and flour cooked together until it achieves a rich, golden-brown color. Brown roux has less thickening power than white or blonde roux, but imparts a deep, Maillard-reaction savory flavor and a rich brown color to your sauce. Cooking minced shallots in the roux adds a hint of sweetness, then beef bone broth is added in a thin stream to prevent lumping. After 20 minutes simmering, add the reduced wine and the sauce base is complete.

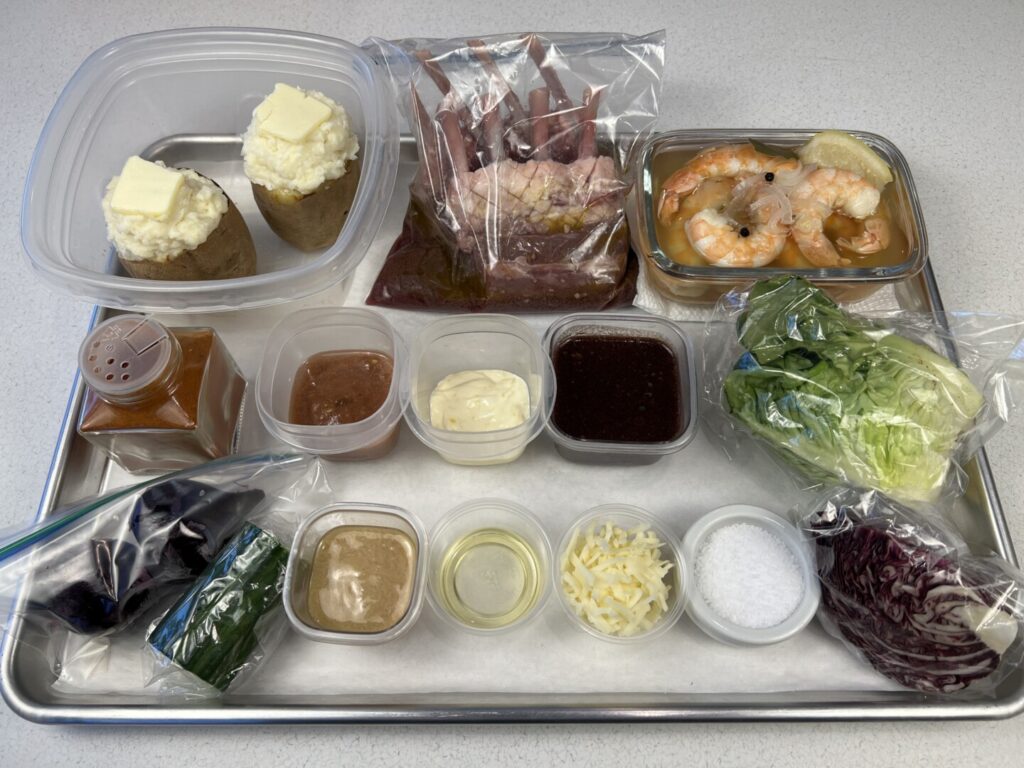
After a few more prep tasks, your mise-en-place is complete. If you’re serving the Chilled Shrimp appetizer, combine the mise for it and the Roast Rack of Lamb on the same tray.
It’s Valentine’s Day—time to COOK!
Your shrimp appetizer is already complete and needs only to be plated. The only finishing needed for the chocolate mousse is whipping up some Chantilly cream, and then piping it into the glasses. (Keep the cookies separate until serving time.) You’ll find instructions for these tasks in the COOK! section of each recipe. Plate both of these courses ahead of time and hold the plates in the ‘fridge until ready to serve.
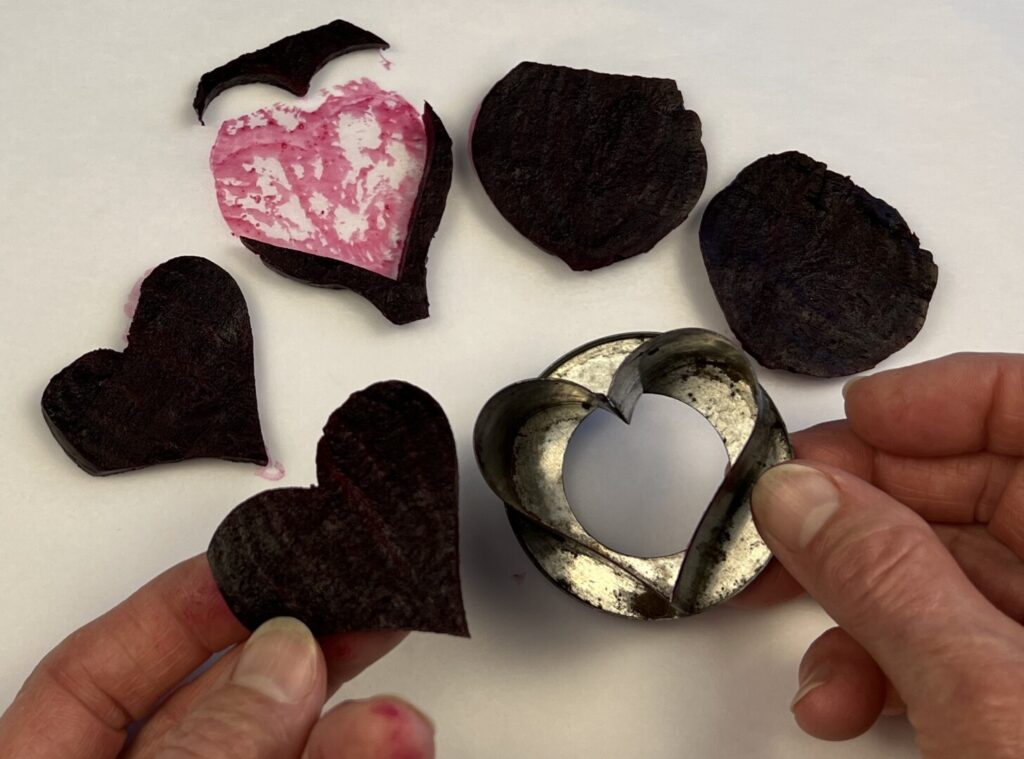
While the oven is preheating, fabricate the “heartbeets.” Slice them lengthwise, a little thicker than 1/8 inch. Use a heart-shaped cutter—or get creative and cut them freehand with a knife.
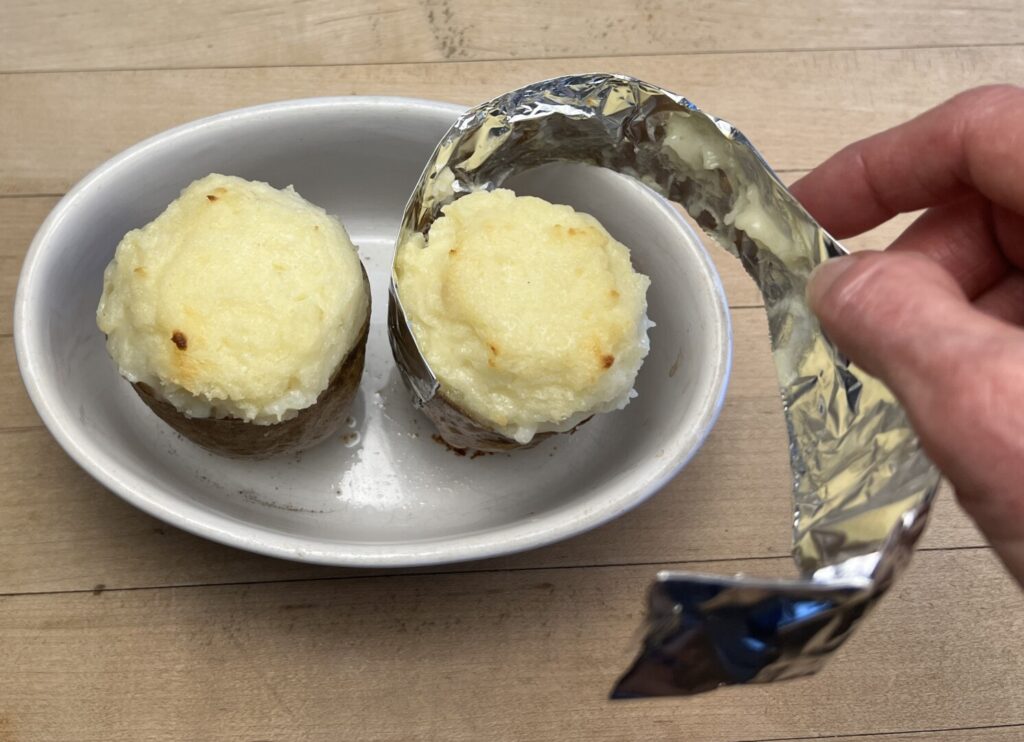
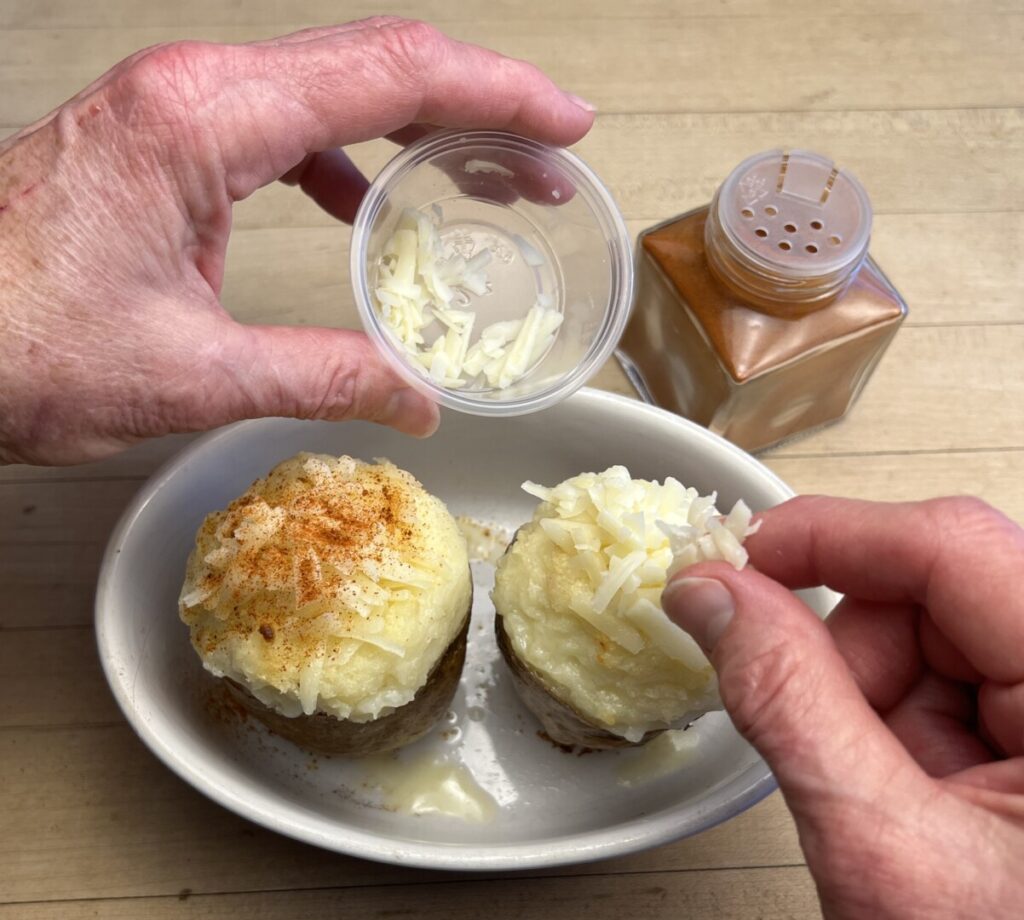
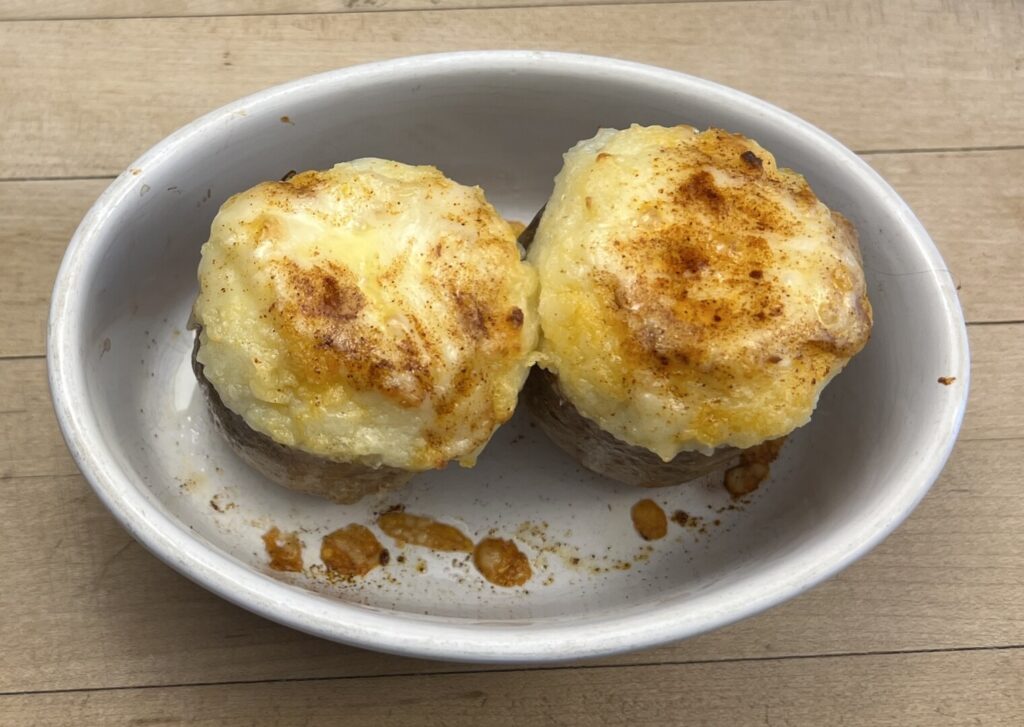
Next, you’ll start re-baking the potatoes. After 30 minutes in the oven, carefully peel off the foil “collars.” Top the potatoes with more cheese and paprika, and finish baking golden brown.
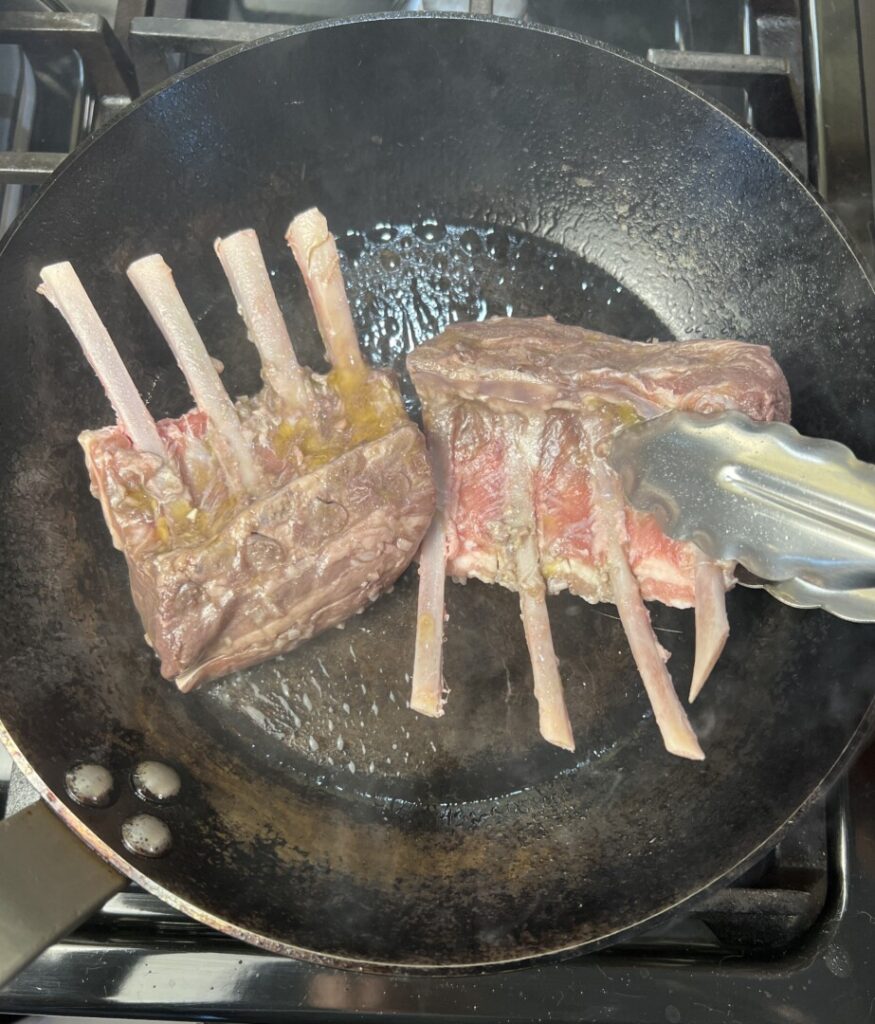
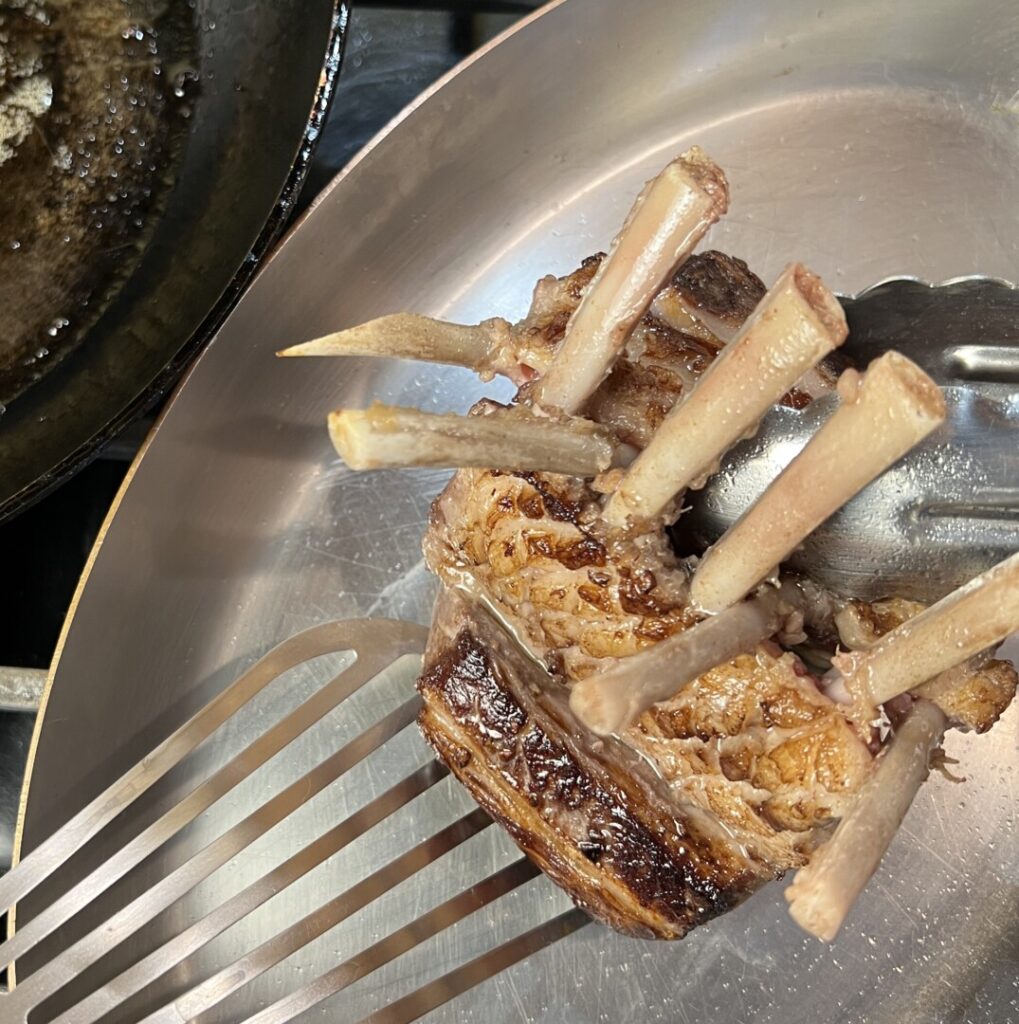
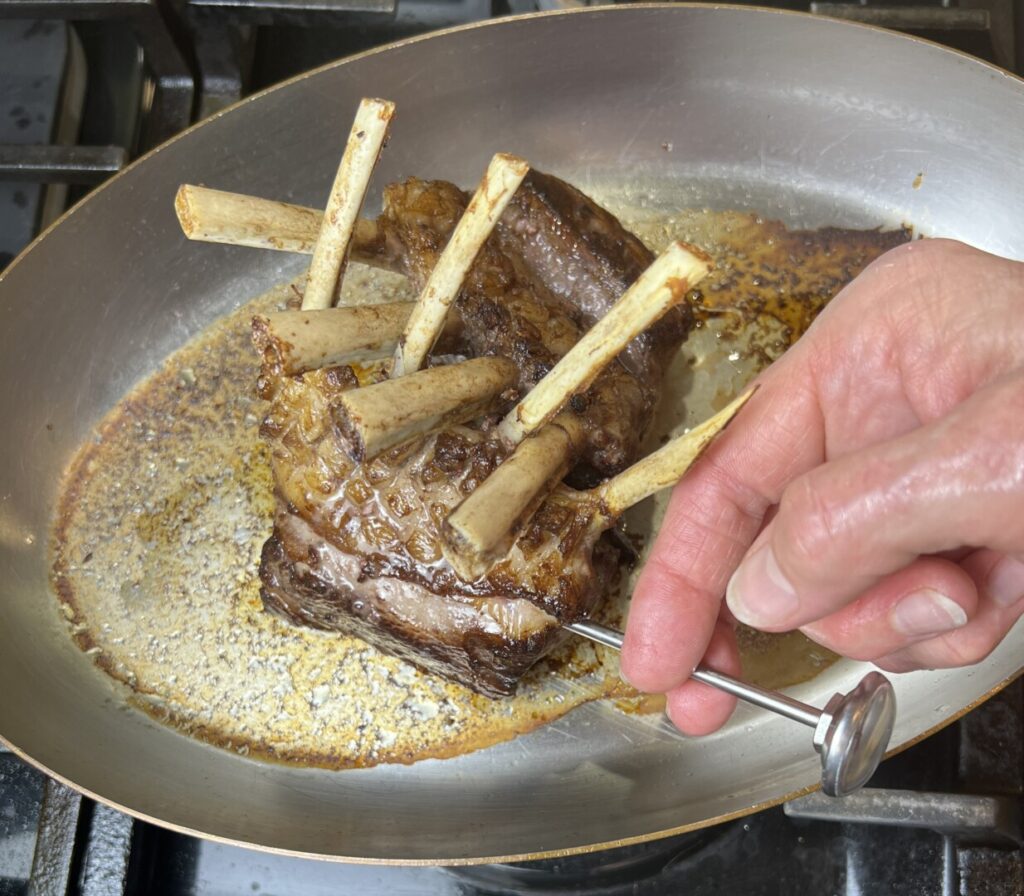
Once the potatoes are in the oven, pan-sear the racks. Heat a pan, blot them dry, and sauté them meaty-side-down until golden brown. Press down on the bones to ensure a good sear on the crosshatched fat. Then turn them up on end, rib bones intertwined, to brown the bottom of the eye meat. Transfer to a roasting pan, baste with marinade, and finish roasting. Use a thermometer to judge doneness: 125°F for rare or 130°F for medium rare. Transfer the racks to a cutting board set in a sheet tray, and rest them for a few minutes in a warm place to allow the interior juices to redistribute throughout the meat.

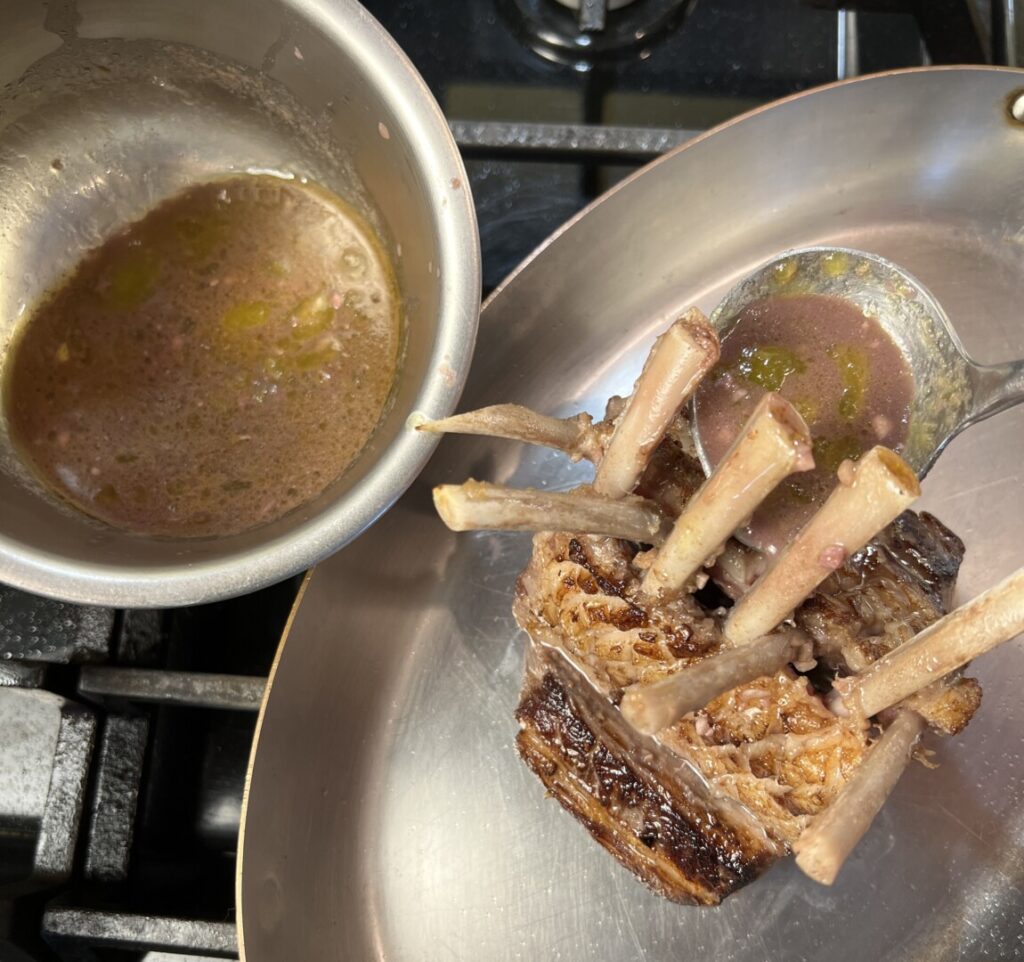
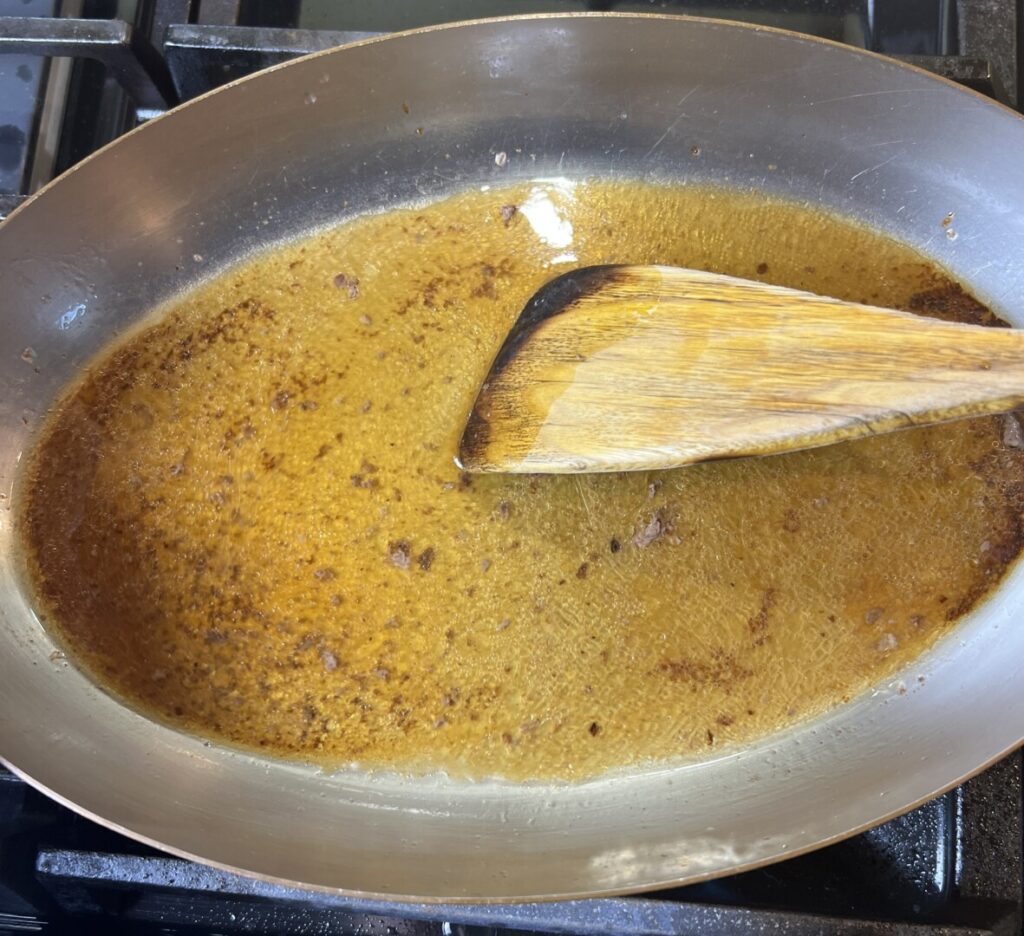
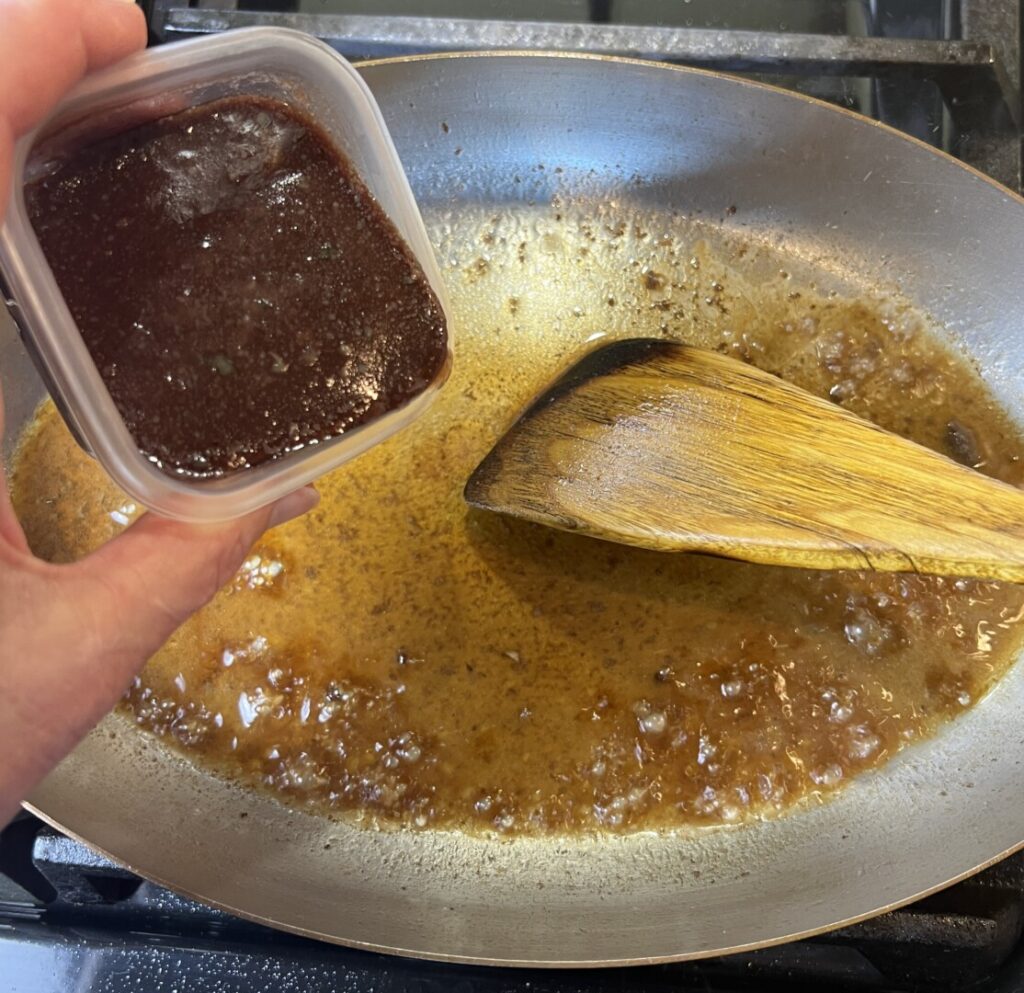
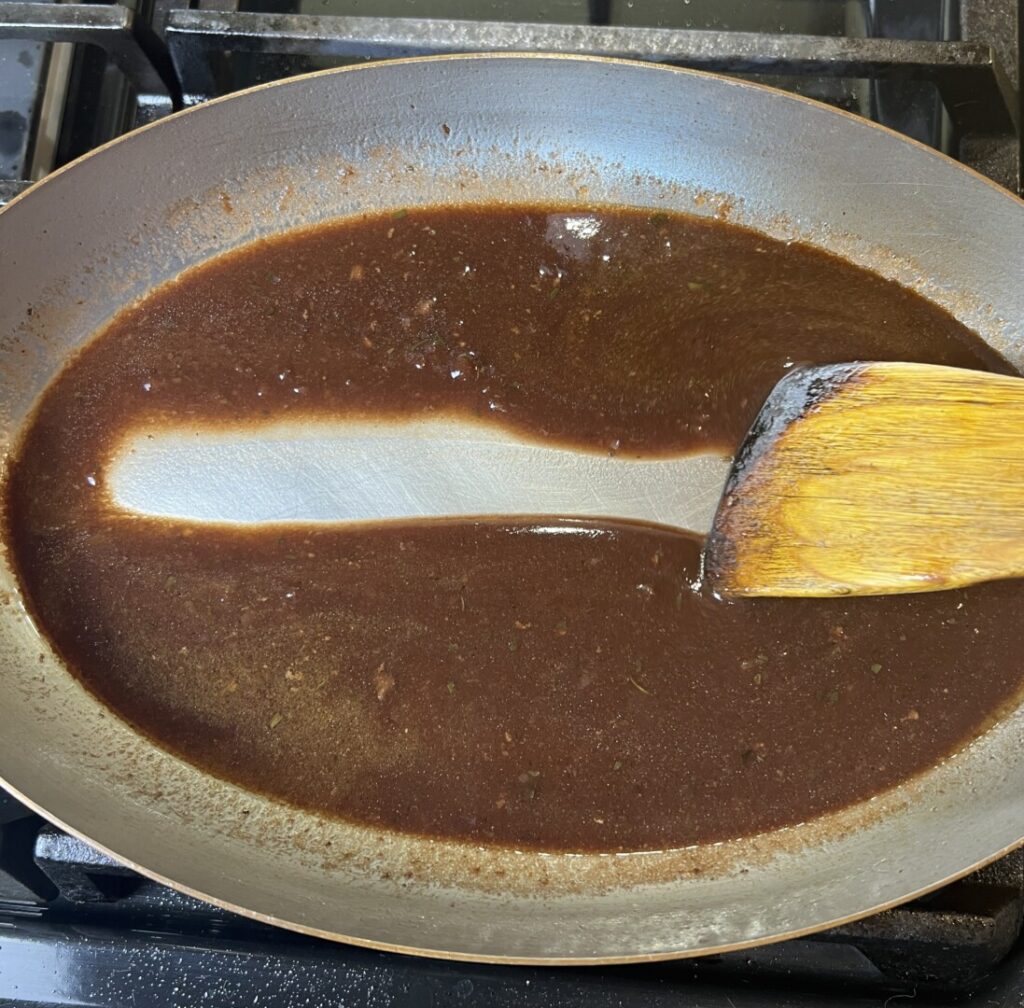
Meanwhile, place the roasting pan over a burner and deglaze it with a little water. Add the sauce base and the optional veal demi-glace, if using. Bring the sauce to the simmer and adjust the consistency with a little water, if necessary, to achieve a nappé consistency. Evaluate the seasoning and correct to your taste.
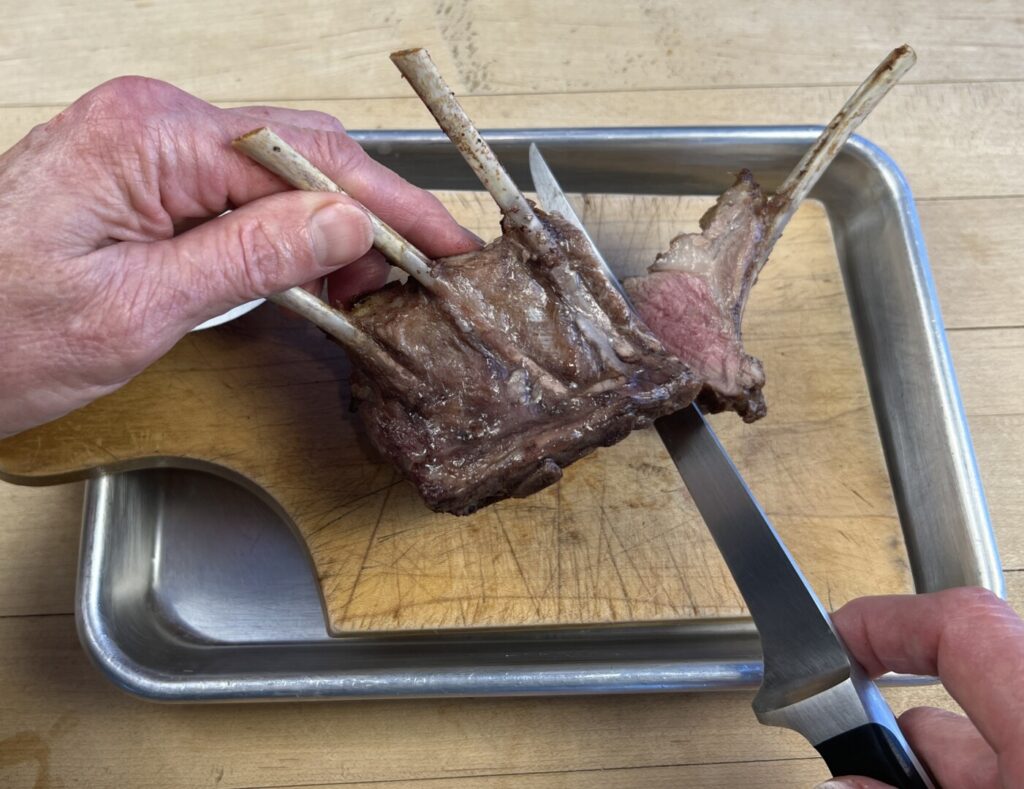
Carve the racks: Turn each rack with the meaty side away from you so that you can see how the bones extend into the eye meat. Slice between the bones, cutting chops of equal thickness. You’ll likely need to slant the knife to cut between the ribs where they joined the backbone. Scrape any juices into the sauce.
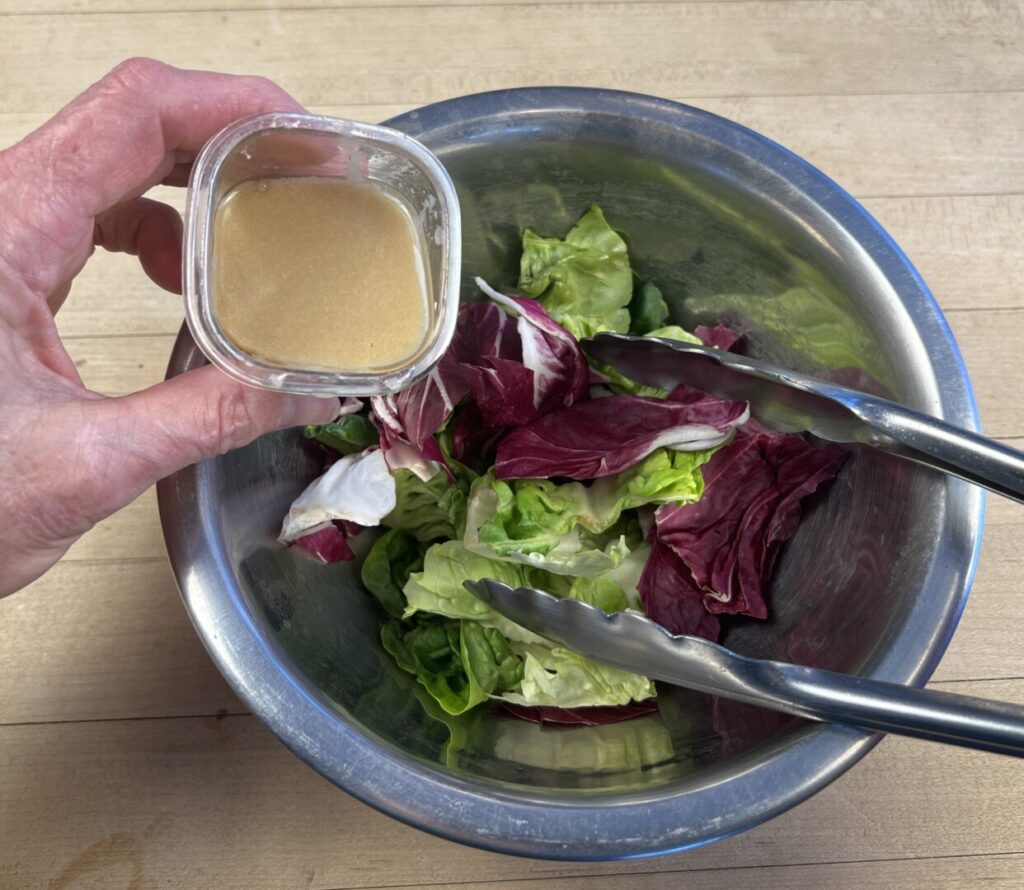
Toss the salad with the sherry vinaigrette, using just enough to lightly coat the leaves.
Now you’re ready to plate!
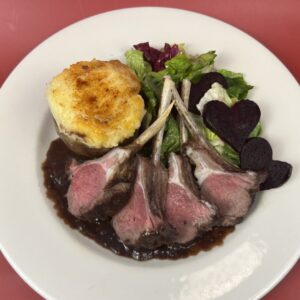
Roast Rack of Lamb with Red Wine-Shallot Jus, Twice-Baked Potato, and “Heartbeet” Salad
Ingredients
PREP: Mise the recipe ahead of time.
step 1 ingredients
- 2 medium-sized russet potatoes
- 2 medium-sized beets
step 3 ingredients
- 1/3 c half-and-half or heavy cream
- 1 Tbsp butter
- to taste kosher salt
- to taste fine-ground white pepper (optional)
- 1/3 c grated extra-sharp white cheddar cheese
- 2 Tbsp grated Parmigiano-Reggiano cheese
- 2 tsp butter, in thin slices
step 4 ingredients
- 1/4 small shallot
- 1/2 c red wine
- 1 Tbsp butter
- 2 tsp flour
- 1 c beef bone broth or beef stock
- 1/8 tsp dried tarragon
- pinch dried thyme
- to taste kosher salt
step 5 ingredients
- 1 garlic clove
- 1/4 tsp kosher salt
- 2 tsp Dijon mustard, preferably Maille original
- 1/2 c red wine
- 1/4 c extra-virgin olive oil
- 1 8-rib rack of lamb, French-cut (refer to lesson)
step 10 ingredients
- 1 tsp pure olive oil (not extra-virgin)
- 1/4 c water
step 11 ingredients
- 2 tsp veal demi-glace
step 13 ingredients
- 1/4 radicchio head
- 1 small head Little Gem or Boston lettuce heart
- 2 Tbsp Sherry Vinaigrette
Instructions
PREP: Mise the recipe ahead of time.
1. Bake the potatoes and roast the beets:
- Preheat an oven to 425°F.
- Scrub the potatoes and beets under cold water and blot dry.
- Use a paring knife to pierce several holes in each potato to release steam.
- Place the potatoes on the oven rack and bake for about 1 hour until they yield to a squeeze and a knife penetrates into the centers with no resistance. Keep the potatoes warm until ready to stuff them.
- Place the beets in a small baking dish, add about ¼ inch water, cover with foil, and bake about 45 minutes until a knife piercing the centers meets with just a little resistance.
- Uncover, cool to room temperature, pour off the liquid, and then scrape off the skins.
2. Make the twice-baked potatoes:
- Cool the potatoes just enough to handle them.
- Heat the half-and-half or cream until steaming hot.
- Cut off one end of each potato, leaving ⅔ of the potato to use as the shell. Reserve the potato ends for another use, or eat them.
- Use a paring knife to define a rim around the cut end of each potato. Scoop the warm potato flesh out of the potatoes and into a bowl, leaving thin layer of potato attached to the skin.
- Use an electric hand mixer to break up the warm potato flesh, and then add the hot half-and-half and butter along with some salt and pepper. Whip the potatoes just until smooth; take care not to over-work lest they acquire a gluey texture.
- Fold in the Parmigiano and 2/3 of the cheddar cheese, reserving the rest of the cheddar to later top the potatoes. Place the topping cheddar in a container.
- Evaluate the seasoning and correct the salt if necessary.
- Shave off the bottom end of the potato shells so that they’ll stand upright.
- Spoon the potato filling into the shells, pressing and tapping them gently on the work surface to firm and compact the filling. Smooth the tops, and then press a slice of the remaining butter on top of each.
- If prepping ahead, place the potatoes in a container.
3. Start the sauce:
- Mince the shallot very fine.
- Place the step 3 wine in a small sauté pan over lowest possible heat. Allow the wine to steam without simmering for about 15 minutes until reduced by half its original volume. Watch carefully so that it doesn’t evaporate away and scorch the pan.
- Place the step 3 butter in a small saucepan over medium heat and melt it. Add the flour and cook, stirring, about 1 minute to make a light brown roux.
- Stir in the shallots and cook a few seconds longer.
- Whisk in the stock in a thin stream to avoid creating lumps. Add the tarragon and thyme, and a little salt.
- Simmer briskly, uncovered, stirring occasionally, about 15 minutes until the sauce lightly thickens.
- Stir in the reduced wine.
- If prepping ahead, cool the sauce to room temperature, place in a container, and refrigerate.
4. Fabricate, portion, and marinate the lamb:
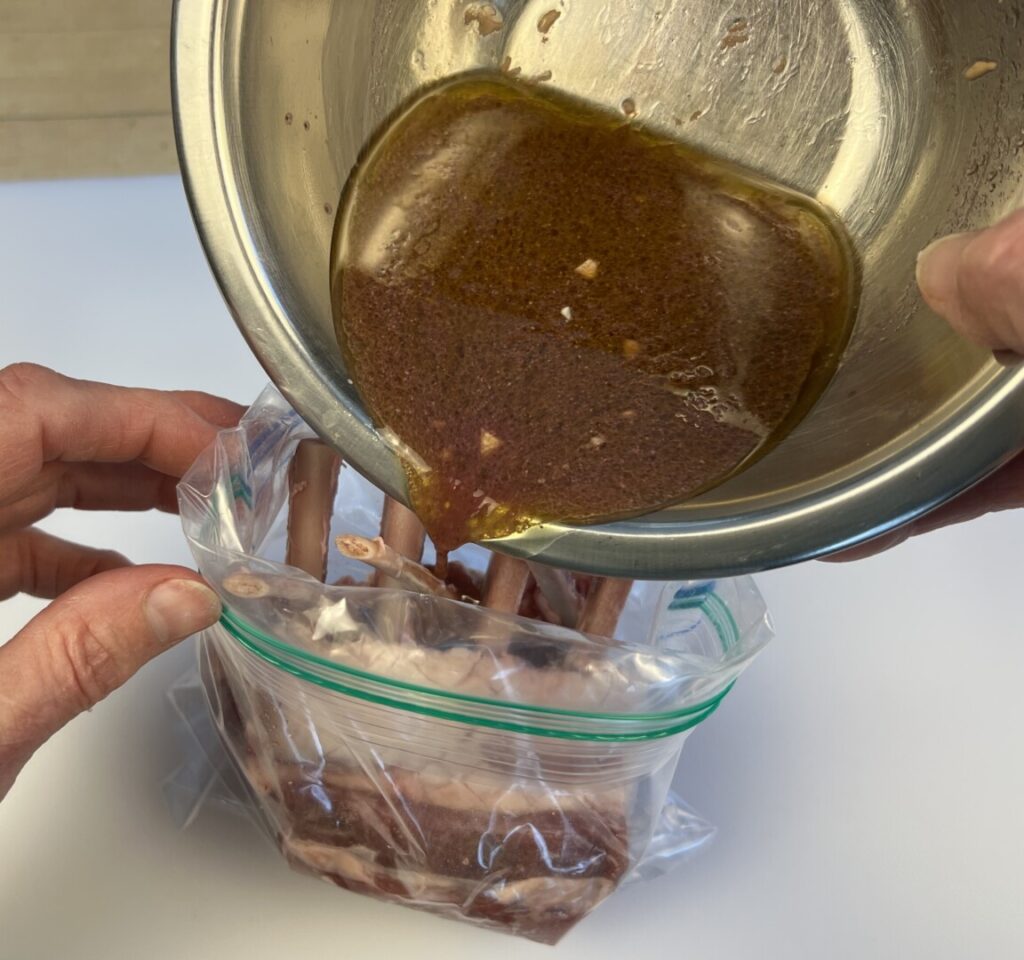
- Mix the marinade: Use a garlic press to press the garlic into a bowl. Add the salt, mustard, step 4 wine, and olive oil. Mix to combine.
- If necessary, scrape off any connective tissue still remaining on the rack’s “Frenched” bones.
- Place the rack on a cutting board with the meaty side up. You may see a layer of connective tissue on the surface of the rack’s “eye” meat. Slide the tip of a flexible paring knife under the connective tissue and remove it, slicing along the length of the meat and pressing upward with the knife.
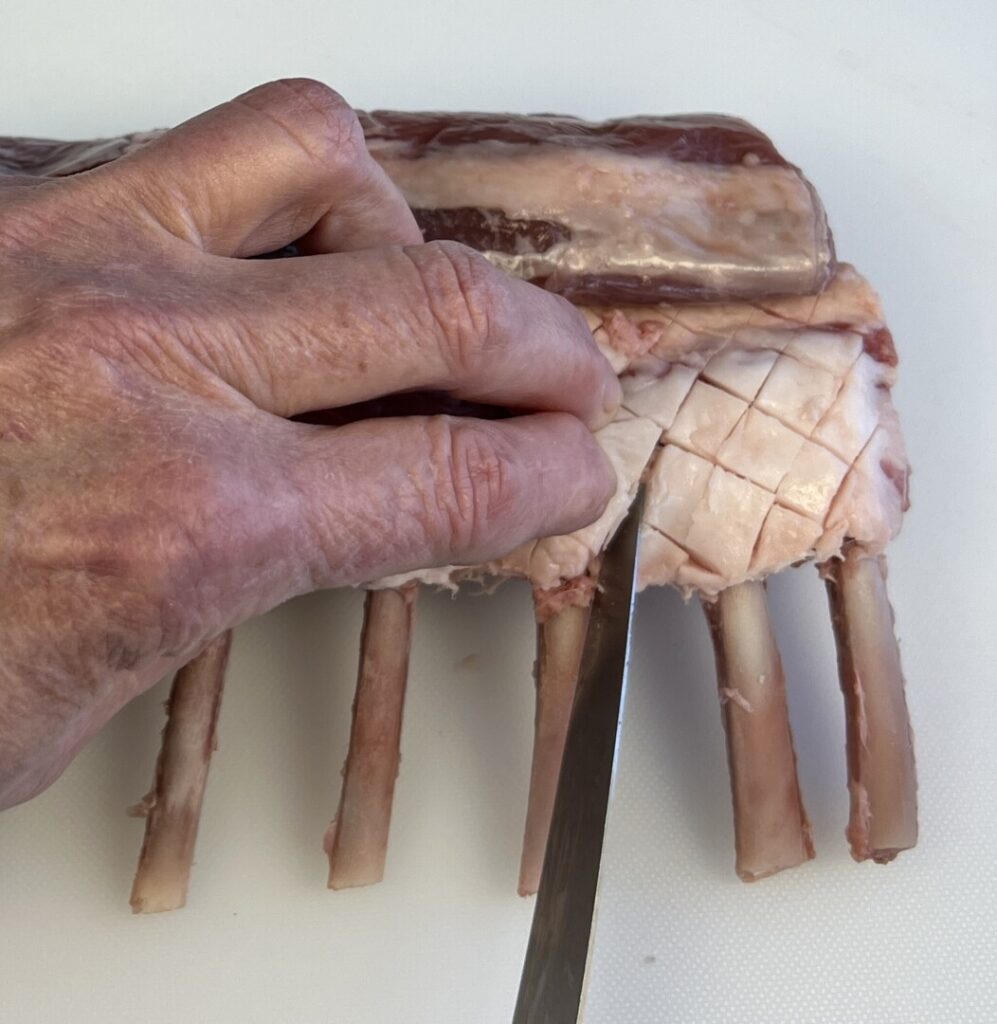
- Score the fat layer between the “eye” meat and the bones: Cut a tight cross-hatch pattern into the fat about ⅛-inch deep.
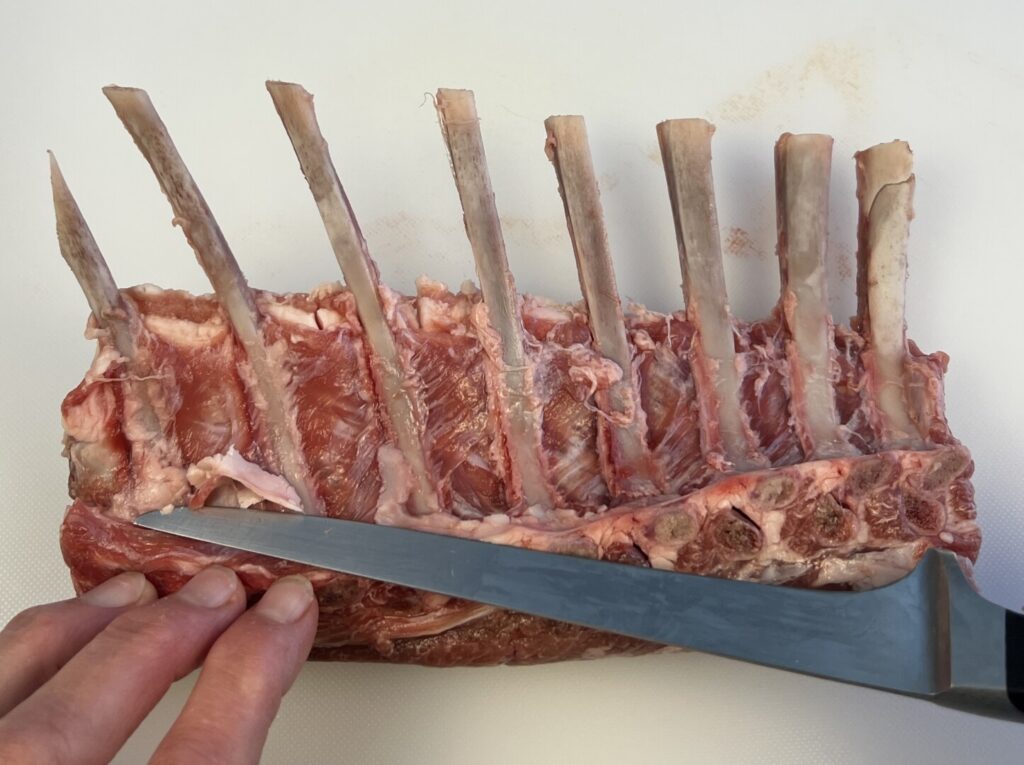
- Now place the rack on a cutting board with the meaty side down. Slide the tip of the boning knife under the connective tissue between the rib bones and remove it.
- Cut the rack into 2 equal-size, 4-rib portions.
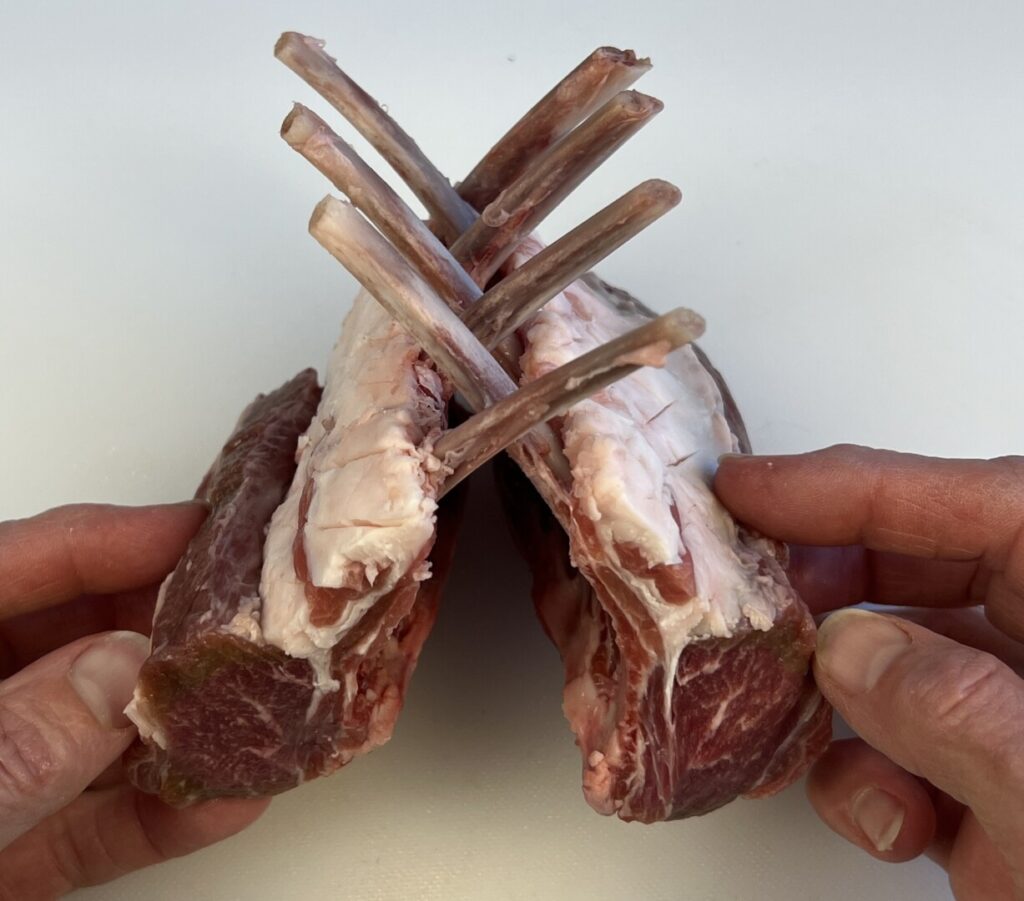
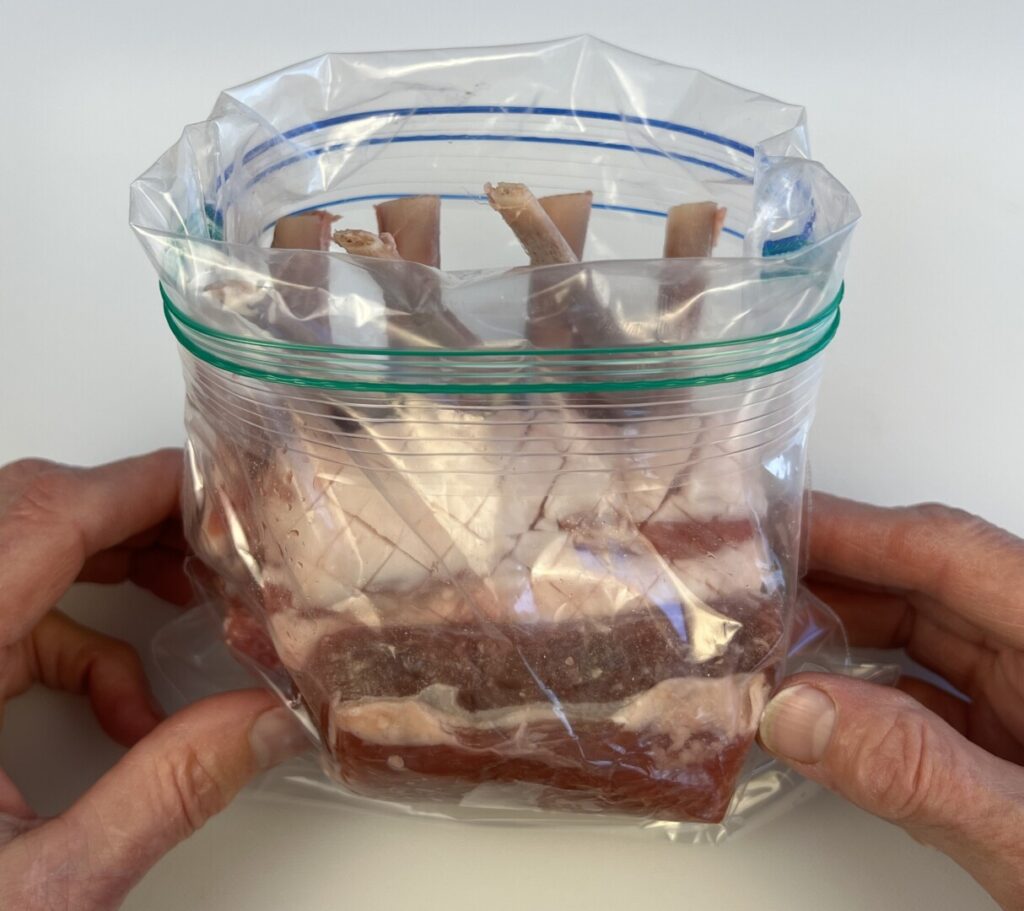
- Put the rack halves together, intertwining the rib bones, and place them, bones-up, in a small, heavy plastic bag. Pour in the marinade and seal shut.
- Refrigerate at least 24 hours. After 24 hours, remove the racks from the marinade and blot dry. Reserve the marinade.
5. If necessary, make the Sherry Vinaigrette.
6. Assemble the remaining mise-en-place for the recipe. (If you’re serving the Valentine’s Day Chilled Shrimp appetizer, combine the mises-en-place on the same tray.)
HOLD: Refrigerate all ingredients up to 5 days.
COOK! Finish and plate your dinner.
7. Preheat an oven to 425°F.
8. Fabricate the “heartbeets:”
- Slice the beets lengthwise a little wider than ⅛-inch thick.
- Using a heart-shaped cutter, or freehand with a paring knife, cut out heart shapes.
9. Re-bake the potatoes:
- Place the potatoes in a baking dish.
- If the potatoes have been refrigerated, bake about 30 minutes until hot through. (Room temperature potatoes will require less baking time.)
- Press the reserved cheddar cheese on top, dust the tops with paprika, and return to the oven for about 10 minutes until the cheese melts and begins to brown.
10. Pan-roast the lamb racks:
- If necessary, remove the rack halves from the marinade and blot dry. Reserve the marinade in a bowl.
- Place a sauté pan over medium heat until hot. Add the pure olive oil, and then add the racks, meaty-side-down. Sauté about 1 minute until golden brown.
- Turn over the racks and arrange them upright in the pan, with rib bones intertwined as before. Sauté about 30 seconds longer.
- Transfer the racks from the sauté pan into a burner-proof roasting pan. Baste with some of the reserved marinade, and add ¼ c water to the pan to prevent scorching.
- Place the racks in the oven and roast about 5 minutes, and then baste again with the marinade.
- Roast about 10 minutes longer to an internal doneness of 125°F for rare or 130°F for medium rare.
- Remove the racks from the oven, place on a small sheet tray or work plate, and rest them in a warm place for about 5 minutes. Reserve the roasting pan.
11. Finish the sauce:
- Place the roasting pan over medium heat, and scrape to deglaze the pan. Add a bit more water of needed.
- Pour the sauce and optional demi-glace into the roasting pan and reheat it.
- Evaluate the consistency: if too thick, add more water; if too thin, reduce over high heat.
- Evaluate the flavor and correct the salt if necessary.
12. Dress the salad:
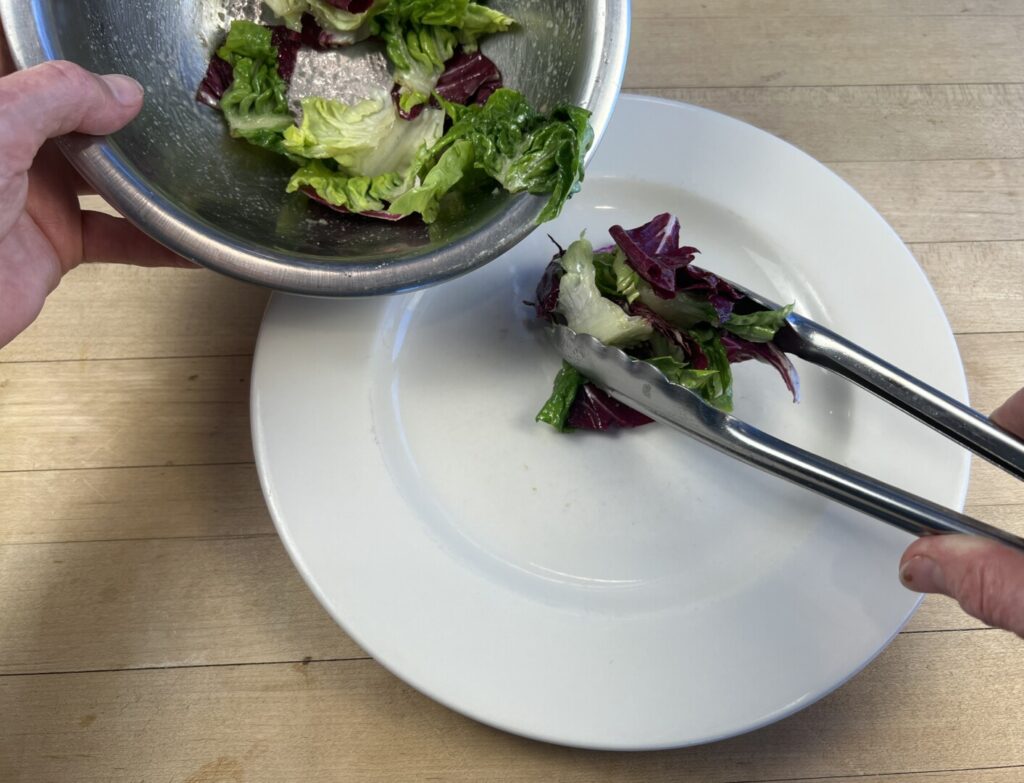
- Tear the radicchio and lettuce into a bowl and drizzle some of the vinaigrette on top.
- Toss to combine, using just enough vinaigrette to lightly coat each leaf.
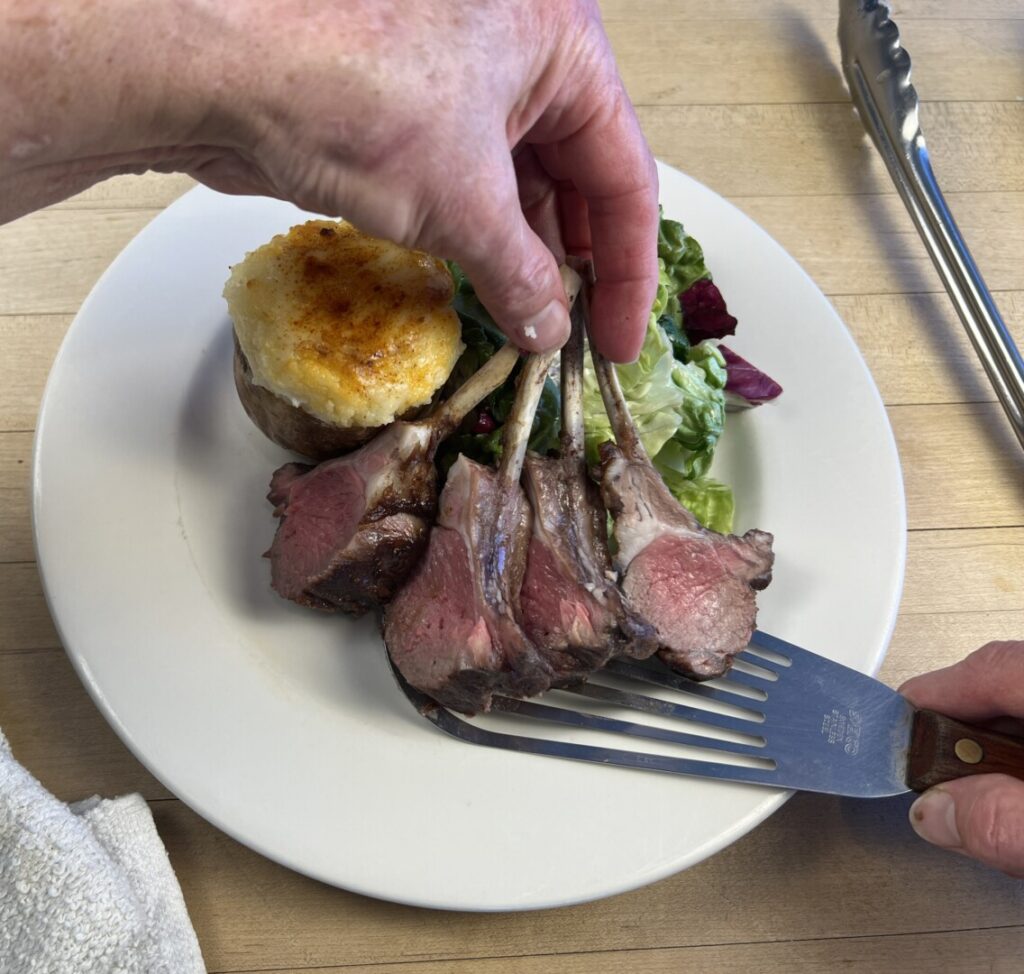
13. Carve the racks:
- Place a cutting board inside a sheet tray to catch juices.
- Position each rack so that the bone side is facing you. Cut between the bones to make 4 chops per person.
- Pour any resulting juices into the sauce.
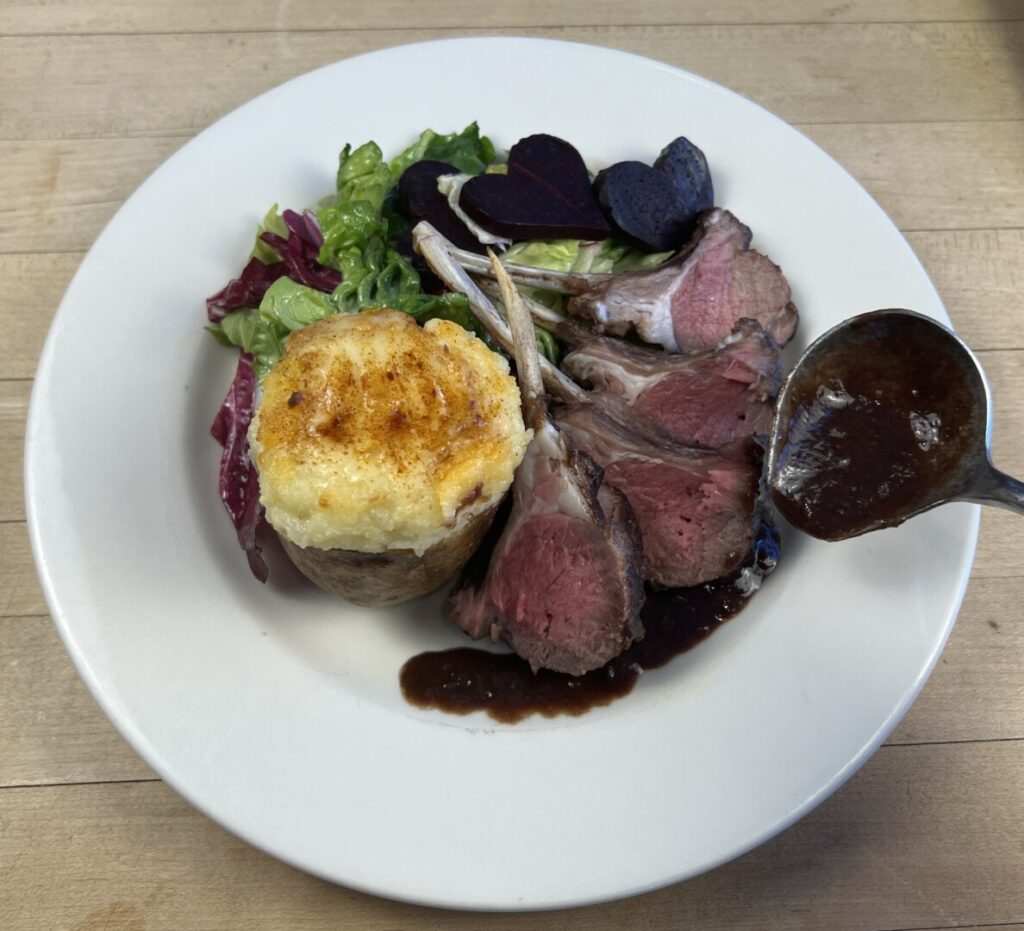
14. Plate:
- Mound a portion of salad on the back right of each slightly warmed plate.
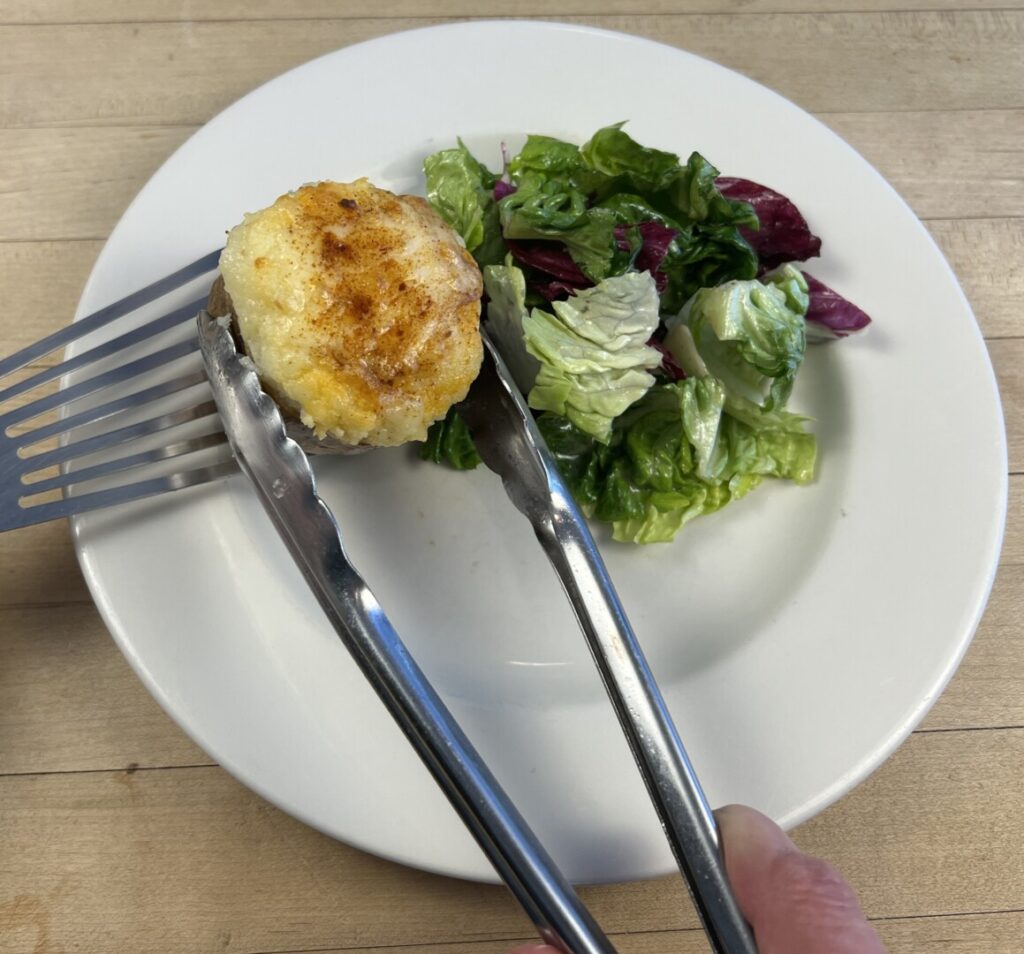
- Place a twice-baked potato on the back left of each plate.
- Arrange the chops in an arc configuration across the front of each plate, propped against the potato and salad.
- Spoon some sauce into the plate well in front of the chops.
- Arrange the “heartbeets” on the salad and drizzle them with a little vinaigrette.
Nutrition
Julia’s Chocolate Mousse with Chantilly Cream and Strawberries
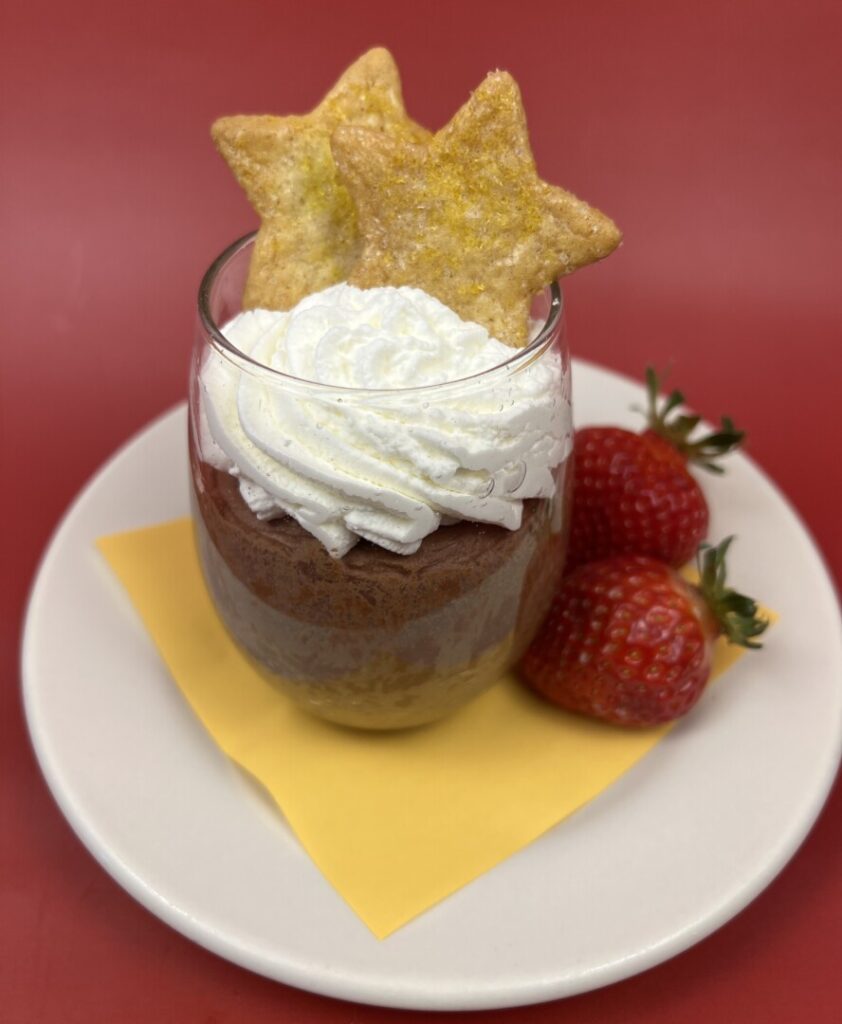
Rich, dense, and deeply-darkly chocolatey, this dessert is the most delicious chocolate mousse I’ve ever encountered. Teamed with fluffy whipped cream, fresh berries, and crunchy vanilla cookies, it makes a truly grand finale to your special dinner.
Our recipe is inspired by the one in Mastering the Art of French Cooking, a two-volume recipe treasury published in 1961 and 1970, respectively. This groundbreaking work by Julia Child, Simone Beck, and Louisette Bertholle, took more than ten years to write. Along with Ms. Child’s popular television show, The French Chef, these books transformed the way Americans cooked and dined, contributing to the culinary revolution that shaped the American food history in the last decades of the 20th century.
The French word mousse translates as “foam.” And it’s exactly that foamy mouthfeel that distinguishes a mousse from a pudding. The recipe begins with preparing a sabayon, a type of cooked custard made with egg yolks. The sabayon is then flavored with the best dark chocolate you can find: couverture-quality pure chocolate, with a cacao content of at least 85% and no fats other than cocoa butter. One thing that makes this chocolate mousse different from most others is that there’s no cream in it—just a rosette of whipped cream on top. Remember that the addition of a dairy product makes dark chocolate into milk chocolate; if you want a dark chocolate mousse, you need to leave out the cream. This recipe ingeniously replaces cream with softened butter, adding richness without compromising the chocolate flavor. Finally, the foam! When beaten, egg whites have the almost magical quality of holding air. As you whip them, tiny air bubbles form within the egg whites’ protein chains; the more you whip, the more bubbles you get. Once you fold the airy, fluffy whites into the chocolate base, the thick custard captures the air bubbles and holds them in suspension until you take a bite. The sensation of the air bubbles bursting on your palate is almost like the mouthfeel of sparkling wine.
(One caveat: the egg whites in this recipe are not cooked; see the recipe notes for an explanation and a workaround solution.)
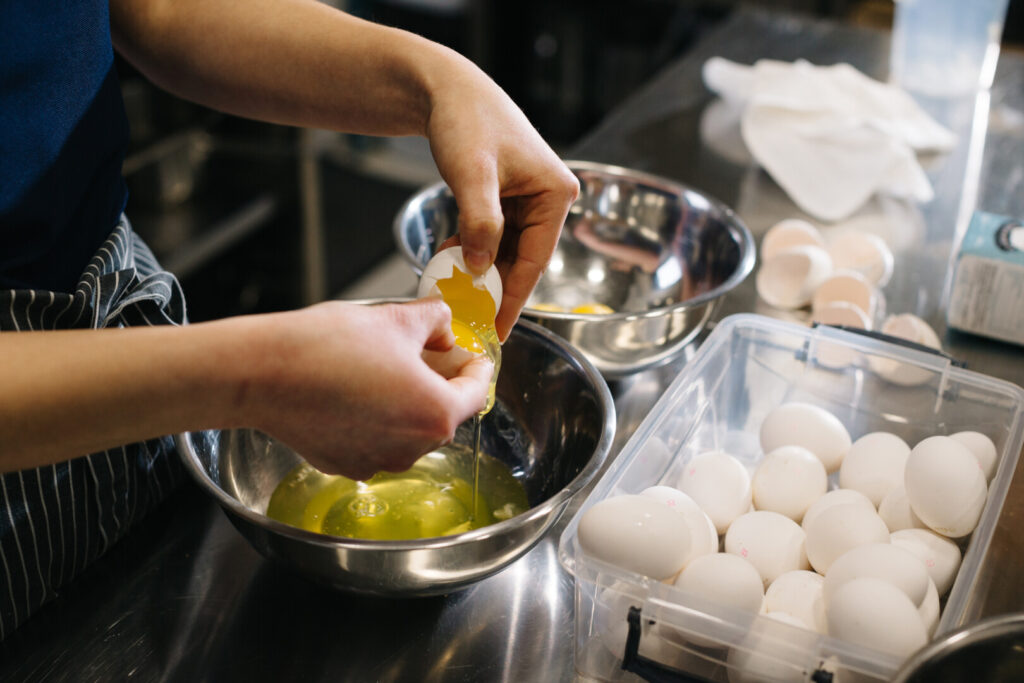
The first step in this recipe is separating eggs. Experienced bakers know the drill…. But if you’re new to dessert making, here are a few tips.
- Fresh eggs are easier to separate than older eggs, because yolks lose their structure as they age and tend to fall apart.
- Eggs need to be at room temperature for most baking, but separate better when cold. If you’re concerned, separate first and then bring to room temperature.
- Make sure your egg whites do not come in contact with any fats, including yolks. If the tiniest bit of fat gets into the whites, they won’t hold air.
Here’s your mise-en-place at the stove:
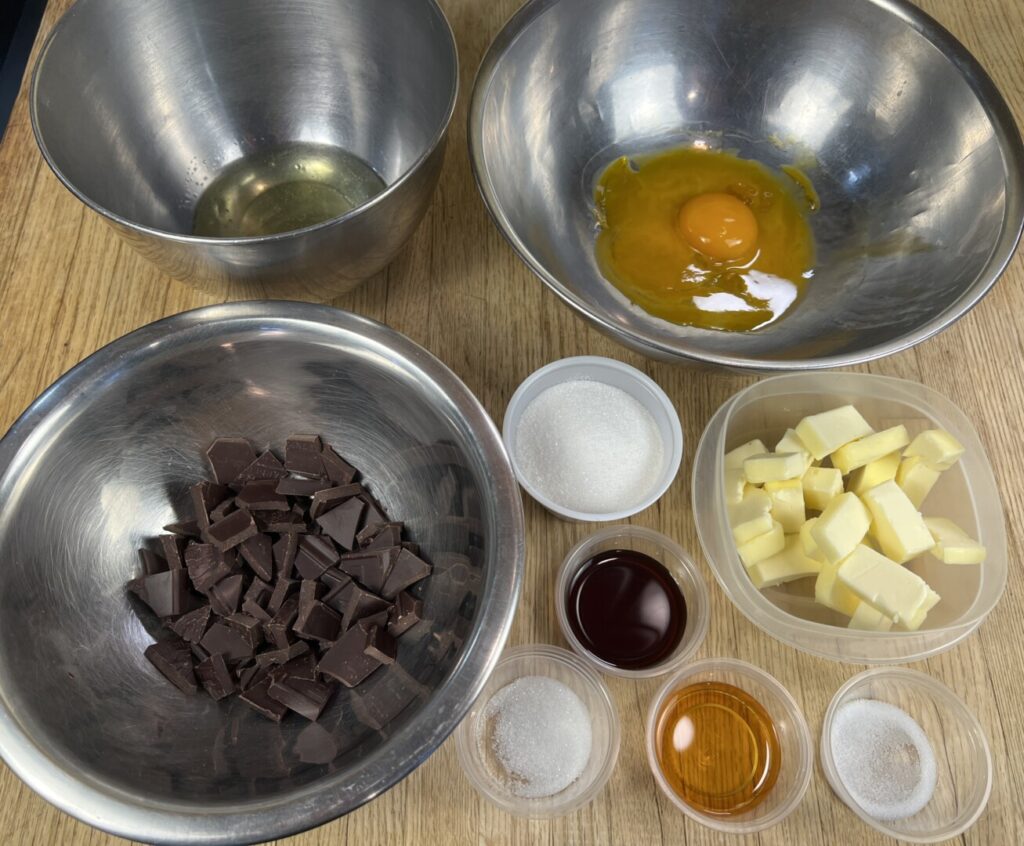
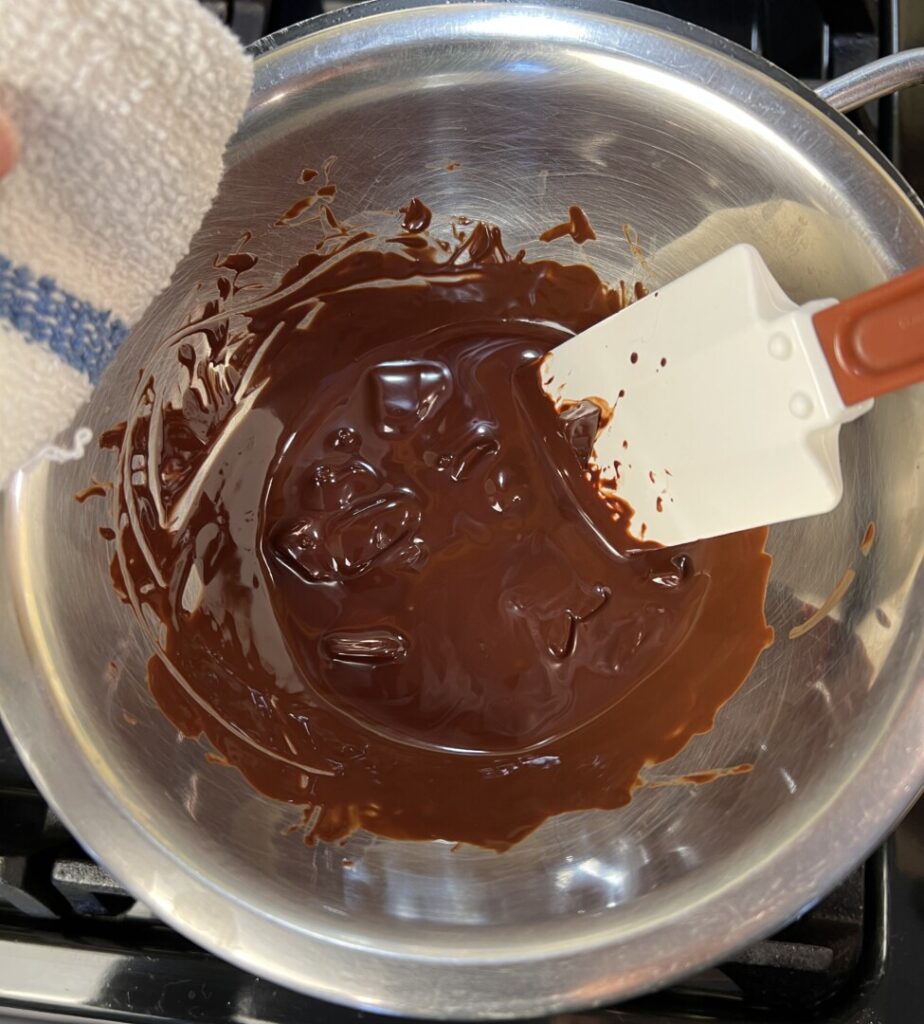
Take care when melting the chocolate. Fine-quality dark chocolate, called couverture, is temperamental. If handled the wrong way, it’ll “seize:” tighten up into a clump that no amount of stirring will loosen.
- Chop or break the chocolate into small even-size pieces before melting.
- Melt chocolate in a double boiler over barely-simmering water. Don’t cover it.
- Stir the chocolate with a plastic spatula.
- Make sure that not a speck of water gets into it—not from the bowl, the spatula, or the steam from the double boiler.
- Keep the chocolate warm until you need it.
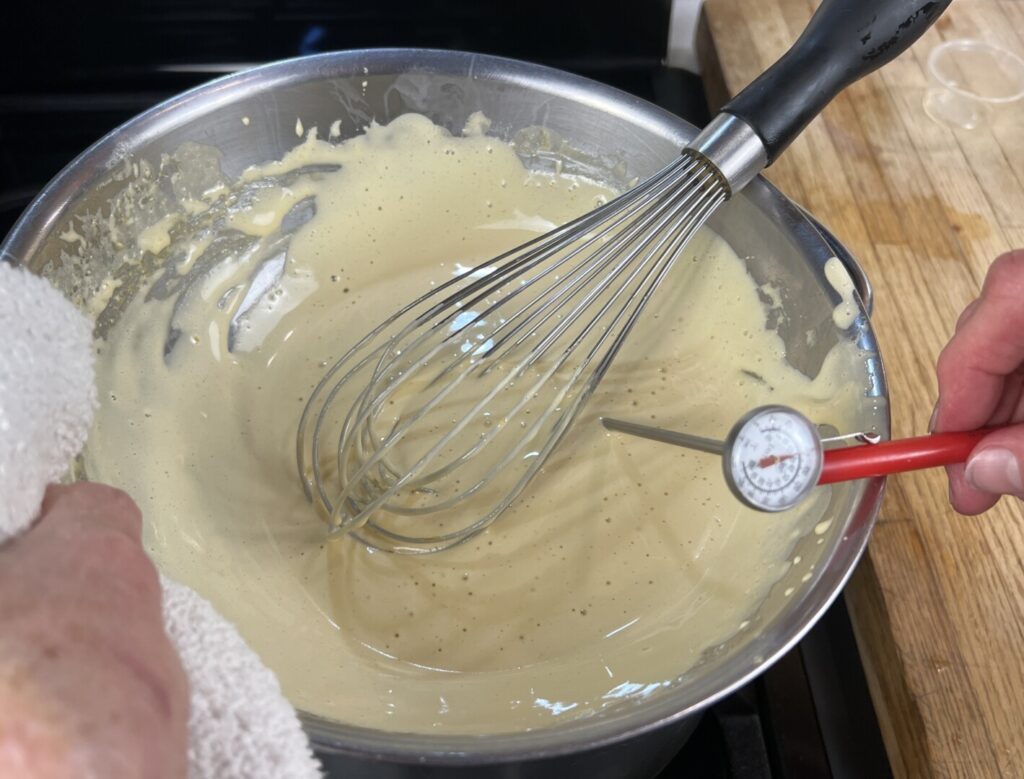
Start the sabayon by vigorously whipping the sugar into the egg yolks, making them light and fluffy. When fully aerated, they should “form a ribbon,” meaning that when poured back upon themselves, a thick band forms and temporarily holds. Then, place the bowl directly on a burner set to lowest heat. Whisk constantly, paying close attention to what’s happening; the mixture will gradually thicken and the aroma of raw egg will dissipate. Don’t overheat, or the sabayon will curdle. When sufficiently heated the sabayon will reach 135°F—if you insert your finger, it will be just too hot for comfort. Finally, cool the sabayon in an ice bath, just to warm room temperature. Don’t let it get cold.
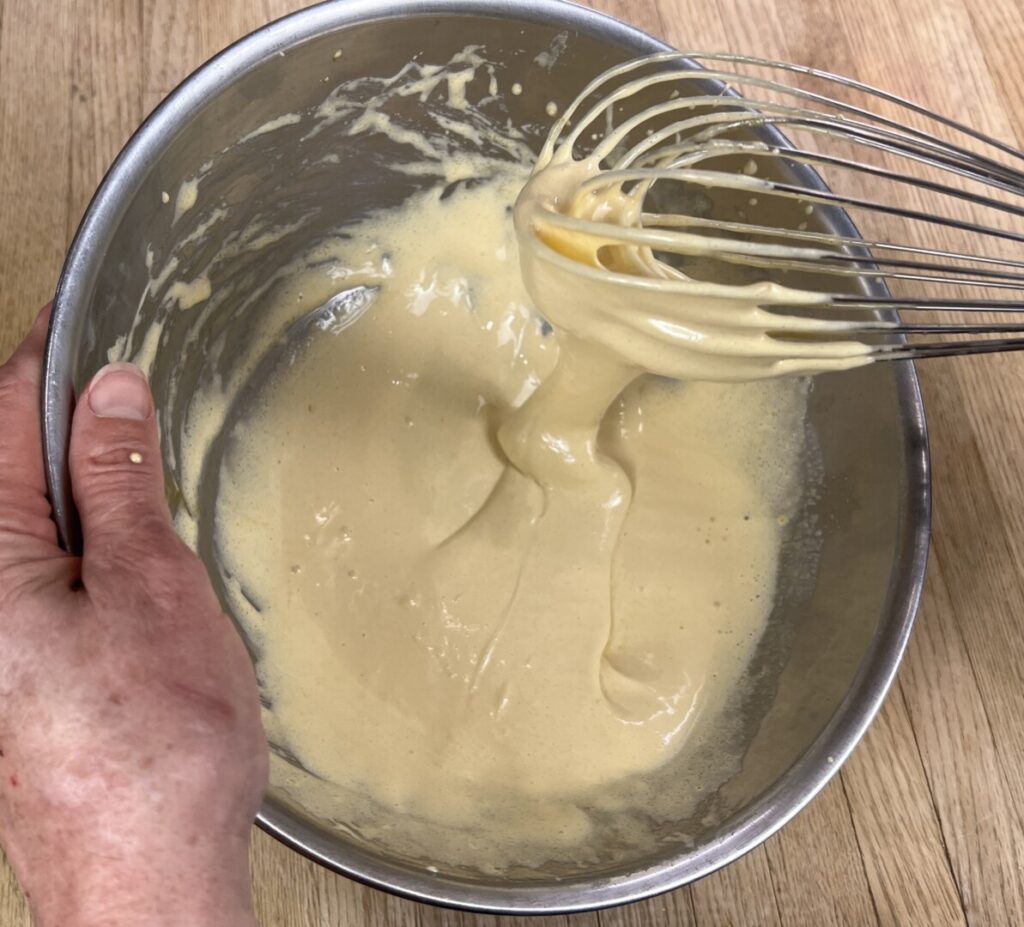
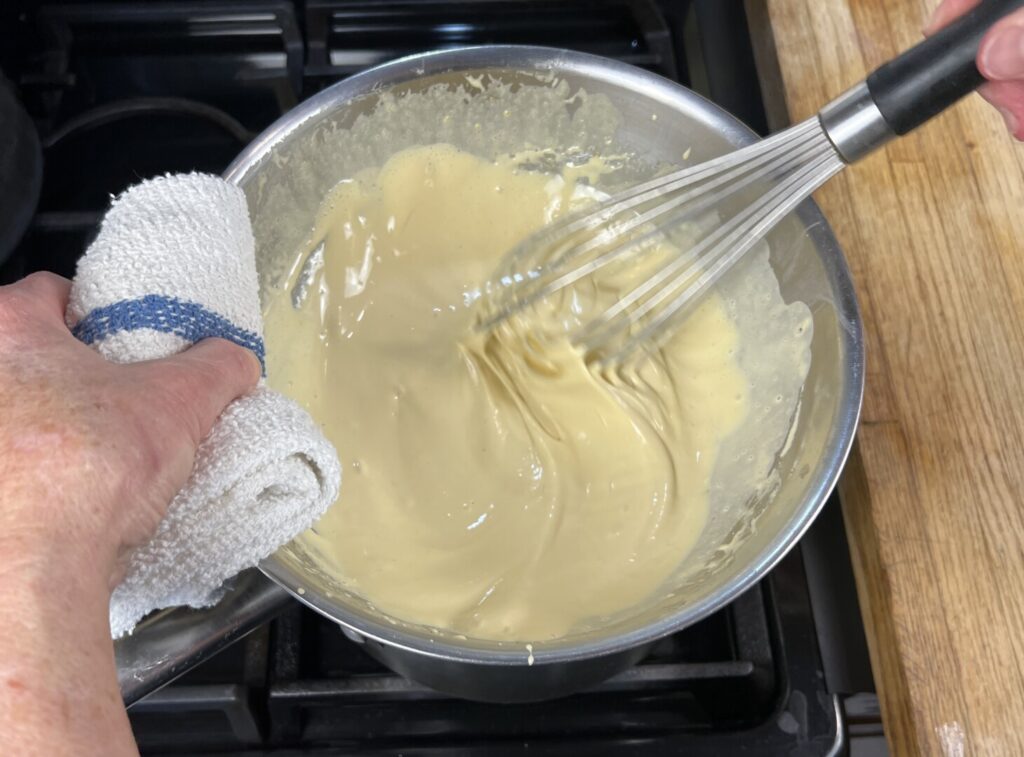
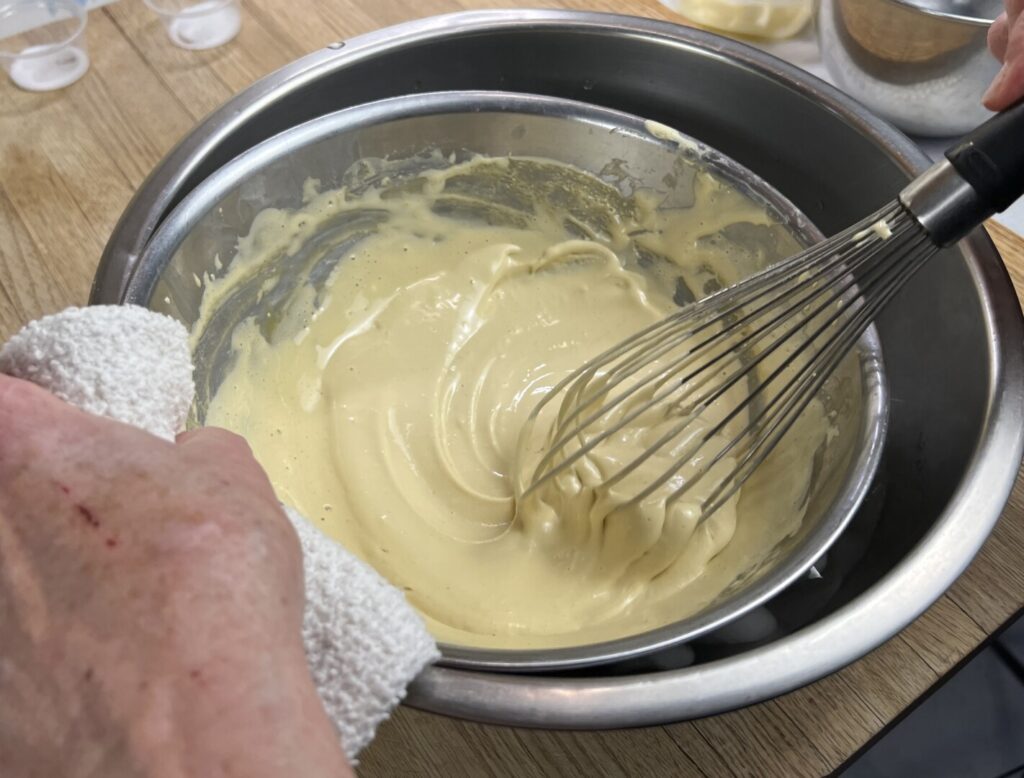
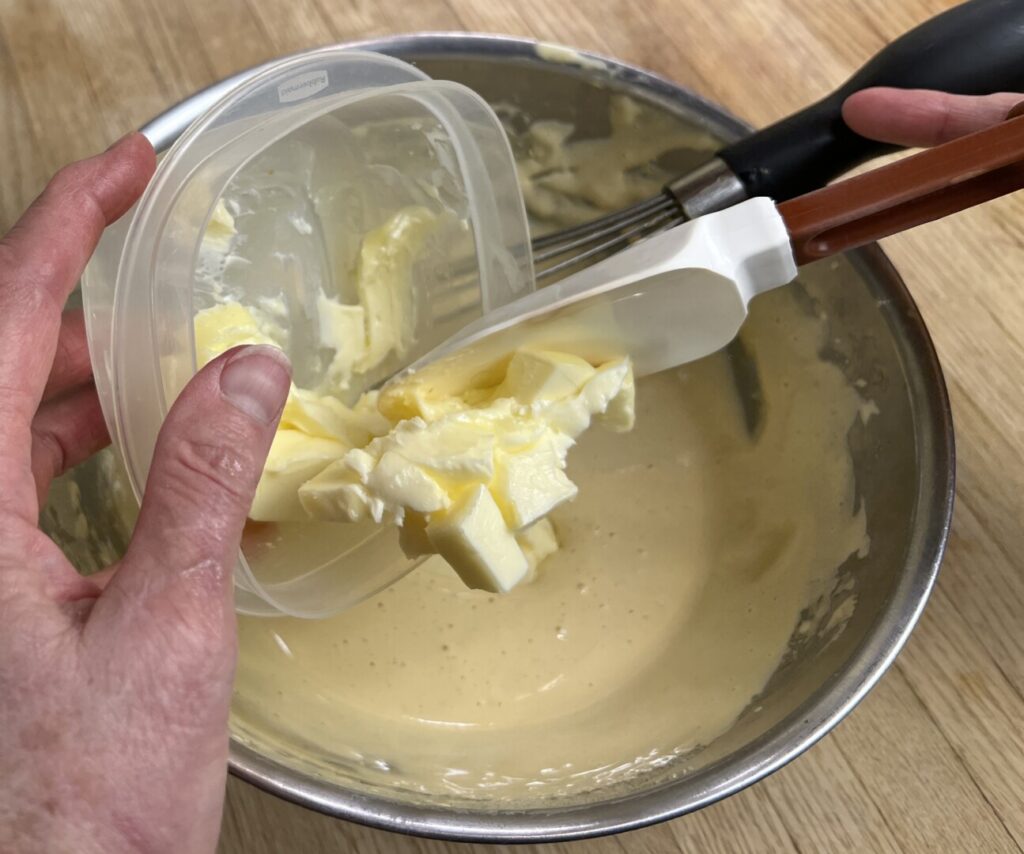
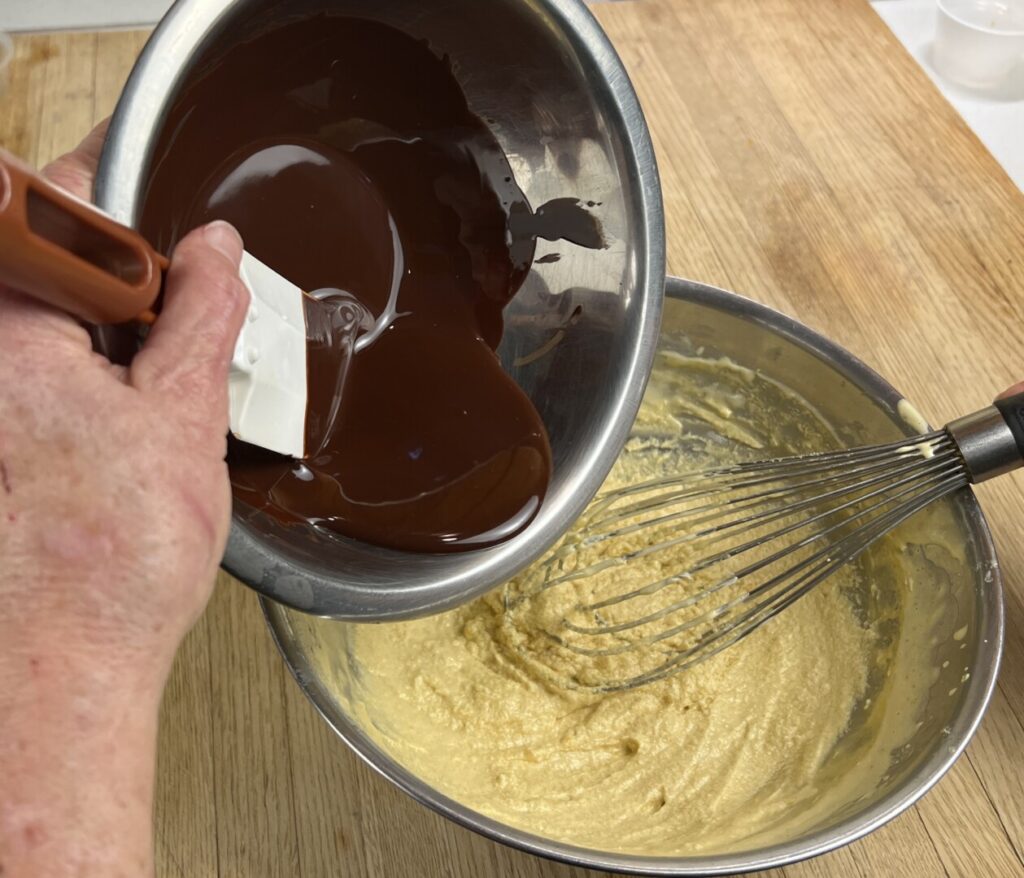
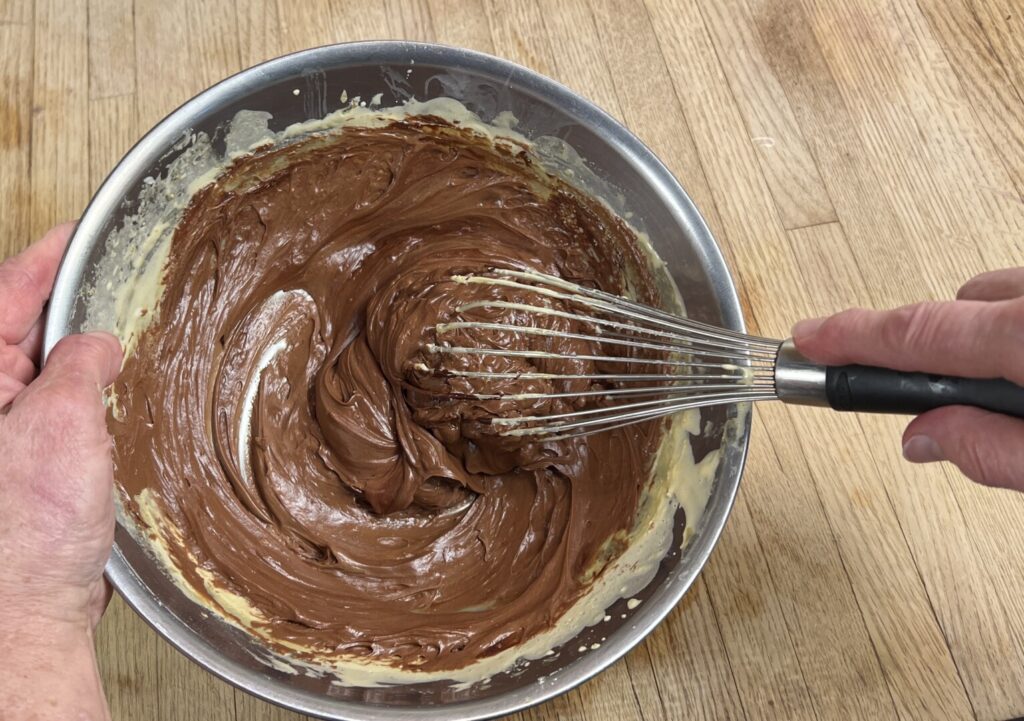
To complete the mousse base, fold in the butter, which must be very soft. If necessary, heat it for a few seconds in a microwave oven, but don’t let it melt. Then, stir in the warm chocolate until the color is homogenous.
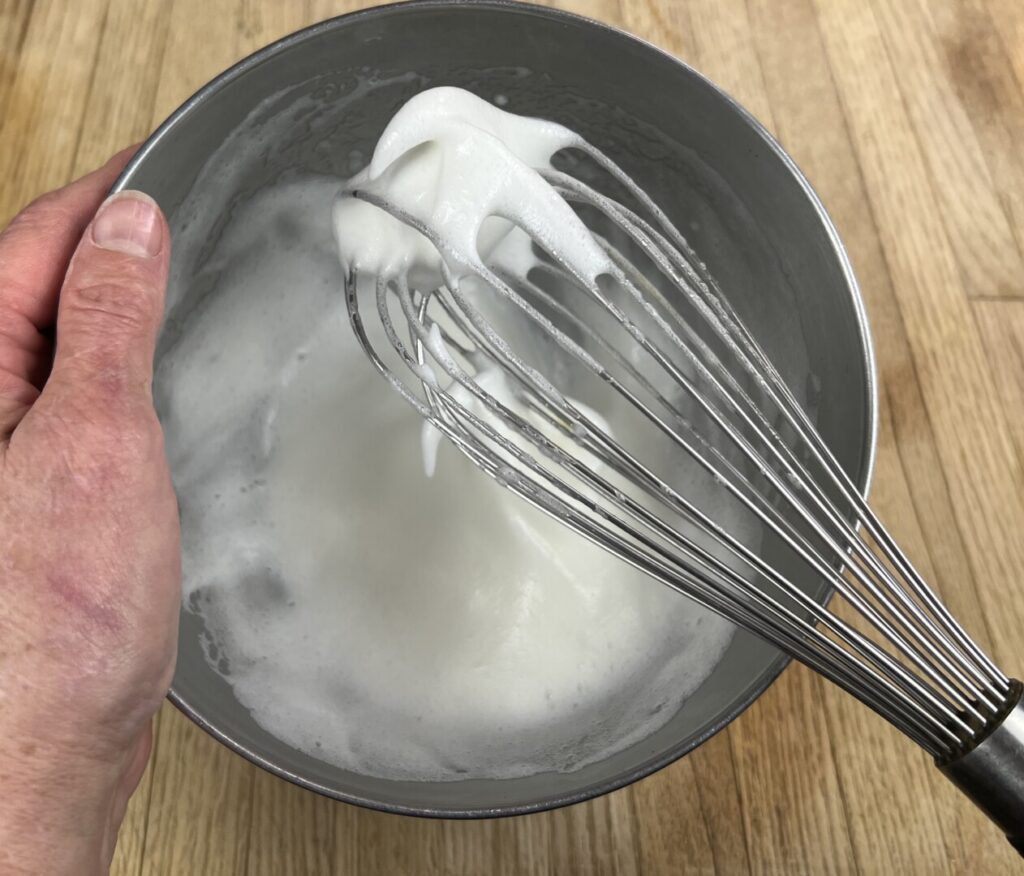
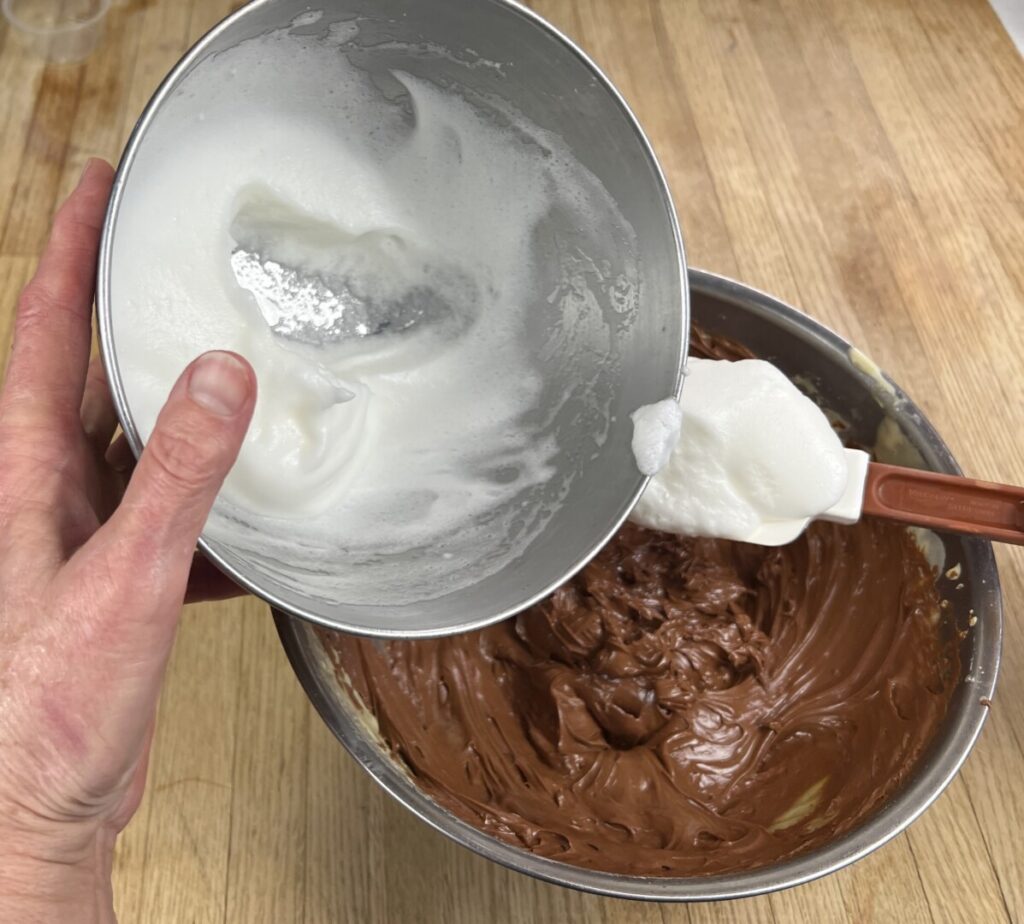
Beat the whites with a little sugar and a pinch of salt. The first beating stage is foamy; beat to soft peak, then stream in the sugar as you beat to firm peak—the whites will mound softly into a point when lifted with the whisk. Don’t over-beat; if the whites become grainy or crumbly, they won’t hold the air. You’ll need to discard them and start again.
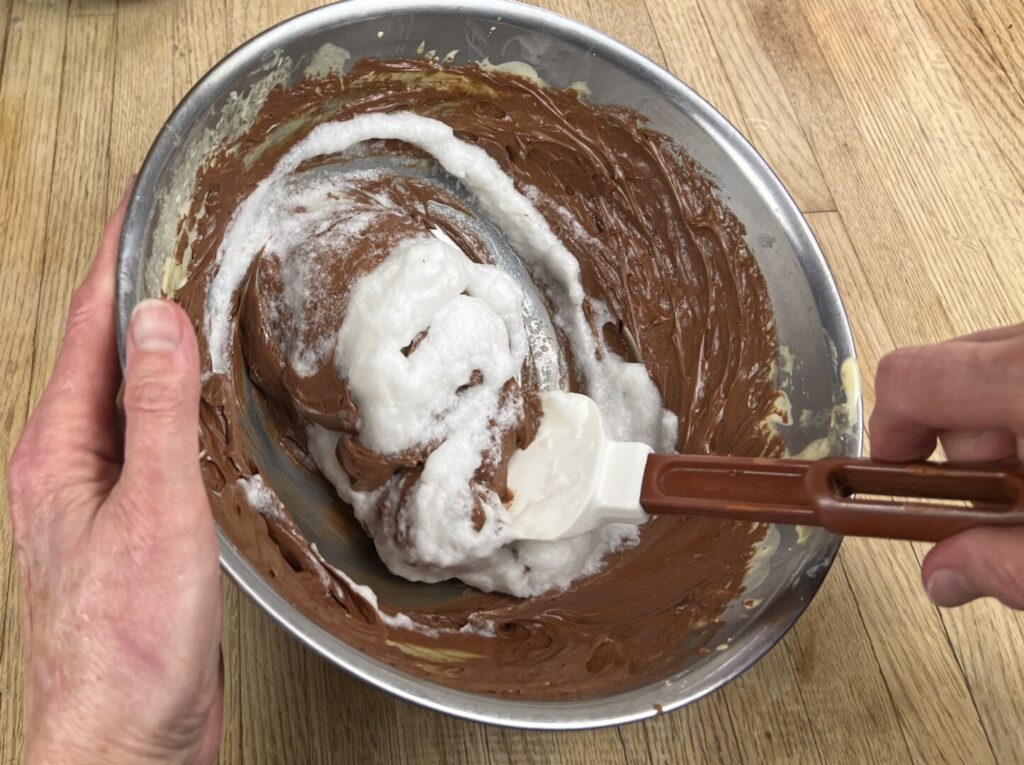
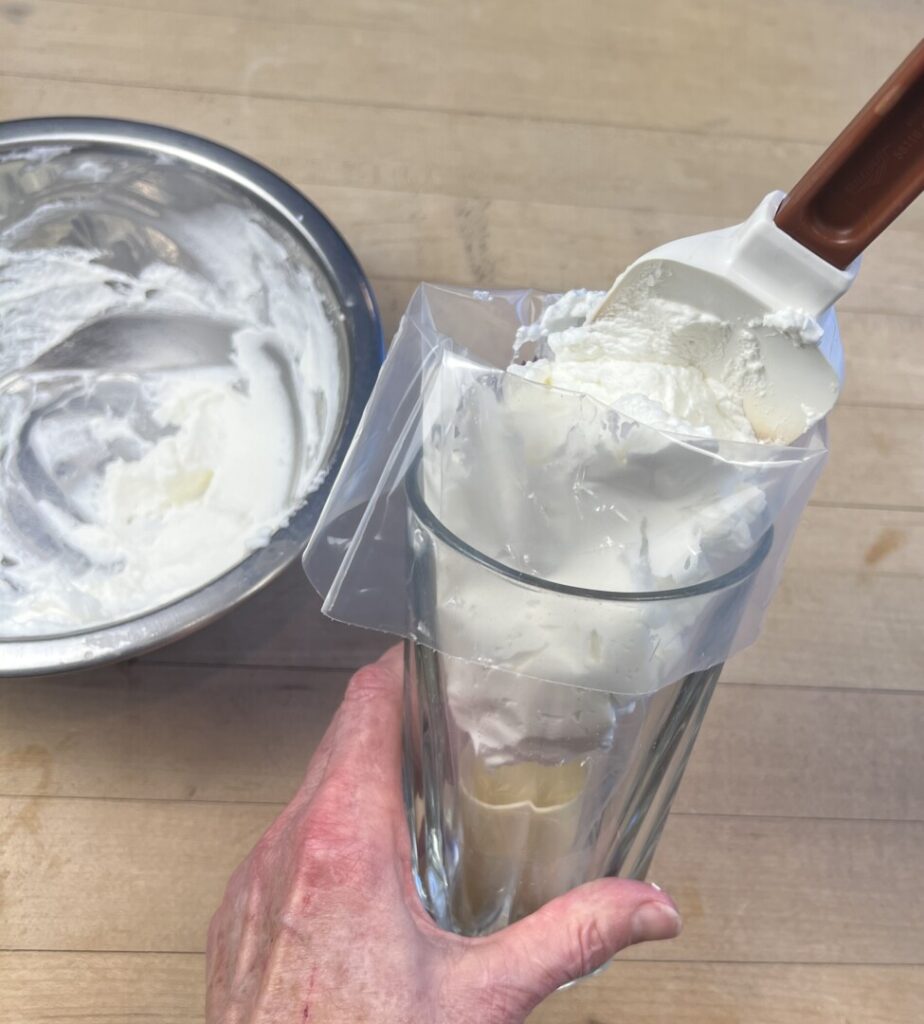
Quickly but gently fold the whites into the mousse base until the color is homogenous and the base is light and fluffy. For a neat appearance, a pastry bag fills the glasses neatly and efficiently. Tap the glasses on the work surface to flatten the surfaces and force out air pockets.


It’s Valentine’s Day—time to COOK!
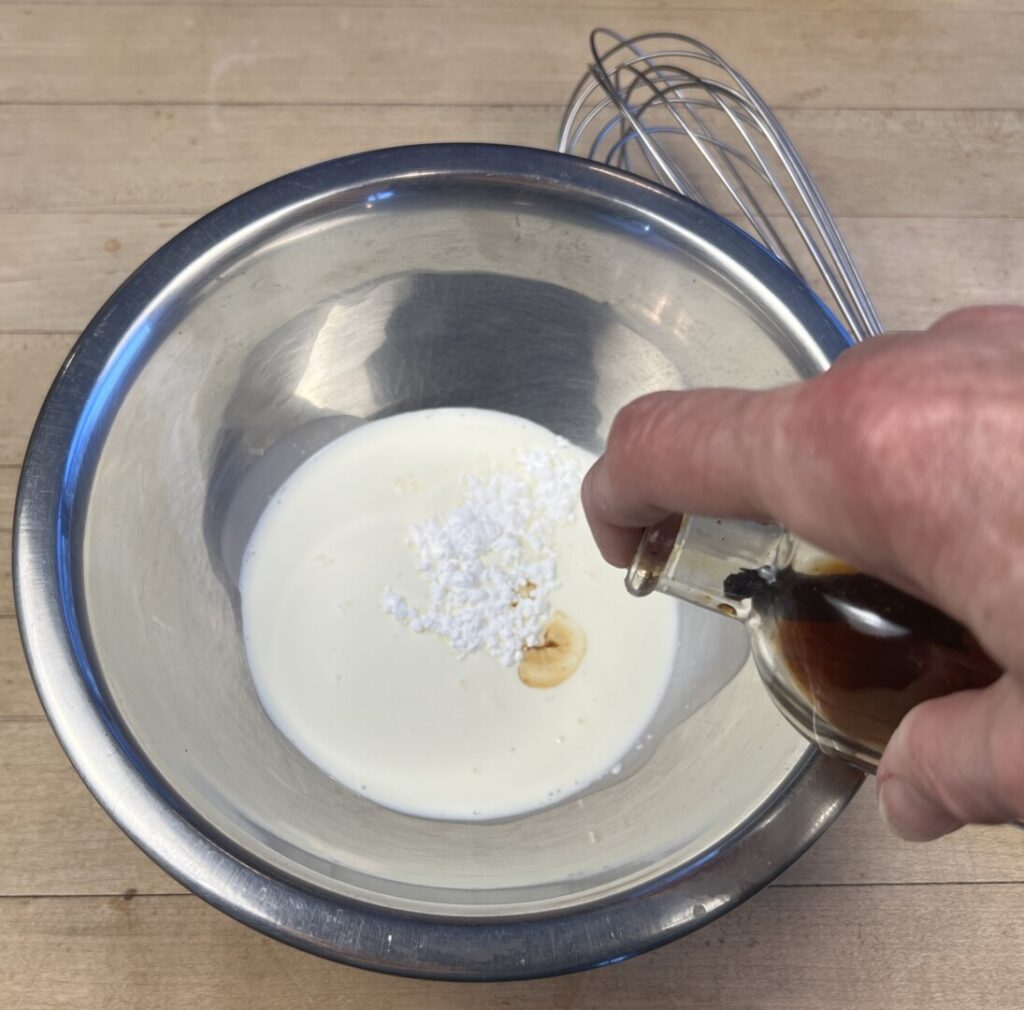
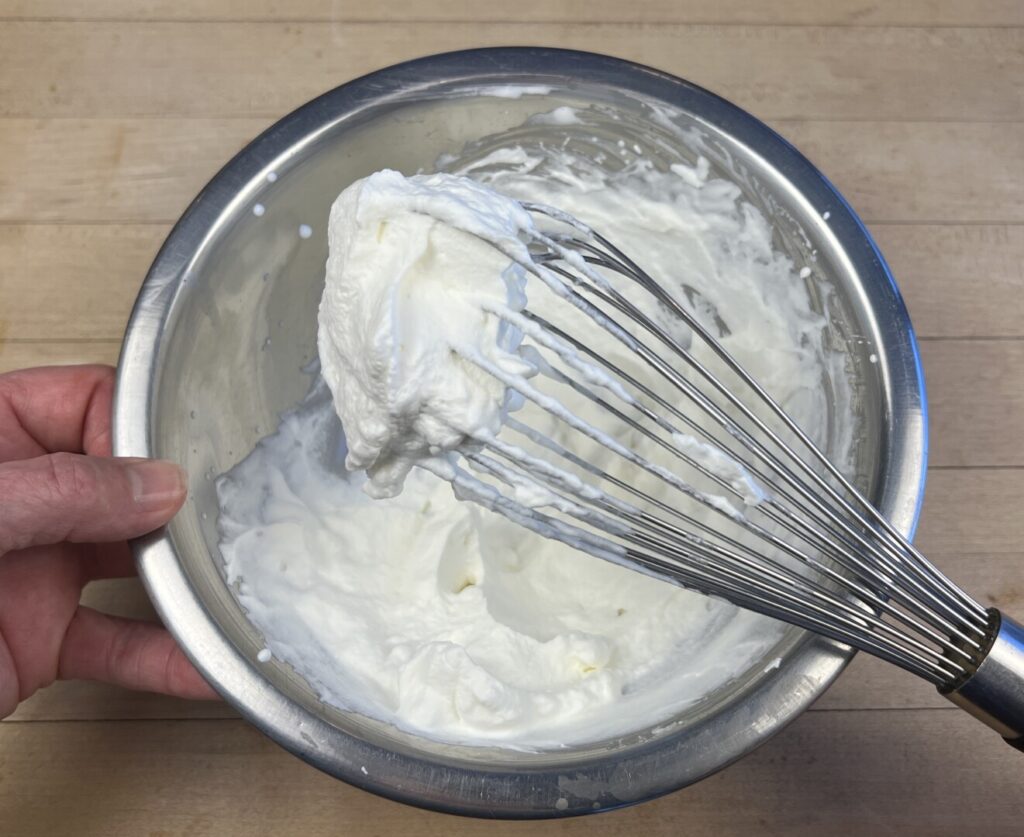
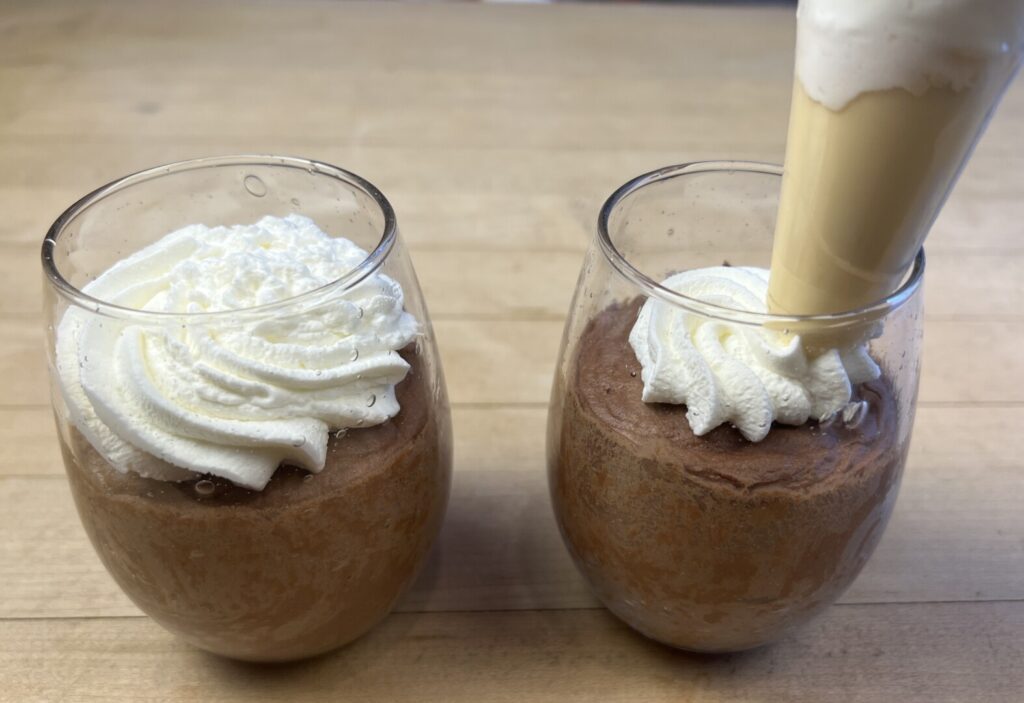
The glasses of mousse are hiding in the ‘fridge, ready to be unwrapped and served. Last-minute prep involves only washing the strawberries and making Chantilly cream. Use a chilled bowl and have the cream very cold; add confectioner’s sugar and vanilla, then beat to firm peaks. Load up a pastry bag and pipe a big, plump rosette of Chantilly cream on the surface of each mousse.
Assembling the dessert plates takes only a few seconds.
Enjoy!
Julia’s Chocolate Mousse with Chantilly Cream and Strawberries
Ingredients
step 2 ingredients
- 2 eggs*, room temperature (see recipe note)
step 3 ingredients
- 2 oz 85% cocoa solids bittersweet chocolate
step 4 ingredients
- 2 1/2 oz sugar
- 1/4 c espresso or strong black coffee, room temperature
- 2 Tbsp cognac or brandy
step 5 ingredients
- 1 oz unsalted butter
step 6 ingredients
- 2 tsp sugar
- pinch fine-ground salt
step 9 ingredients
- 4 strawberries
step 10 ingredients
- 1/2 c heavy cream, cold
- 1 tsp confectioner's sugar
- 2 drop pure vanilla extract
step 11 ingredients
- to taste crisp vanilla cookies
Instructions
PREP: Mise the recipe ahead of time.
1. Create 2 double boilers:
- Choose a small and a medium-size stainless steel bowl, each of which fits snugly into a saucepan with the bottom of the bowl at least 3 inches above the bottom of its saucepan.
2. Prepare egg yolks and egg whites:
- Separate the eggs, placing the yolks in the larger of the double boiler bowls and the whites in an additional clean, dry, grease-free bowl. Take care that no yolk gets into the whites. (If this happens, the whites will not hold air when beaten.)
3. Melt the chocolate:
- Chop or break the chocolate into small pieces and place it in the remaining double boiler bowl.
- Fill the bowl’s saucepan with about 1 inch of water. Place the saucepan over low heat and then set the bowl of chocolate in it. Stir and scrape the chocolate with a plastic spatula until it’s completely melted and smooth. Don’t allow the chocolate to get too hot or to get even a drop of liquid in it, or it may seize up and become unusable.
- Remove the double boiler from heat and hold on the back of the stove.
4. Make coffee sabayon:
- Choose a bowl larger than the bowl holding the egg yolks. Create an ice bath by filling the larger bowl ⅓ full of ice and adding a little water.
- Fill the remaining saucepan with about 1 inch of water. Place it over low heat and bring the water to a bare simmer.
- Vigorously beat the step 4 sugar into the egg yolks until light and fluffy, and then whisk in the coffee and cognac.
- Fit the yolk mixture bowl into the saucepan of barely simmering water. Whisk constantly for about 3 minutes until the mixture becomes foamy, thickens to a custard-like texture, and reaches a temperature of 135°F. (If you test it with your finger, it should feel slightly too hot for comfort.) Take care not to overheat it, lest it curdle.
- When the sabayon is thickened and hot, transfer its bowl to the ice water bowl and continue to whisk until barely warm. Immediately remove from the ice bath; do not allow it to become cold.
5. Make the mousse base:
- If necessary, warm the butter for a second or two in a microwave oven, taking care not to melt it.
- Whisk the soft butter into the sabayon until smooth. (If either ingredient is too cool, the mixture may appear curdled; that’s OK, as it will smooth out when the chocolate is added.)
- Ensure that the chocolate is still warm and fluid. Scrape the chocolate into the sabayon mixture and whisk until smooth and thick.
6. Whip the egg whites:
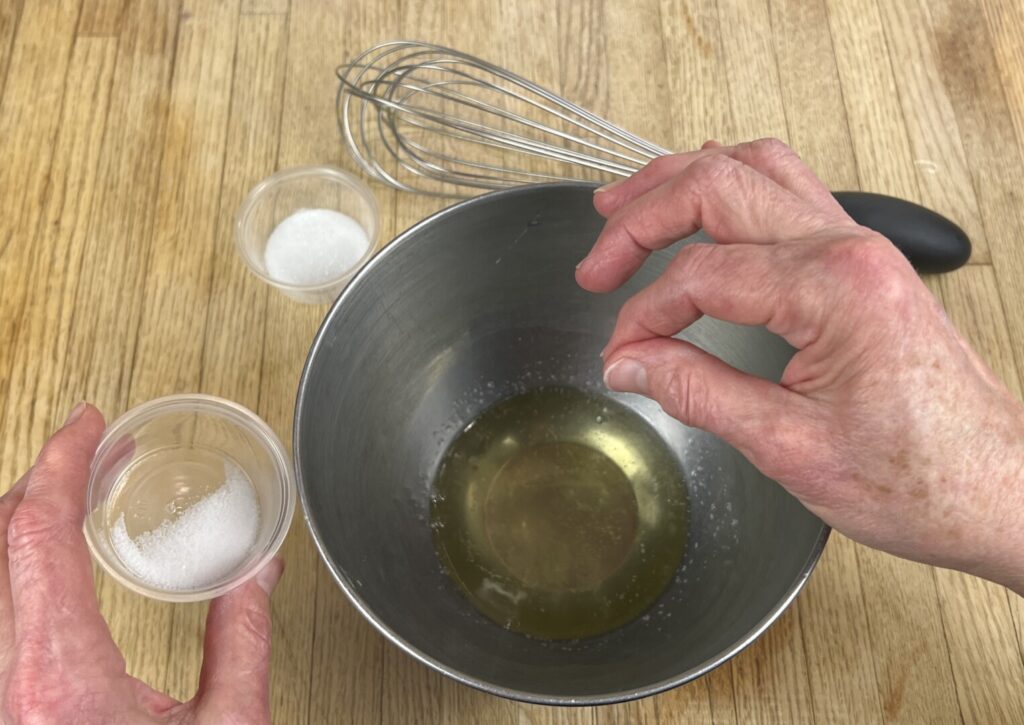
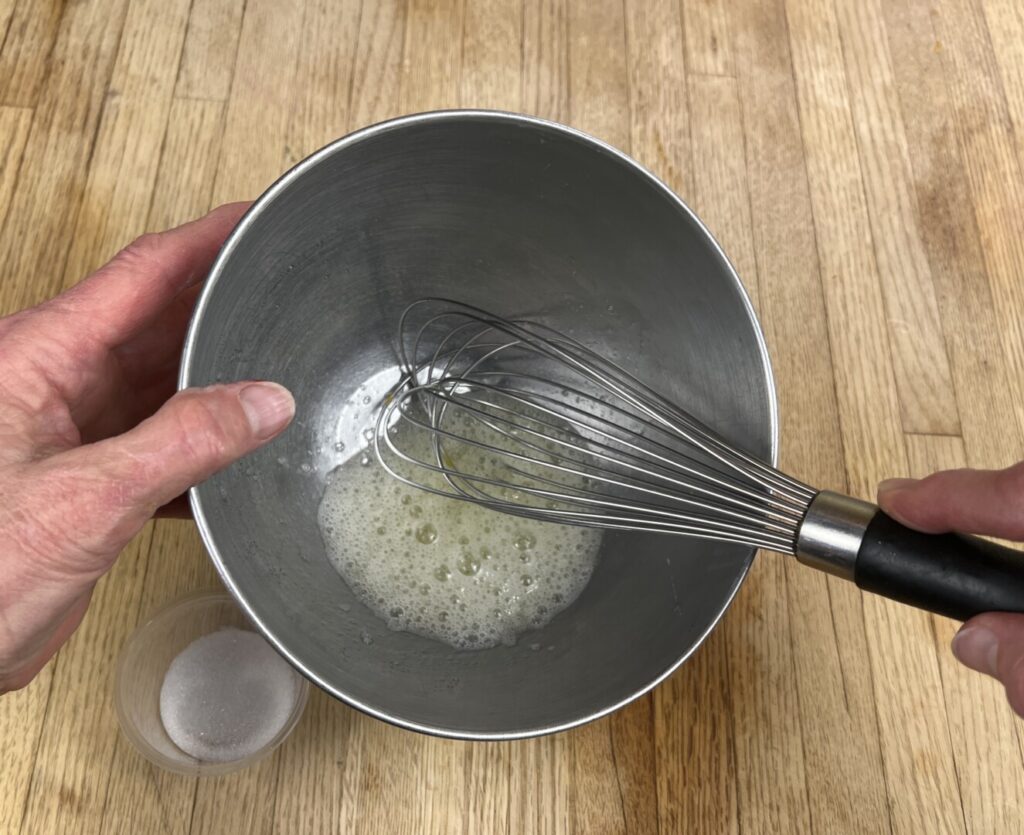
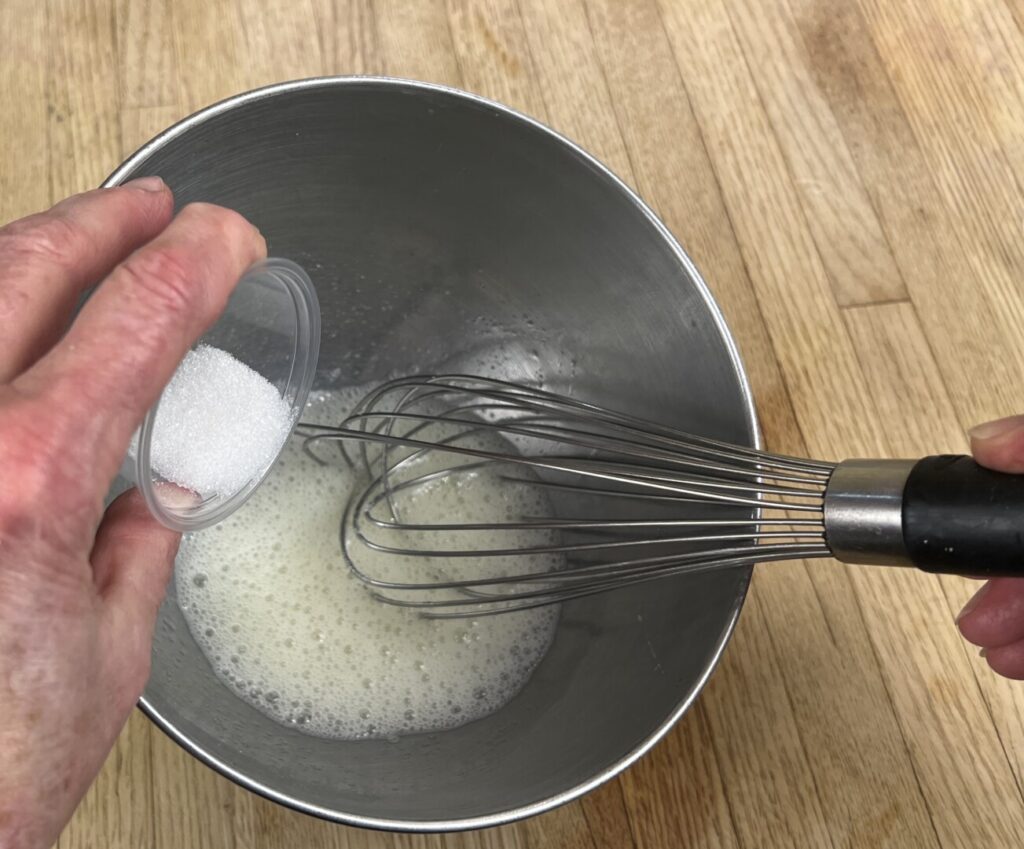
- Use a clean, dry, grease-free whisk to whip the egg whites to a foamy consistency.
- Whip the step 6 sugar and the salt into the whites and then continue whipping vigorously to firm peaks. Don’t overbeat to a stiff or crumbly texture.
7. Complete the mousse:
- Fold the beaten egg whites into the mousse base until until the mixture becomes light, fluffy, and homogenous in color.
8. Fill glasses or ramekins with mousse:
- For help ensuring best appearance, transfer the mousse into a pastry bag (no tip needed).
- Cut off about ½ inch of the bag’s pointed end, and insert it into one of two serving glasses or cups. Pipe half of the mousse into each glass. (Alternatively, spoon or scoop the mousse into the glasses.)
HOLD: Cover the glasses with plastic wrap and refrigerate up to 7 days
COOK! Finish and plate your dessert.
9. Wash the strawberries and blot dry on paper towels.
10. Make the Chantilly cream:
- Place a stainless steel bowl into the refrigerator for a few minutes until cold.
- Combine the cream, confectioner’s sugar, and vanilla in the chilled bowl.
- Beat with a whisk to firm peaks.
- Transfer the Chantilly cream into a pastry bag fitted with a star tip.
- Pipe a large rosette of cream covering the surface of each mousse.
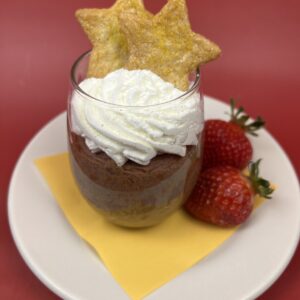
11. Plate:
- Place each glass of mousse onto a plate lined with a beverage napkin.
- Arrange the strawberries on each plate.
- Plant one or more cookies (depending on size) in the cream at the back of the glass.