

Your Cooking Lesson
Advice, explanation, and in-depth information to help you achieve recipe success.
The now-iconic dish Spaghetti Primavera burst onto the North American culinary scene in the mid-1970s when it was first served as a non-menu “special” dish prepared tableside at the legendary French restaurant Le Cirque in Manhattan. At the time, when most Americans believed that pasta was inseparable from tomato sauce, the combination of al dente spaghetti with crisp-tender vegetables in a creamy cheese sauce was a revelation. Today the dish remains popular, in many variations, as a seasonal first course or a rich and satisfying vegetarian entrée.
Although the word primavera means “springtime” in Italian, the original recipe for Le Cirque’s Spaghetti Primavera included fresh tomatoes, zucchini, and basil—which, in my experience, are summer produce. So, in keeping with the spirit of the season, our recipe includes truly springtime vegetables only.
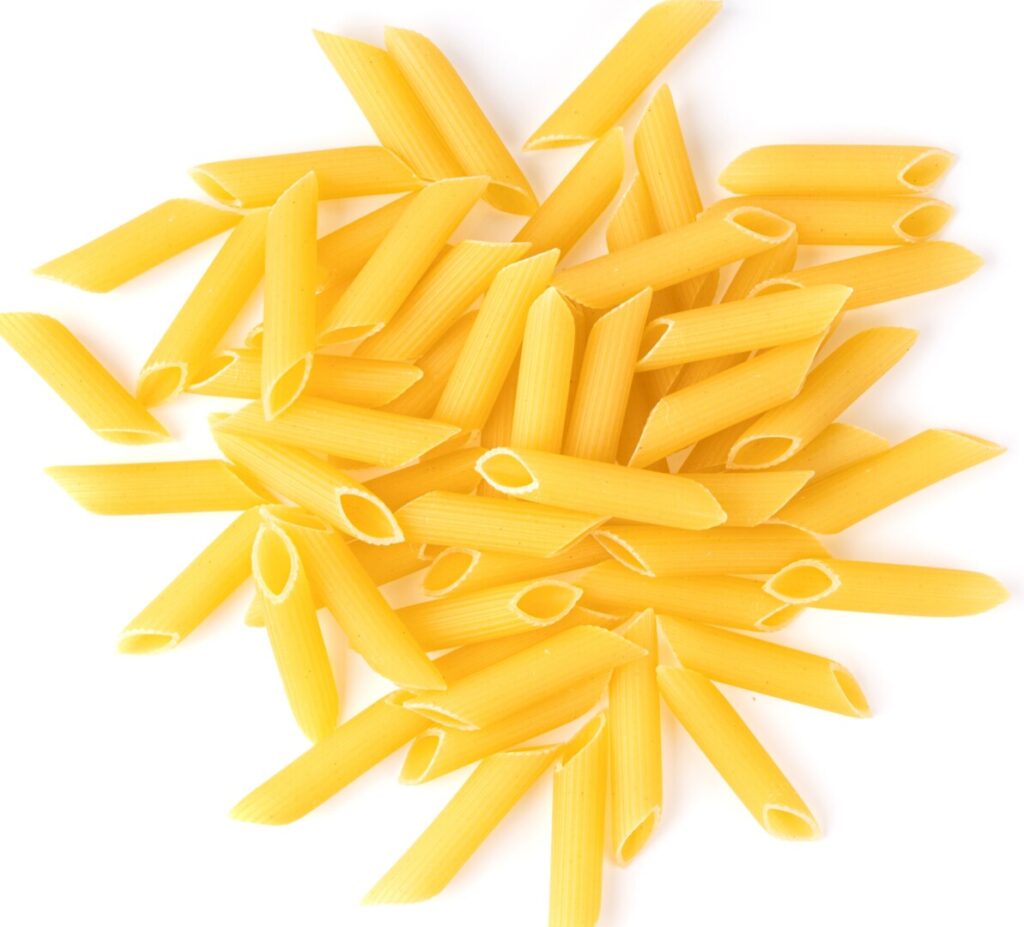
Instead of spaghetti, we’re using penne pasta—technically, penne rigate, or ridged penne. This form of penne is most popular because the little grooves etched onto the outside of the tubes help the sauce adhere to it. Penne means “quill” in Italian, the name reflecting its tubular shape with pointed, diagonally-cut ends. Following the Italian esthetic of matching pasta shapes with pasta sauces, the penne shape reflects that of the diagonally-cut vegetables in the dish.
Penne Primavera can be a complete dish in its own right. You can serve it as a traditional Italian first course, or as a rich and satisfying vegetarian entrée. However, its creamy cheese sauce can be a bit rich to serve in quantity. Teaming it with lemony pan-roasted chicken breast cuts the richness and adds more protein to your meal.
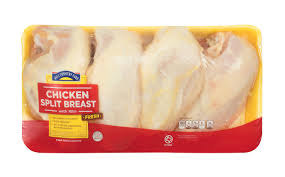
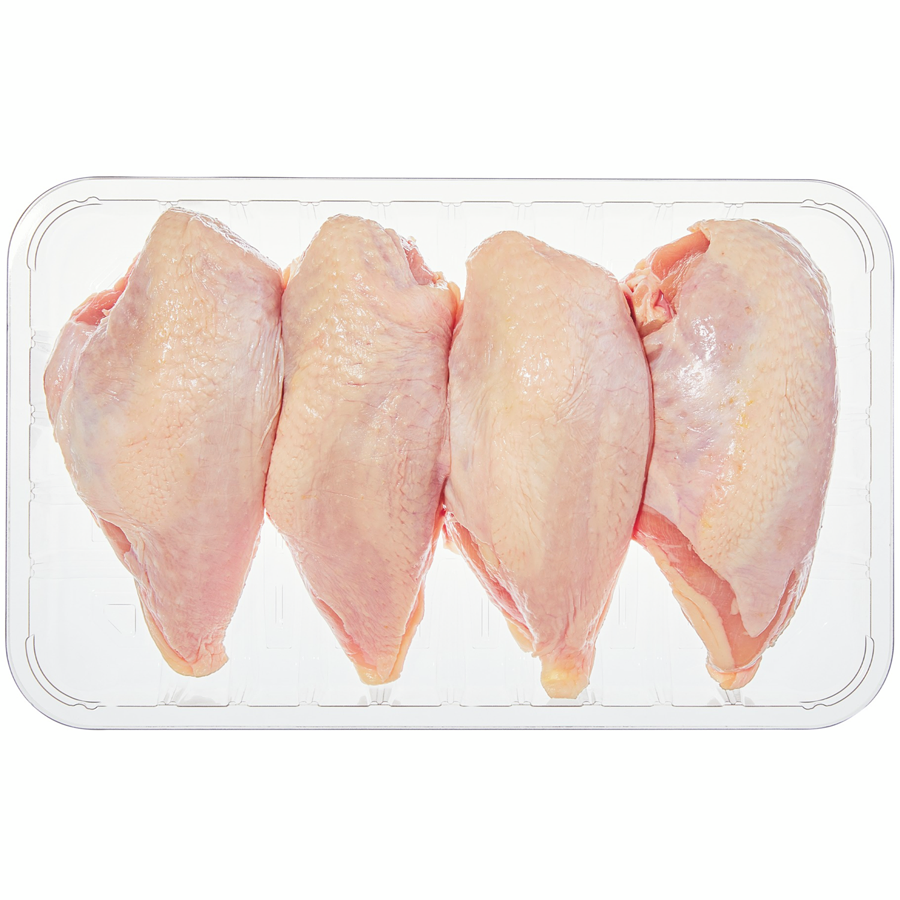
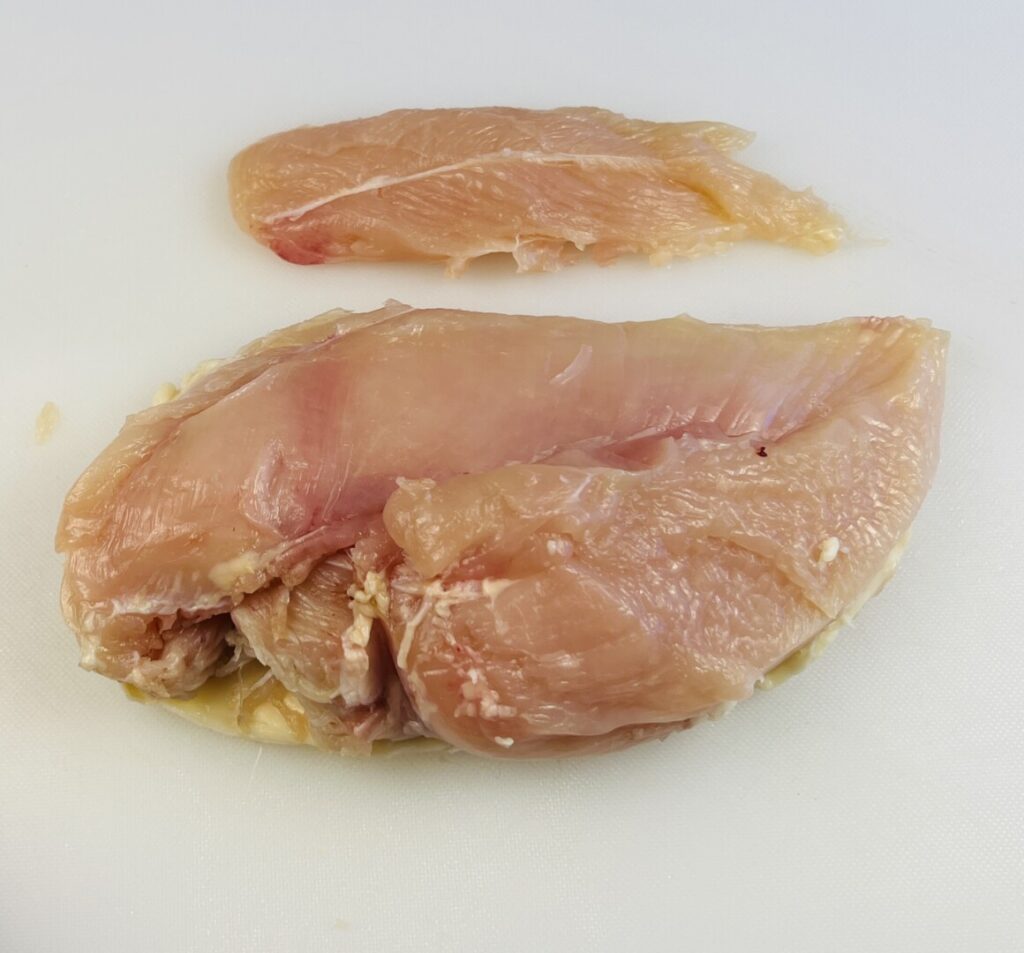
The vast majority of chicken sold in North America is fabricated during processing into boneless, skinless breasts. These typically have little flavor and, because they contain virtually no fat, when cooked to the USDA-required internal temperature of 165°F, they invariably have a dry mouthfeel. As you’ve undoubtably experienced, chicken roasted with the skin on is more moist and flavorful, because the fat in and under the skin creates flavor and succulence. Serious cooks willing to spend some time on poultry fabrication purchase whole fryer chickens and break them down into skin-on legs, breasts, and stock bones. However, this requires skill and time. I recommend a middle-of-the-road option: Buy bone-in, skin-on split chicken breasts, and remove the bones. Because these are usually cut from large, more mature chickens, one breast half yields enough meat for two entrée portions.
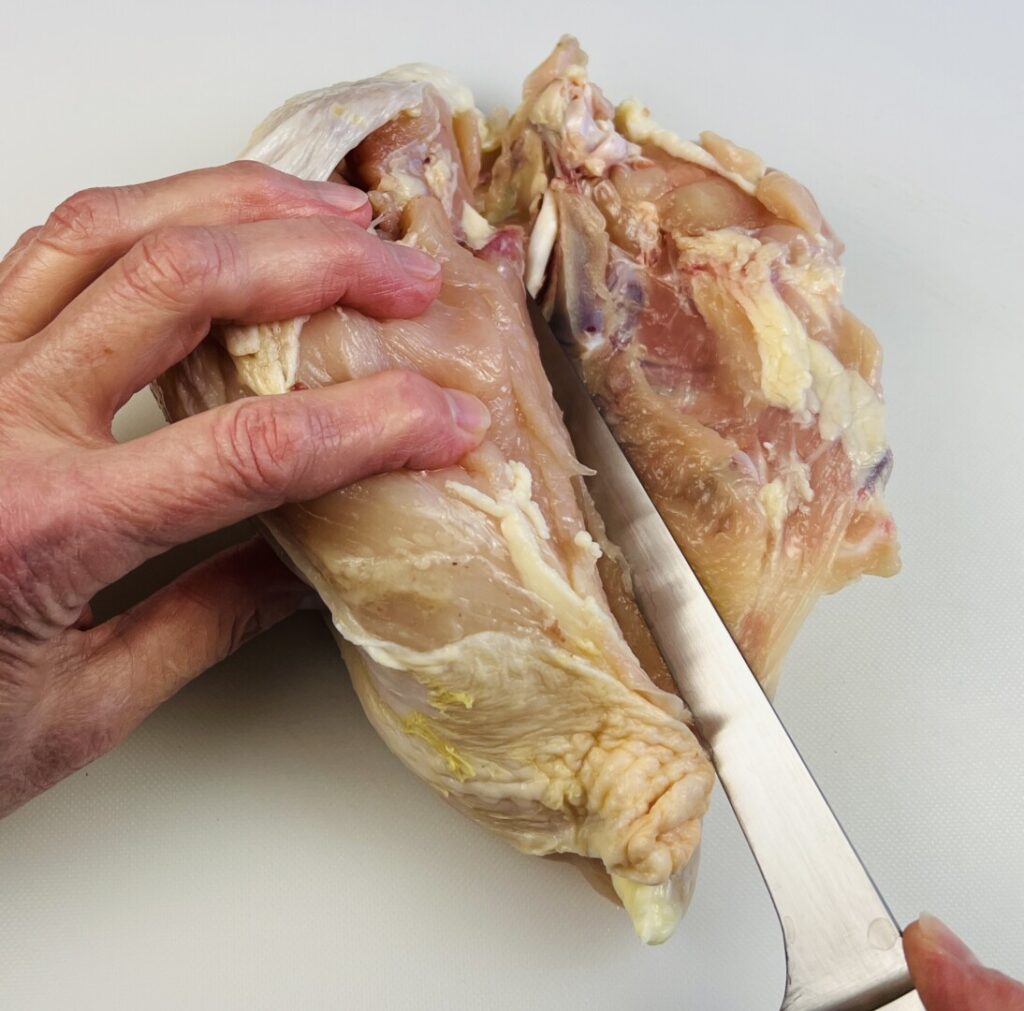
For best results, choose a sharp boning knife with a flexible blade. Turn the chicken breast up on its side with the thicker end on the cutting board and the thinner end up. Insert the knife blade between the bones and the breast meat, and slice downward with the blade sliding against the contour of the bones. As you cut, pull outward on the meat to open it out and away from the bones. When the blade reaches the cutting board, the breast meat will have completely separated from the bones.
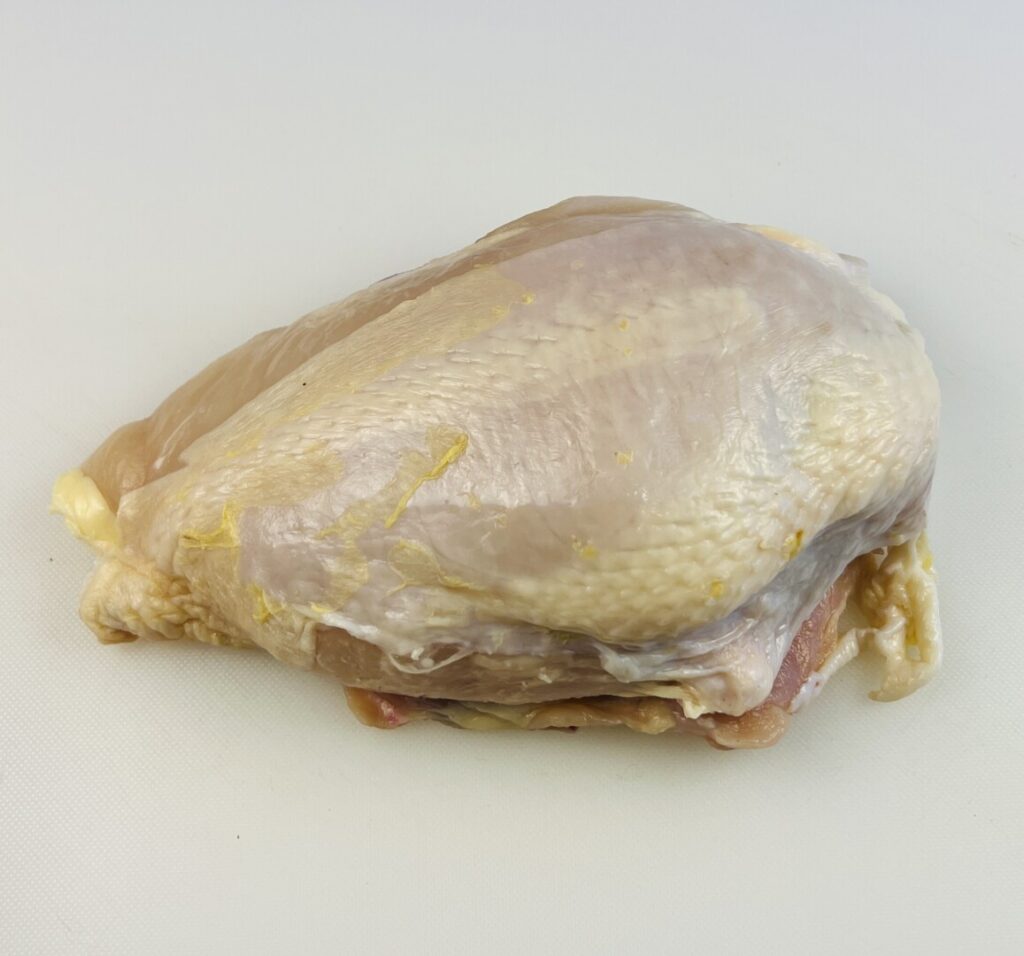
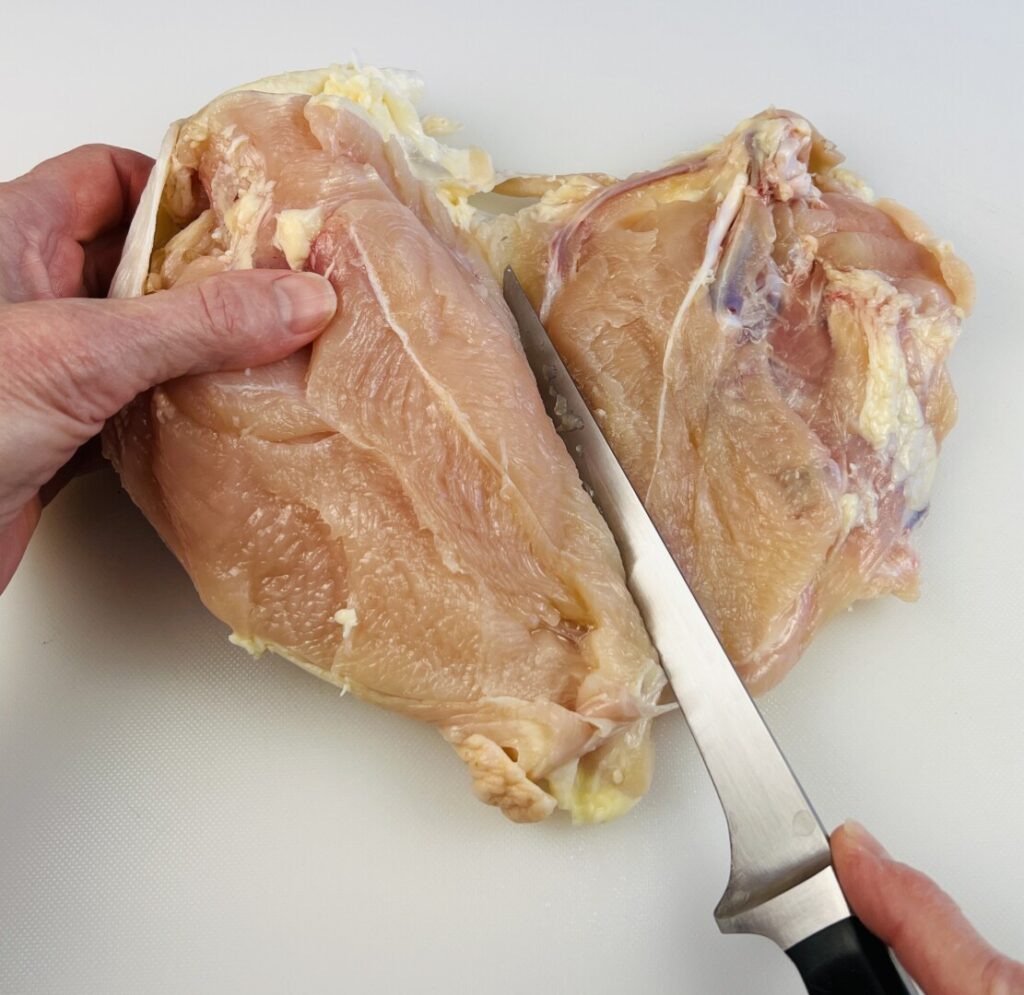
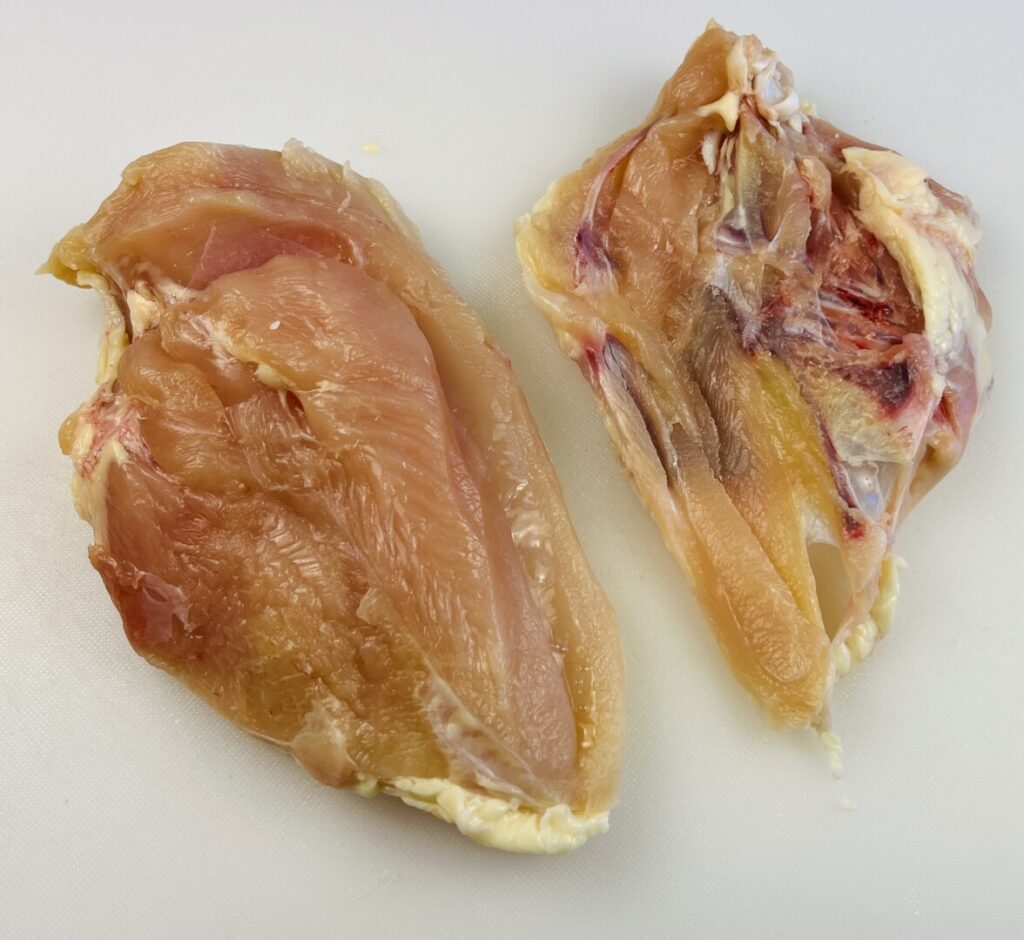
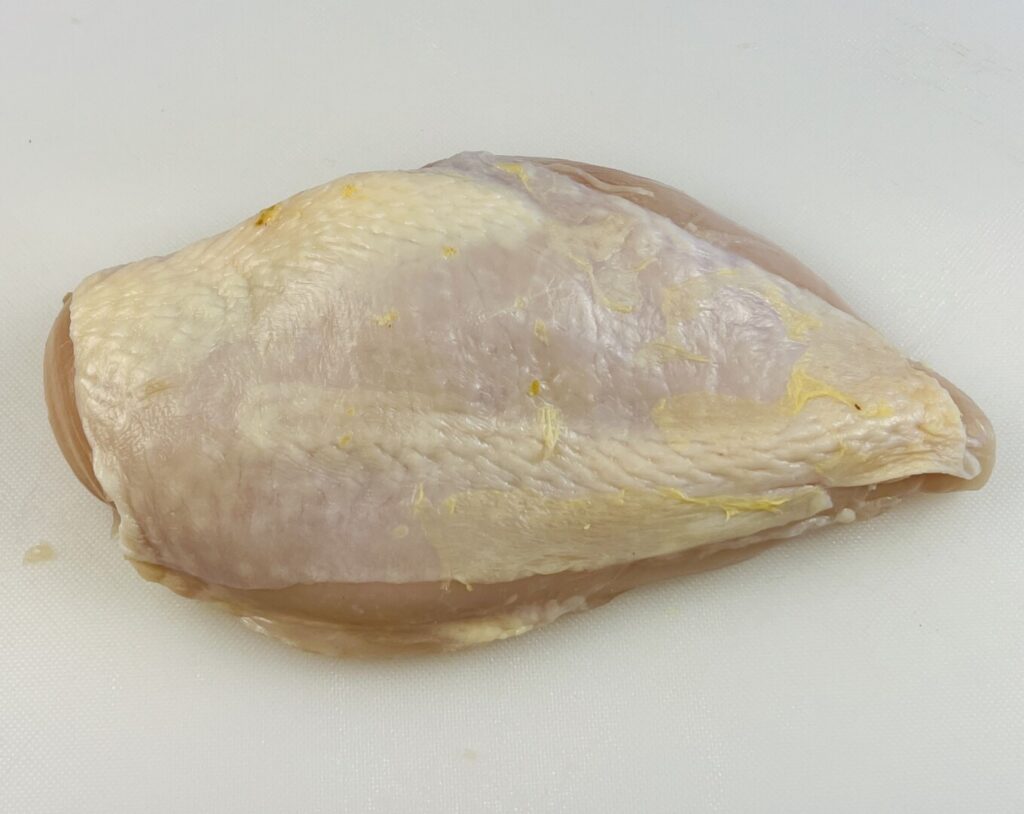
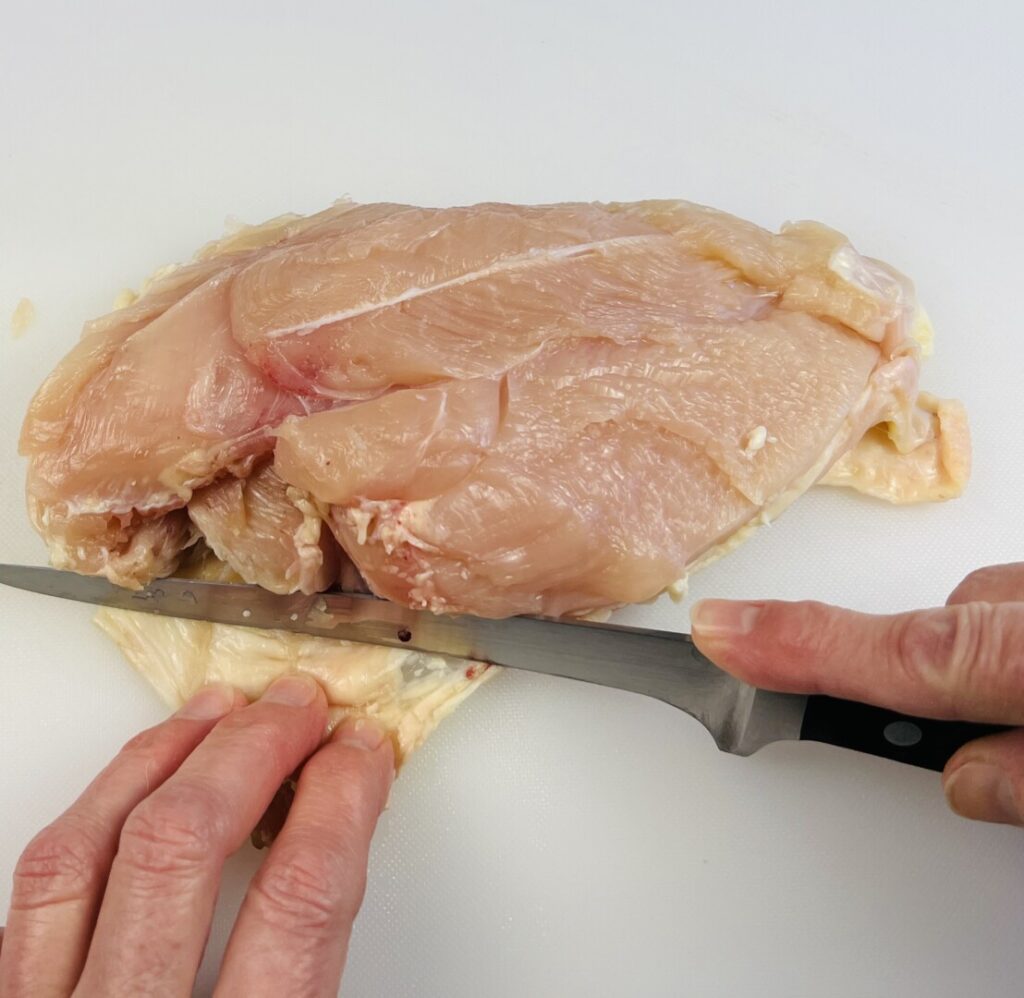
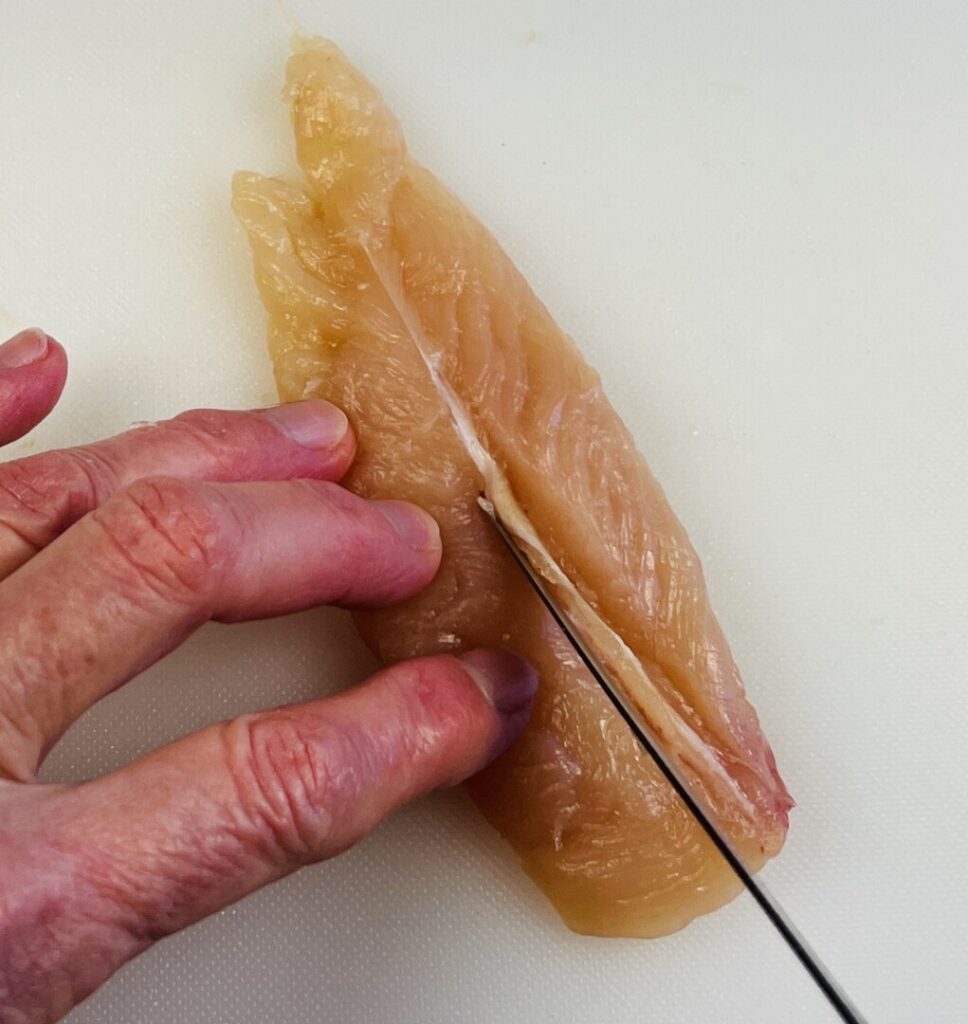
With the now boneless breast on the cutting board skin-side-down, trim away any excess skin and fat. Make sure to leave enough skin on the breast to completely cover the breast meat. When you did the initial boning out, if you’ve cut accurately and close to the bones, the chicken tender will be intact against the larger breast lobe. Because the tender usually overcooks when left on the breast, it’s best to remove it and reserve it for another use, such as in a stir-fry. You can keep a plastic bag for chicken tenders in the freezer and “collect” them until you have enough to cook. As you can see in the photos, a chicken tender contains a tough, white tendon running vertically through it. It’s an efficient, time-saving practice to remove the tendon before freezing so you don’t have to dirty a knife and cutting board when you’re ready to cook the tenders.


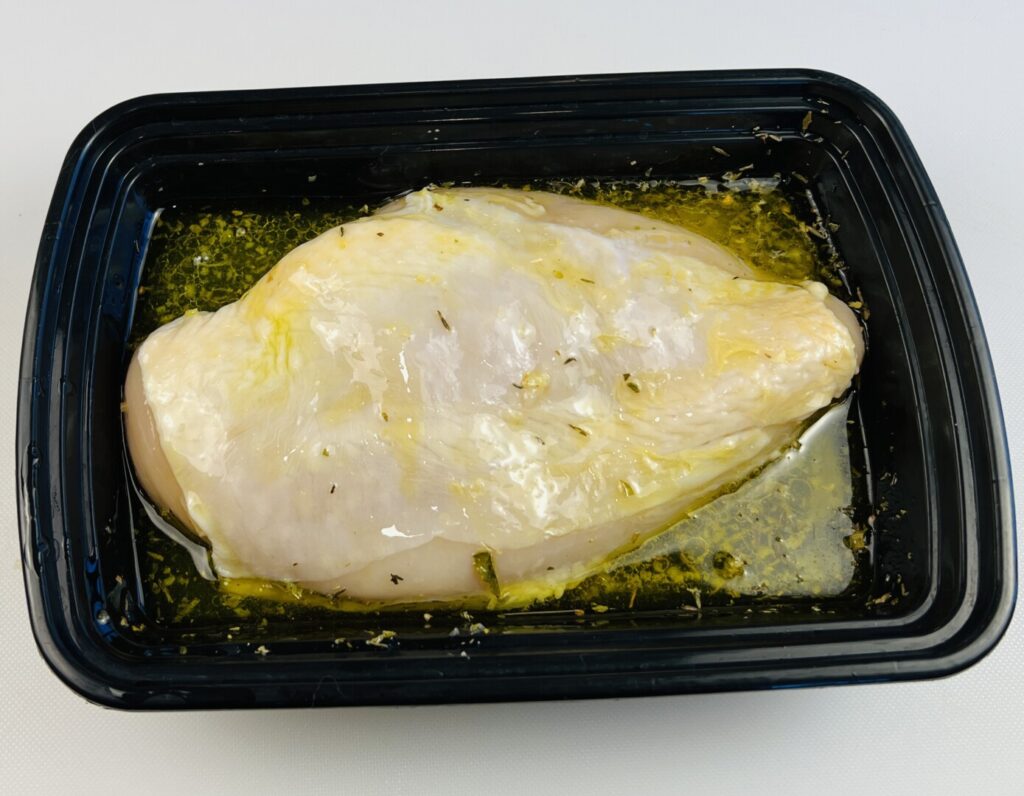
Although chicken breasts are by their nature already tender, marinating them adds flavor and, if done for the right amount of time, helps ensure a pleasant, moist mouthfeel.
By definition, marinades include an acidic ingredient, salt, oil, aromatic vegetables, and seasonings such as herbs and spices. The acidic ingredient—in this case lemon juice—not only adds flavor but also tenderizes by breaking down the meat fibers. For tough cuts of meat, marination provides much-needed tenderization. But for our already-tender chicken breast, we don’t need tenderization, we want only the lemon and other flavors to permeate the meat. So it’s important to not leave the chicken in the marinade too long. If you do, your cooked chicken breast will have a dry, cottony mouthfeel. Observe the marination times specified in the recipe, removing the chicken from its marinade and storing the chicken and marinade separately until needed.
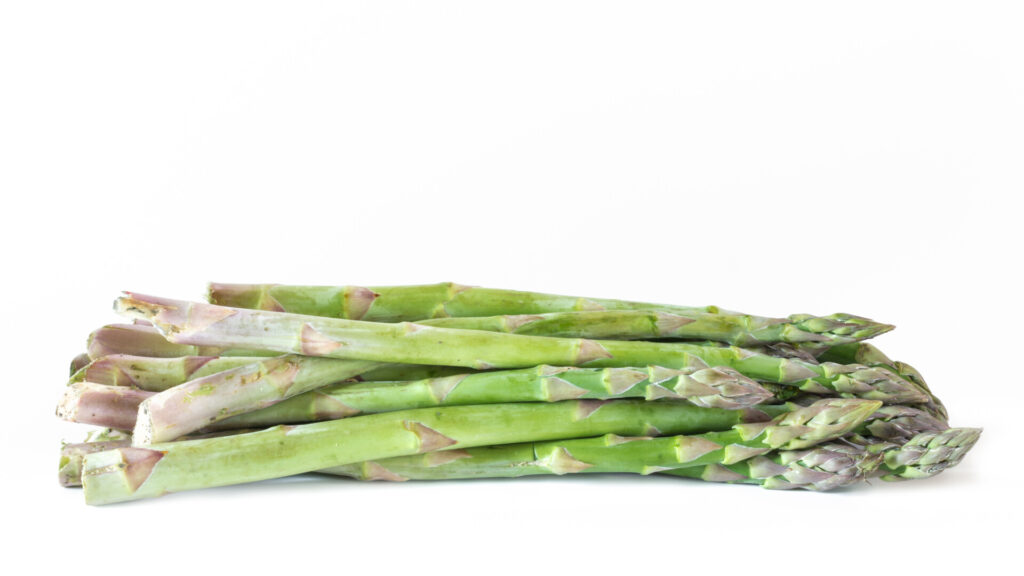
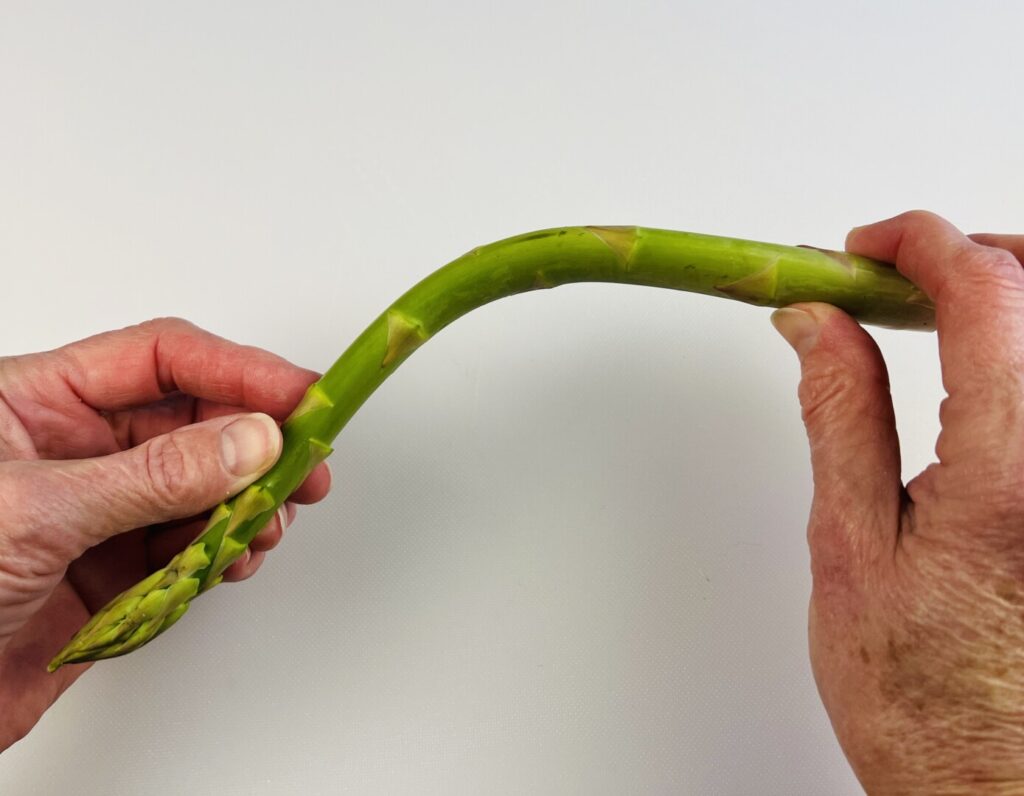
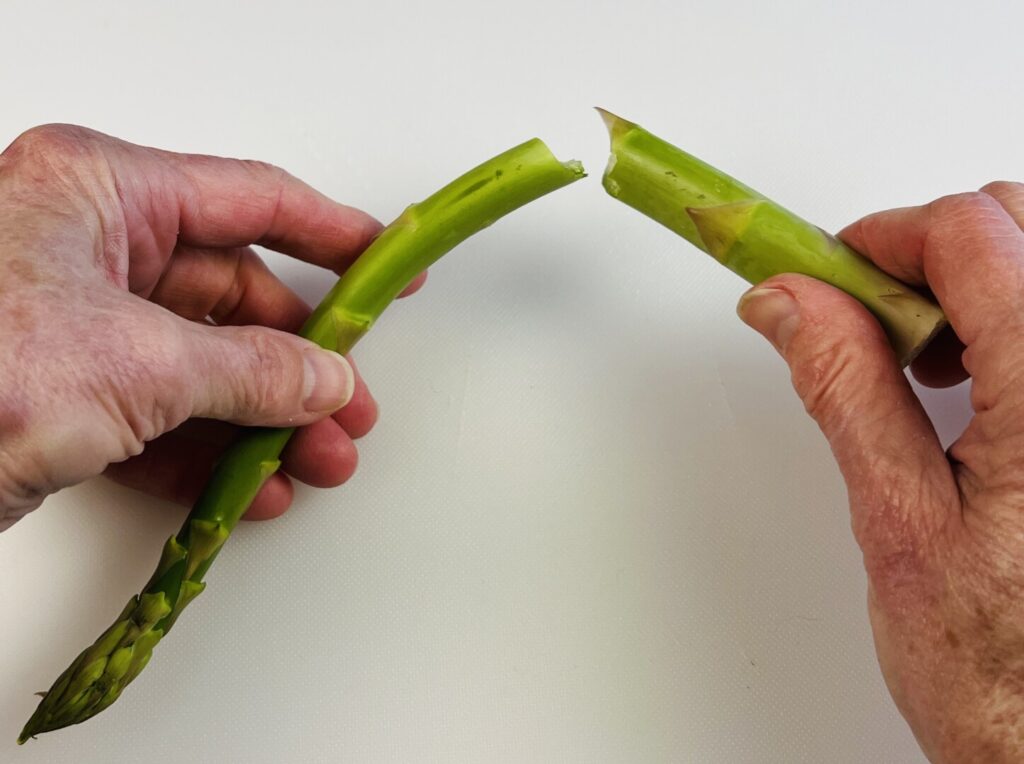
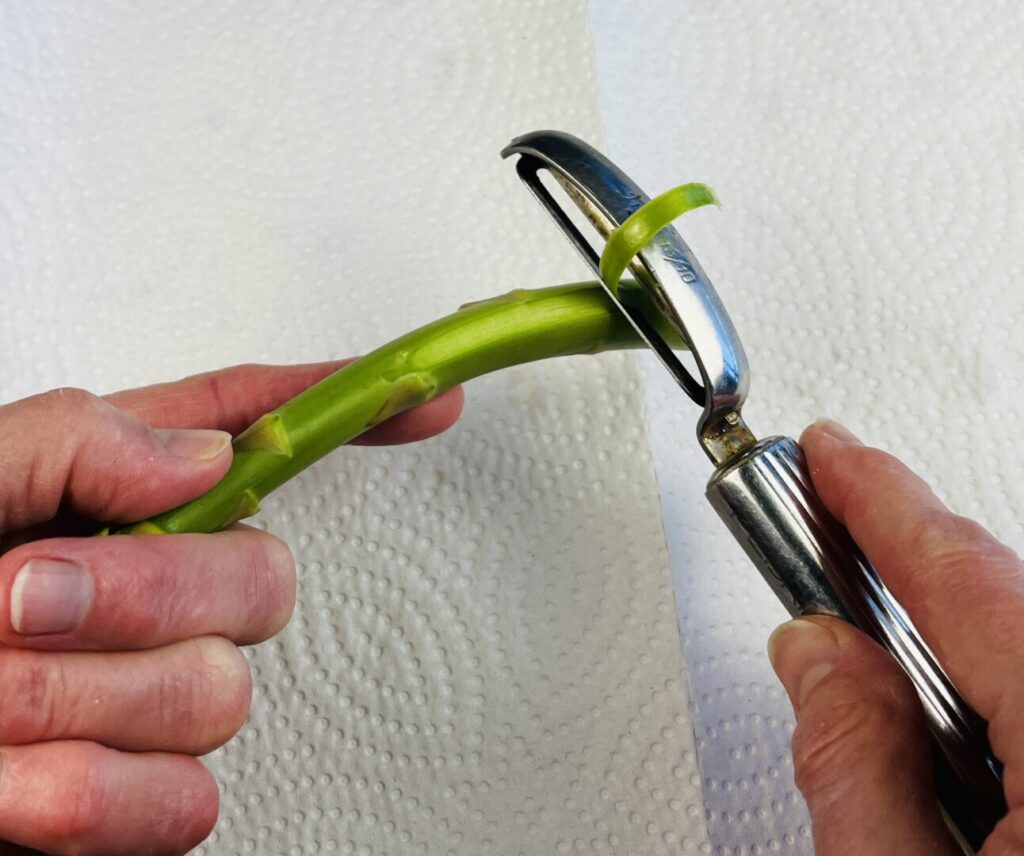
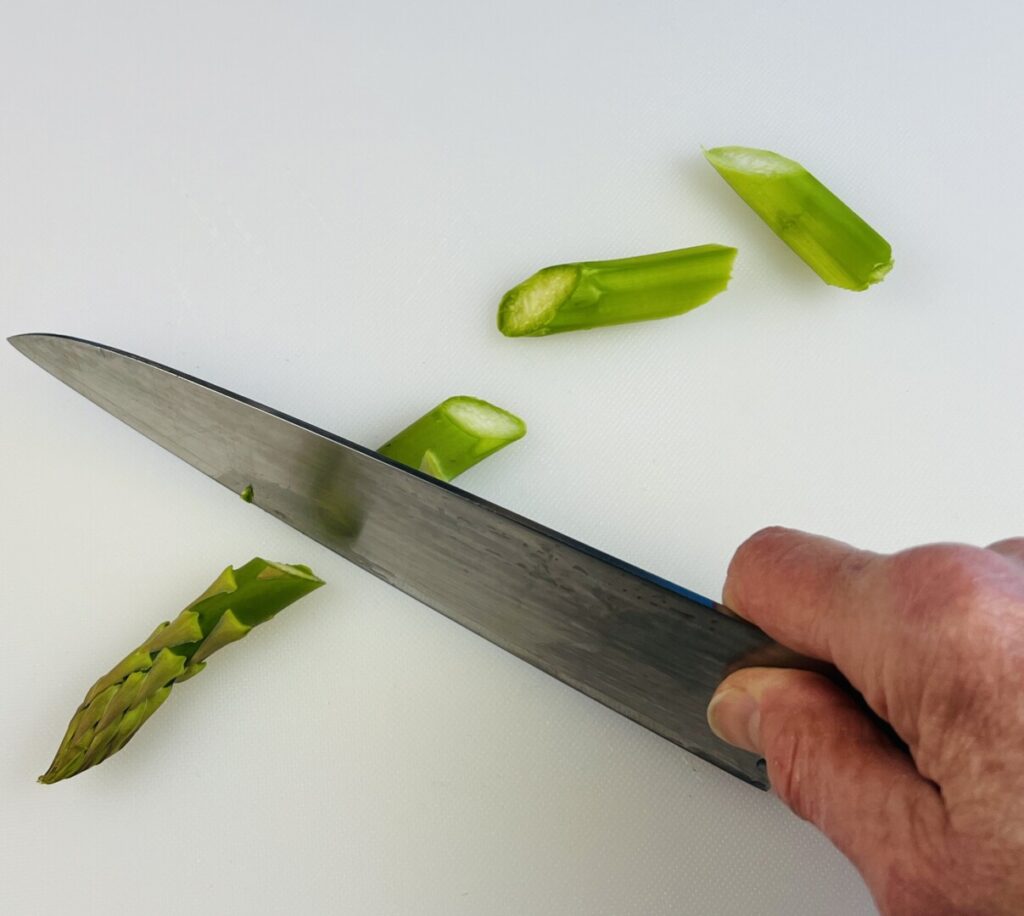
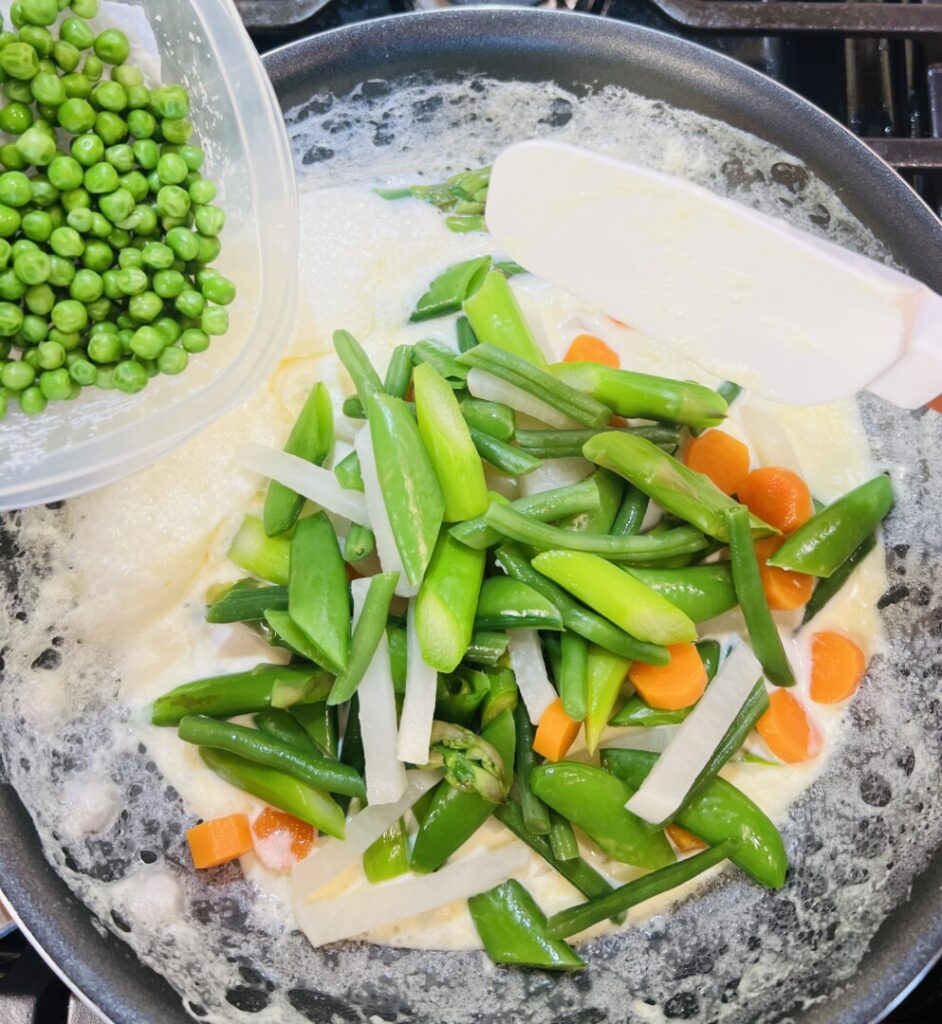
Your next step is to fabricate the primavera vegetables. Asparagus fabrication requires some special knowledge and skills. When an asparagus stalk emerges from the soil in early spring, its tip is a tightly-furled bud that, if not harvested, will develop into feathery branches. The tip is the tenderest part of the spear. The stem part of the spear is more tender toward the tip end, and gradually becomes tougher toward the butt end, where it’s cut away from the ground at soil level. Fortunately, an asparagus spear will self-separate between tough and tender! Just grasp an end with each hand, and gently bend the spear until it breaks. Discard the tough butt end, shown below on the right. To ensure even cooking, thick asparagus spears need to have their tough skin peeled away. Using a swivel peeler with a light touch, begin scraping off only a thin layer of skin from about the stalk’s mid-point out to the butt end, rotating the stalk as you go. For this recipe, cut the stalks on a sharp diagonal into 2-inch lengths.
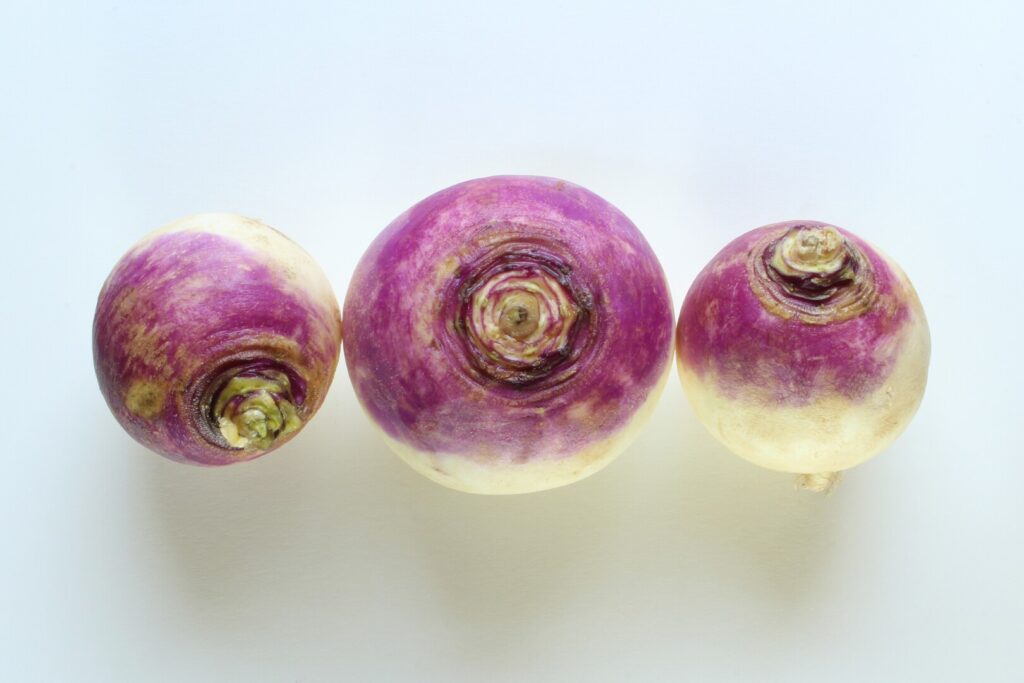
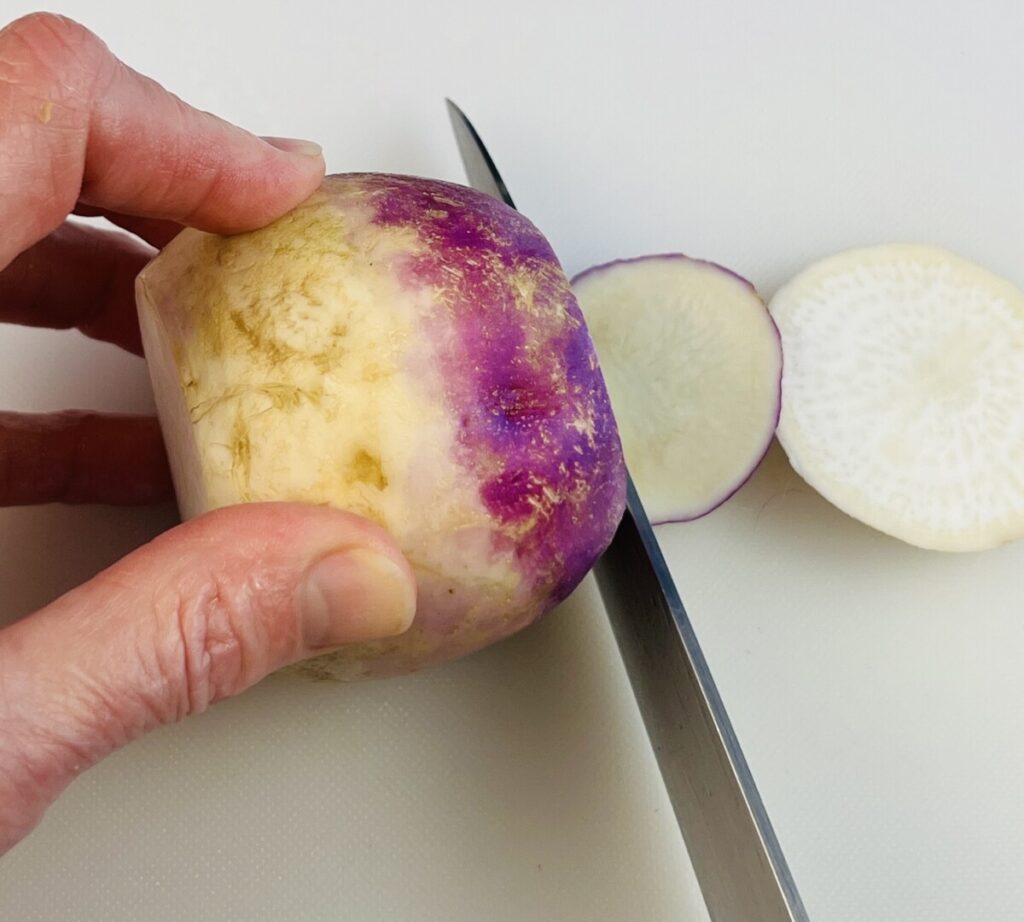
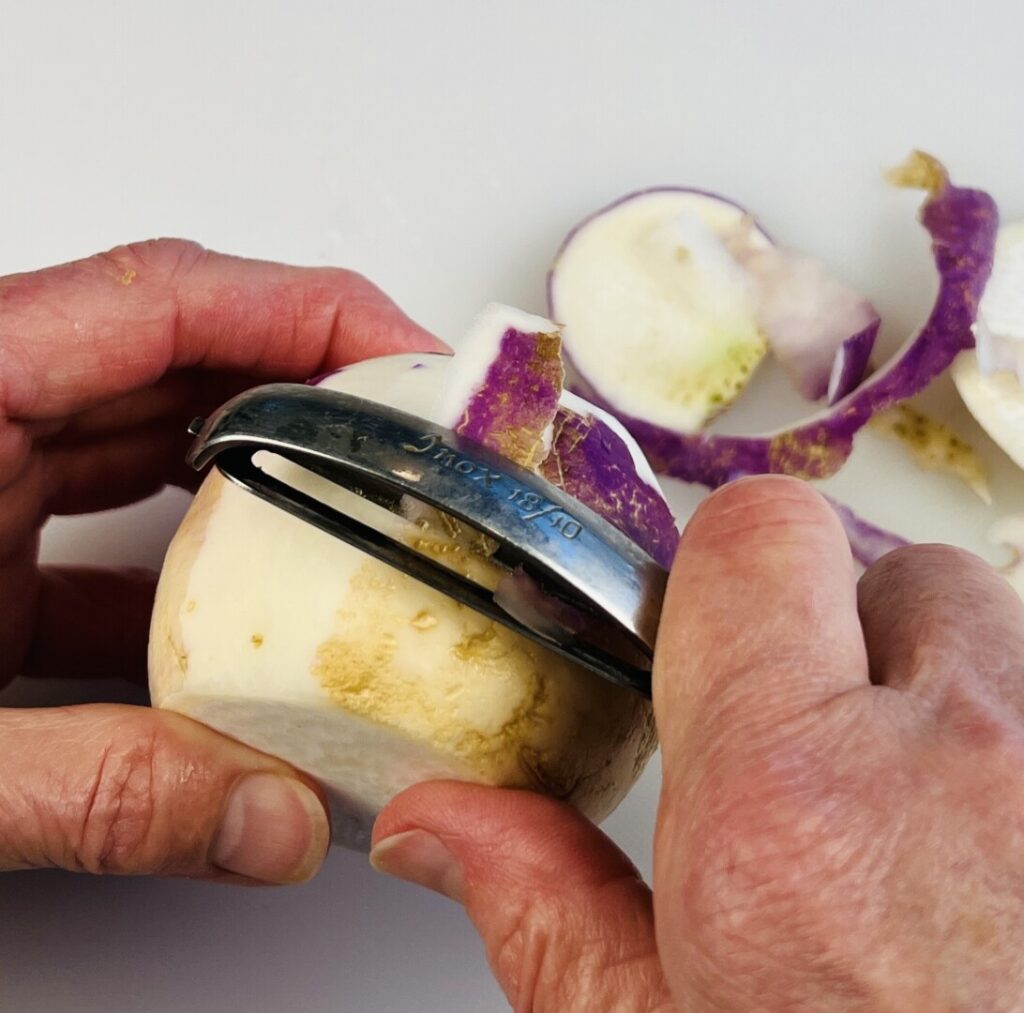
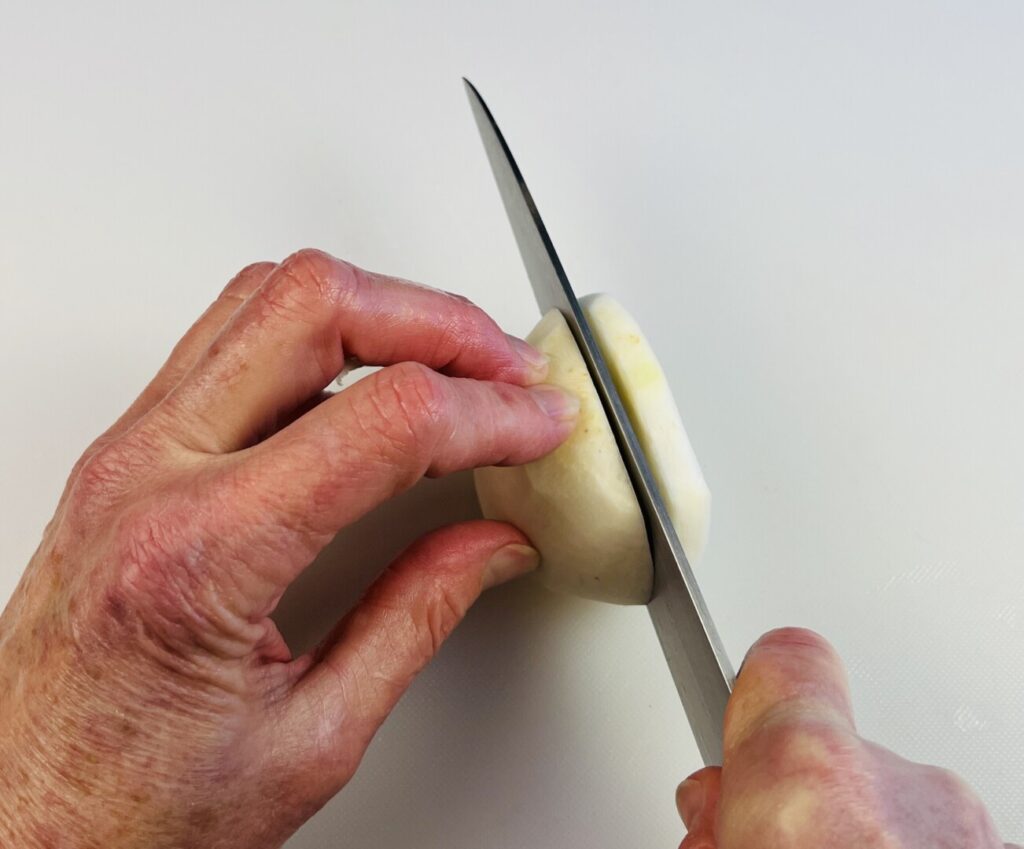
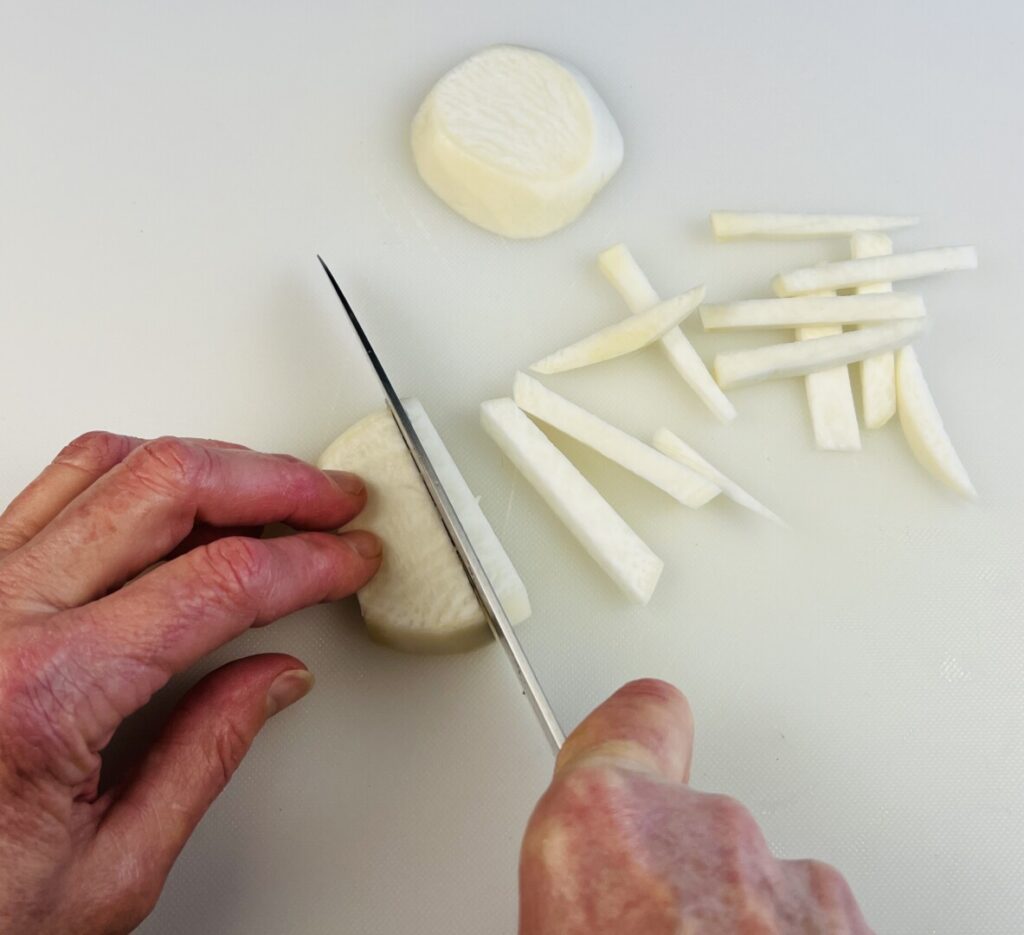
Spring-harvested turnips balance their inherent peppery flavor with the sweetness of youth. Trim and peel the turnip, then cut it into batonnets: French fry shapes just a little smaller than 1/4 x 1/4 x 2 inches.
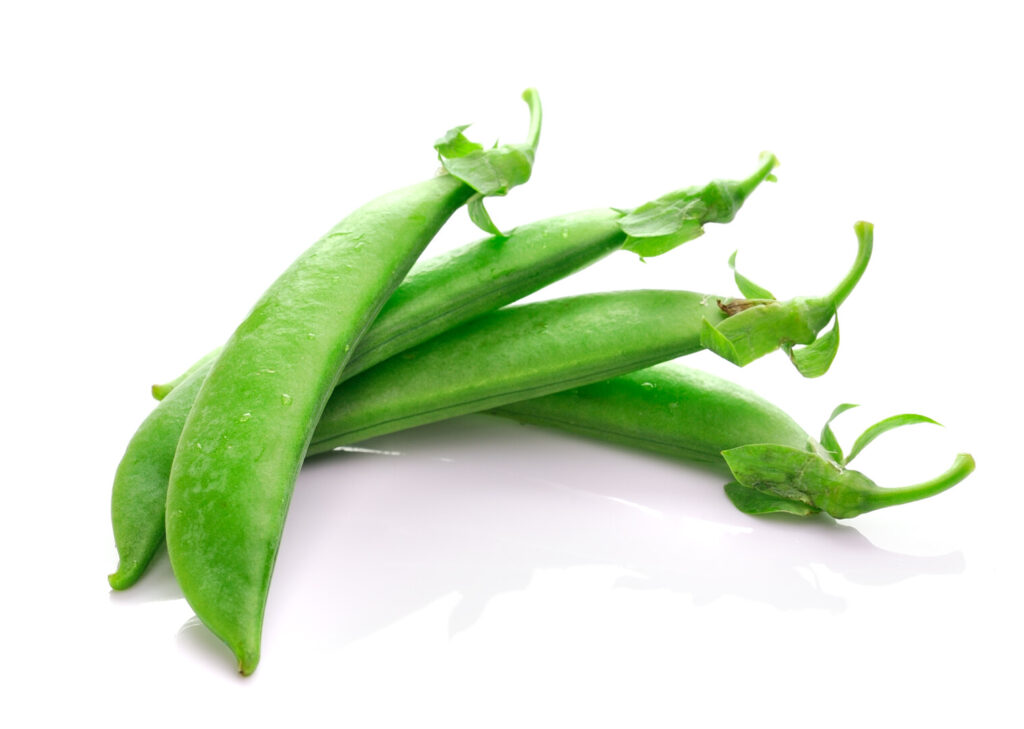
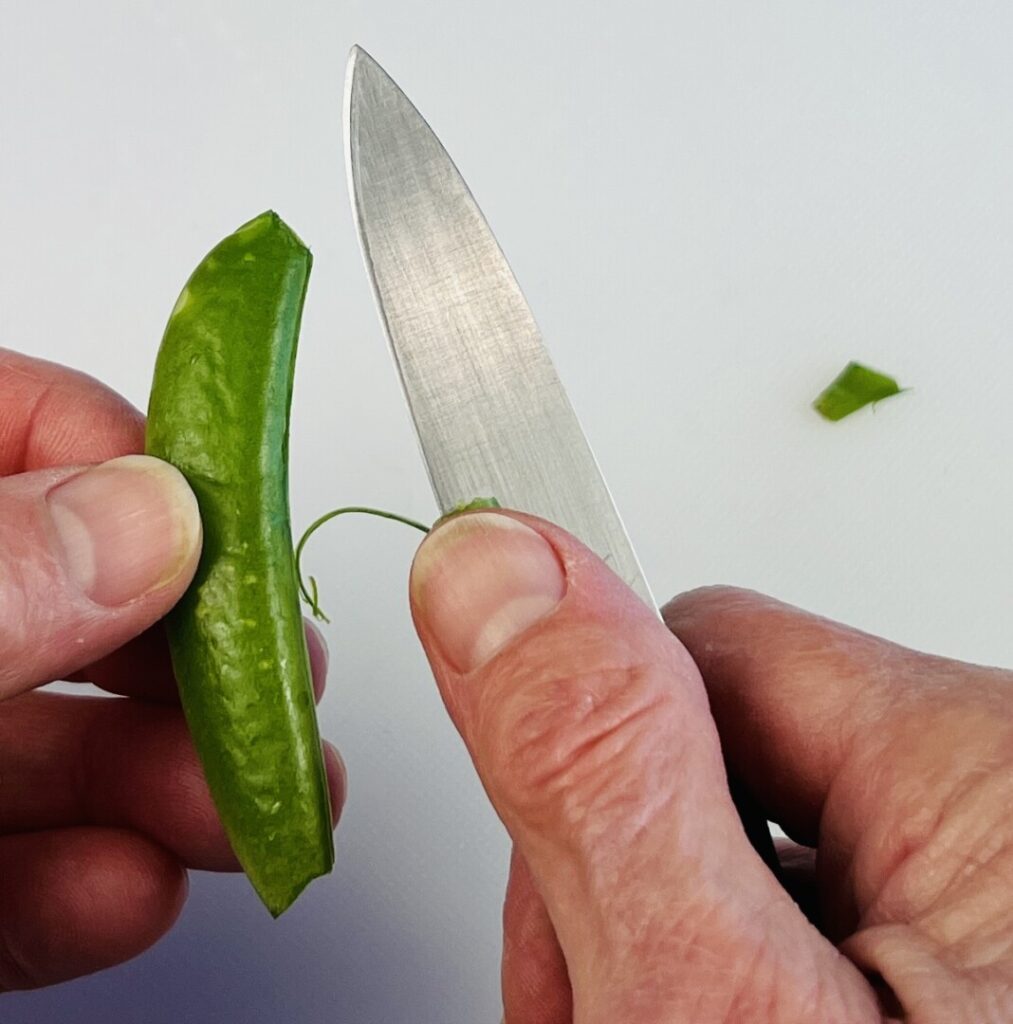
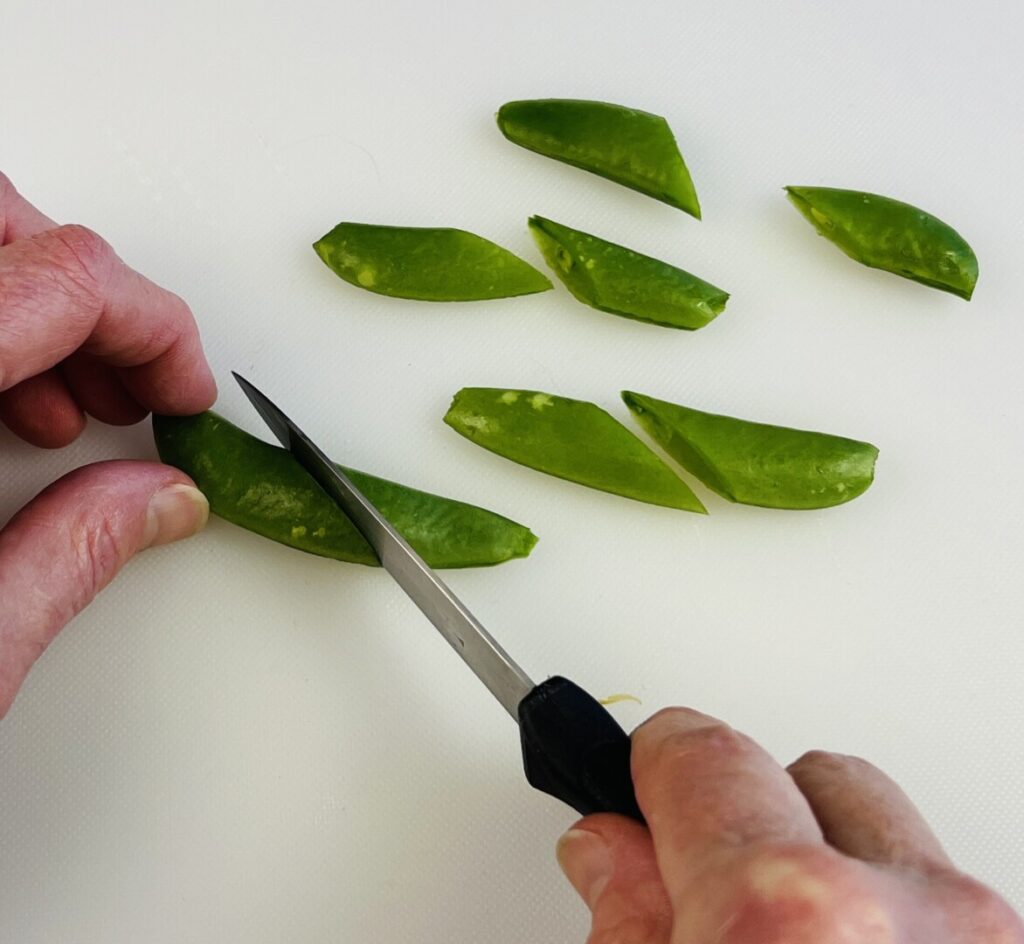
Most commercially-available snap peas have fibrous strings that need to be removed before cooking. The most efficient way to do this is with a paring knife. Trim off one end and pull gently. If a string emerges, grasp it between your thumb and the knife blade and continue pulling downward until the string completely releases from the pod. Turn the snap pea so that the other end is at the top and repeat to string the other side of the pod. If the snap peas are large, cut them in half on a sharp diagonal.
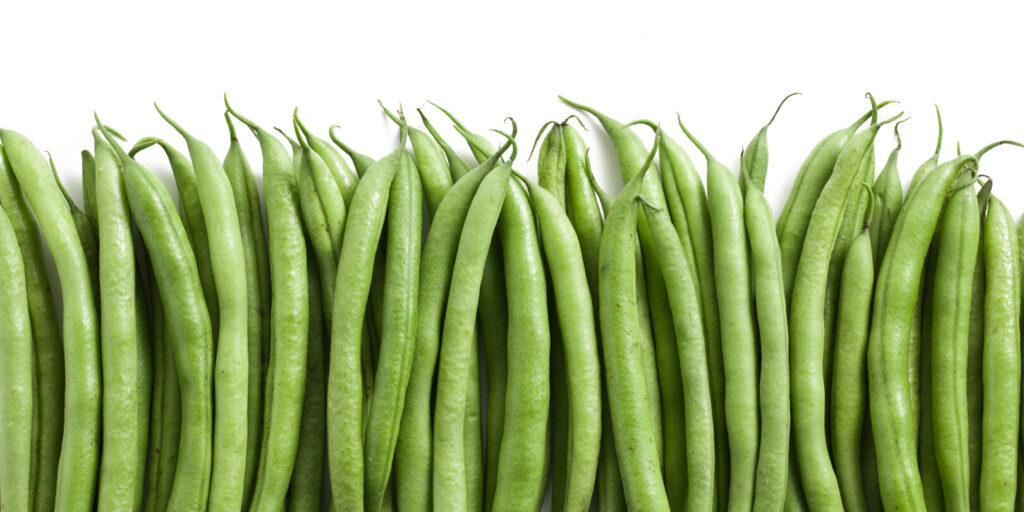
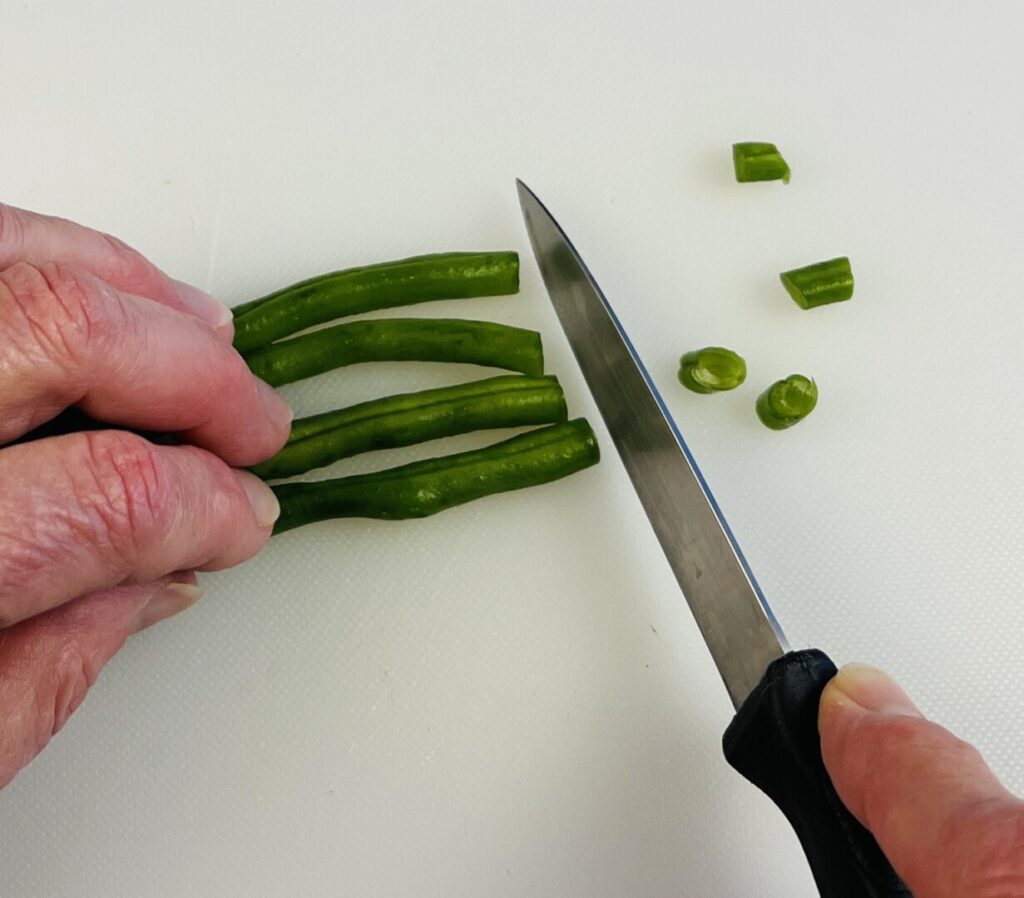
Green beans need only have the stem ends trimmed away and then cut on the diagonal.

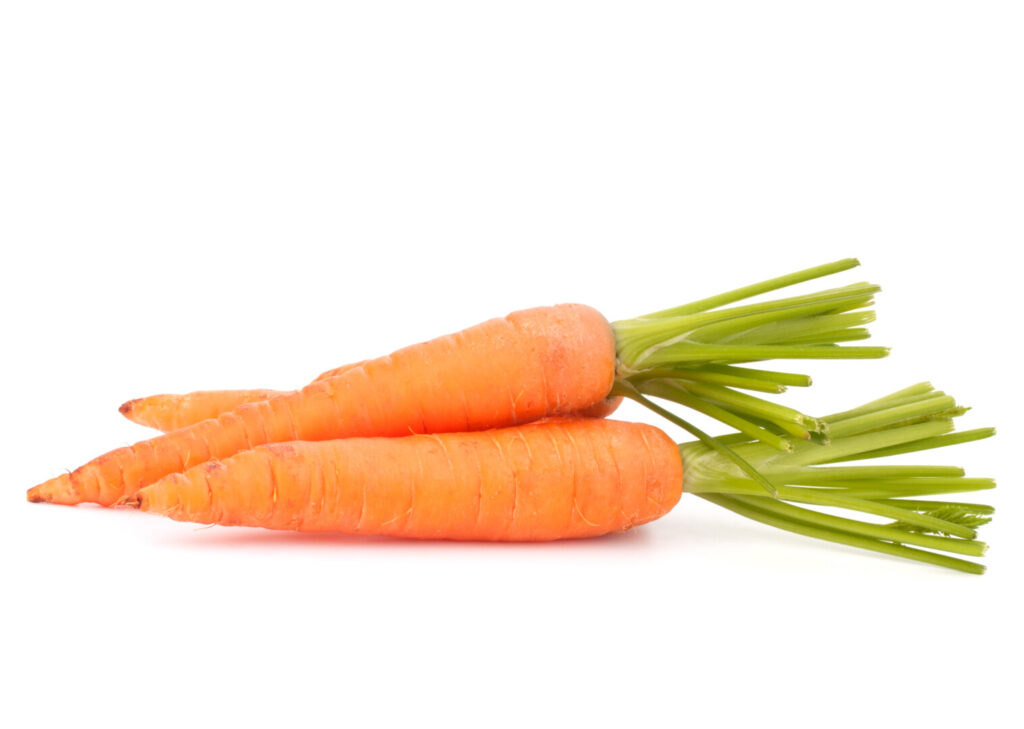
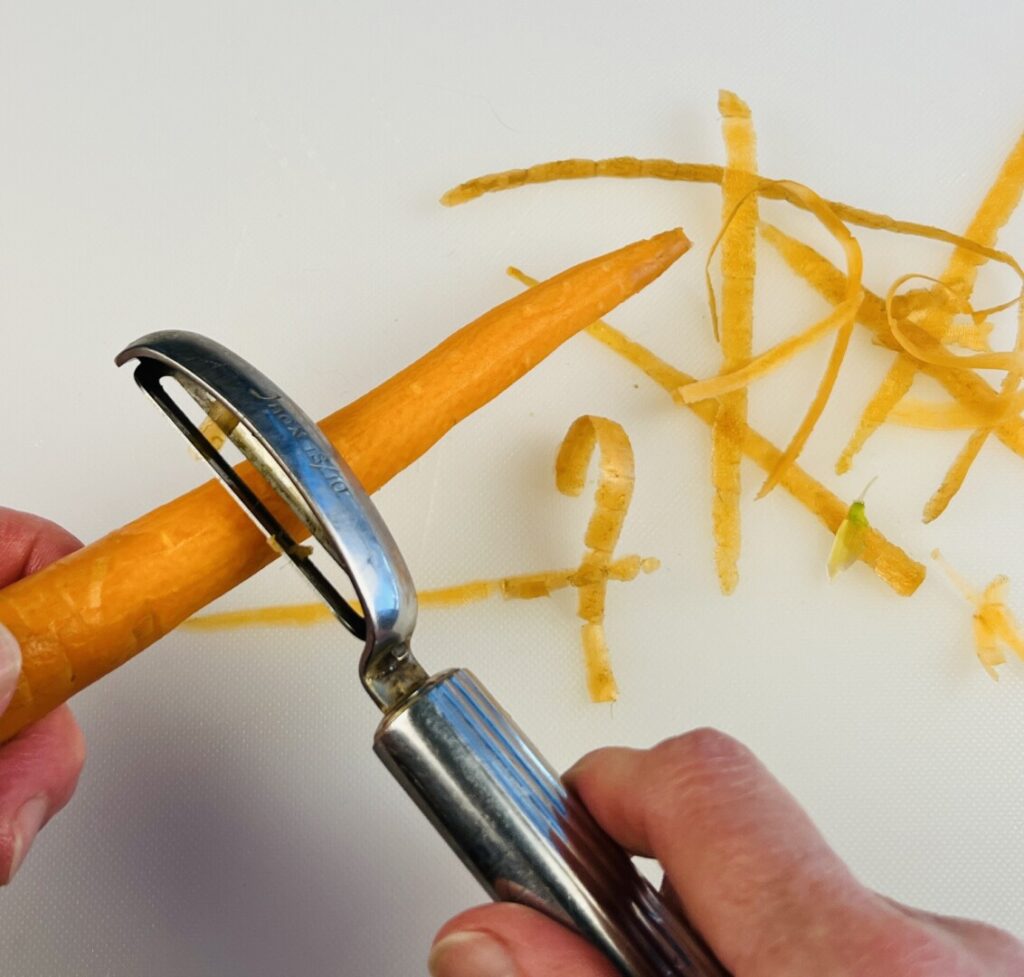
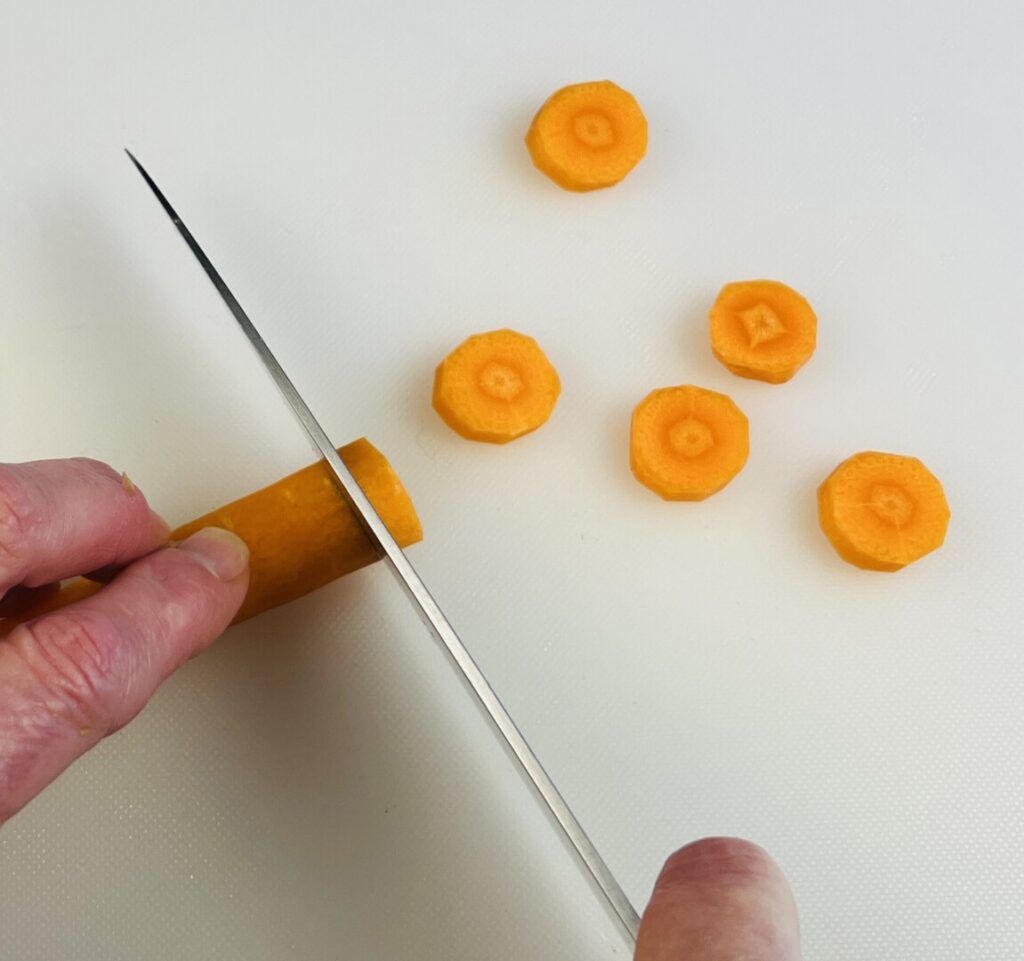
Peel the young carrots and then cut into rounds a little less than 1/4-inch thick.
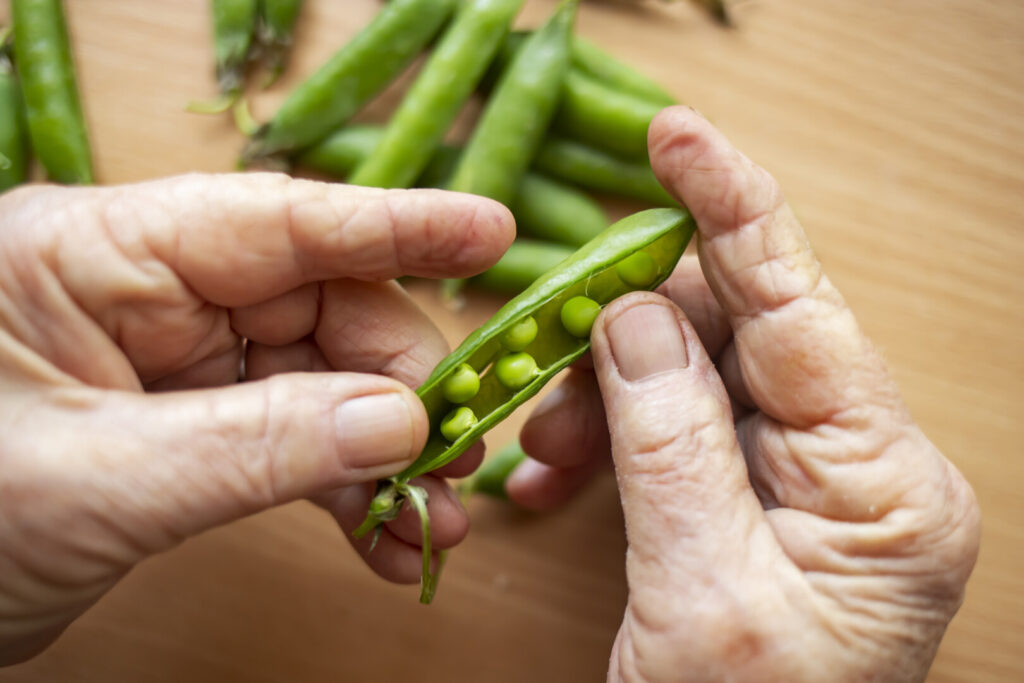
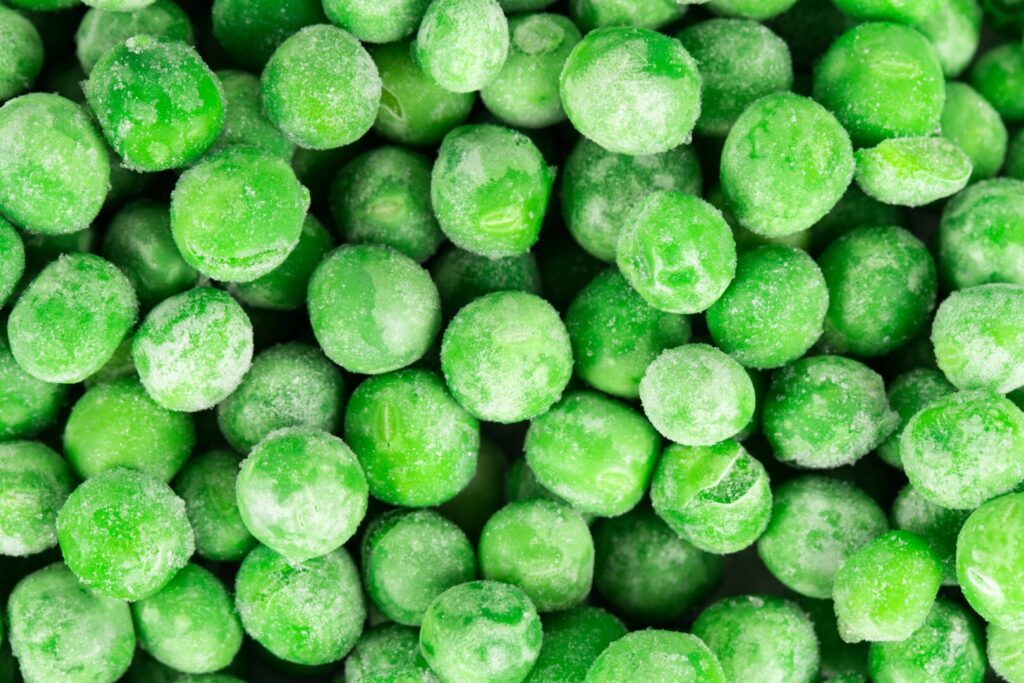
“English peas” is the name now used to distinguish fresh shell peas, or pod peas, from other types such as snap peas and snow peas. Nothing beats the sweet flavor and tender, juicy texture of English peas freshly picked from a local garden and eaten within hours of harvest. True, it requires some time and effort to remove the peas from their pods. But for me this is a peaceful, mindless activity that can be done while watching TV or relaxing with family members. However, a frequent problem with buying commercially-raised English peas is the time elapsed between harvest and table. The moment a pea pod is removed from the plant, the natural sugar in the peas begins converting into starch, causing them to lose flavor and acquire a dry and chewy mouthfeel. Unless you have your own garden, a nearby farmer’s market, or access to a high-quality produce purveyor, you may do better using frozen peas. The benefit of frozen peas is that they’re processed immediately after harvesting and, so, retain their flavor and texture. It’s important to understand that, before freezing, the shelled peas are blanched to optimal doneness; no further cooking is needed. Just thaw them and add to your dish.
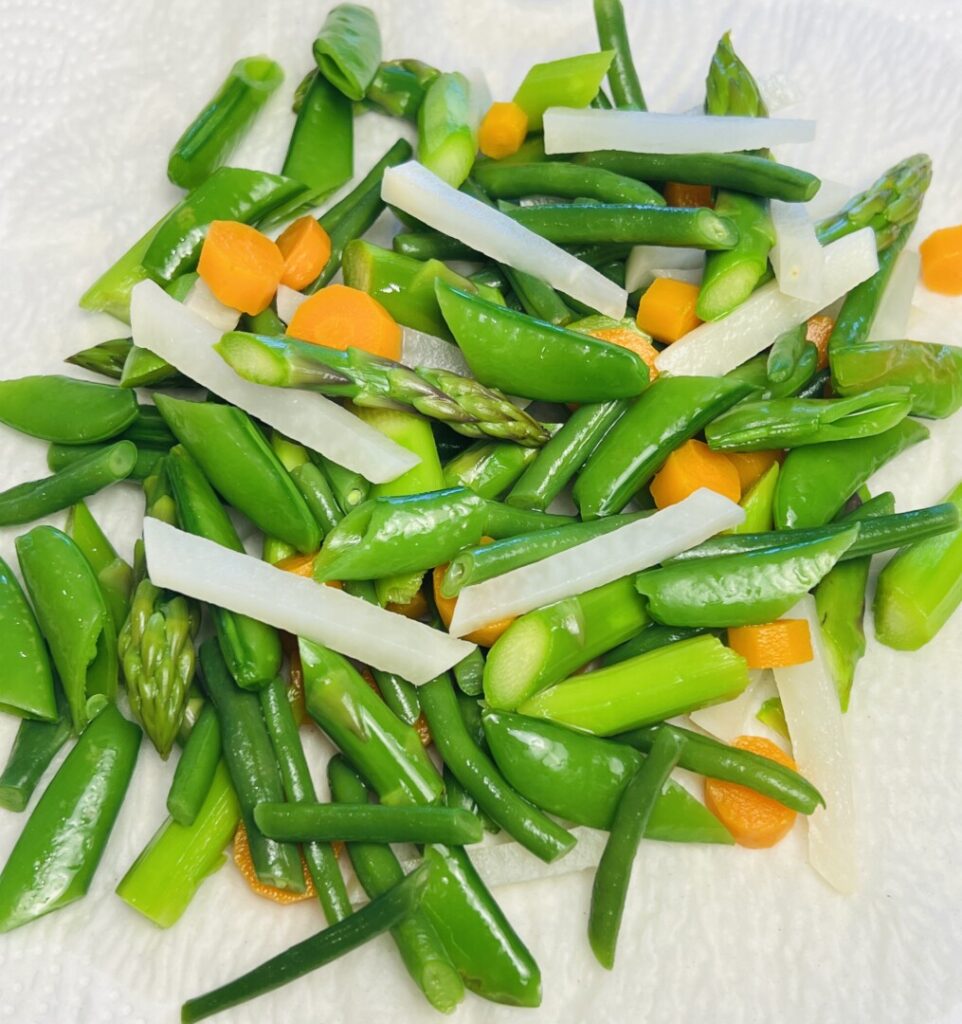
For this recipe we’ll par-cook the vegetables ahead of time, as part of our mise-en-place. I’ve encountered pasta primavera recipes that specify boiling the vegetables along with the pasta. Indeed, this is an efficient idea; however, because each of our vegetables cooks at a different rate, it requires precision timing. After a long day at work I’m simply not up for dealing with that! It’s far less stressful to blanch each vegetable separately to its optimal, al dente texture…
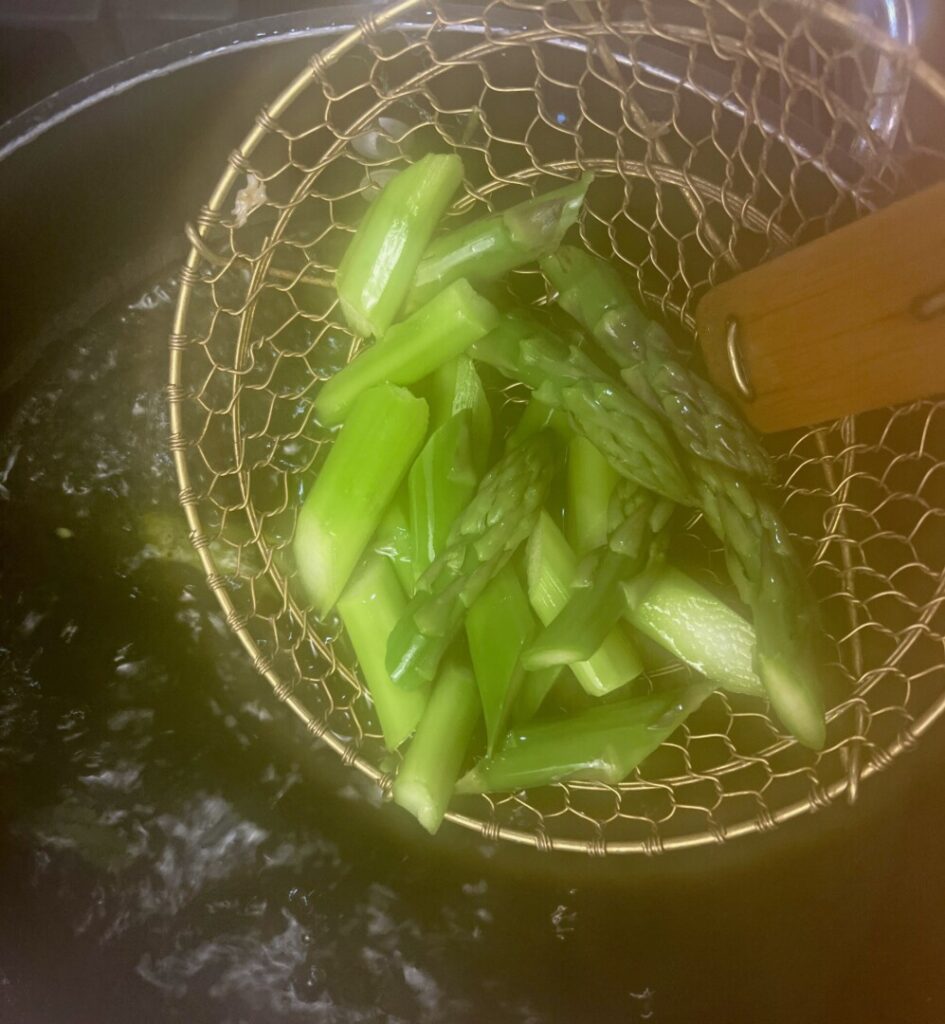
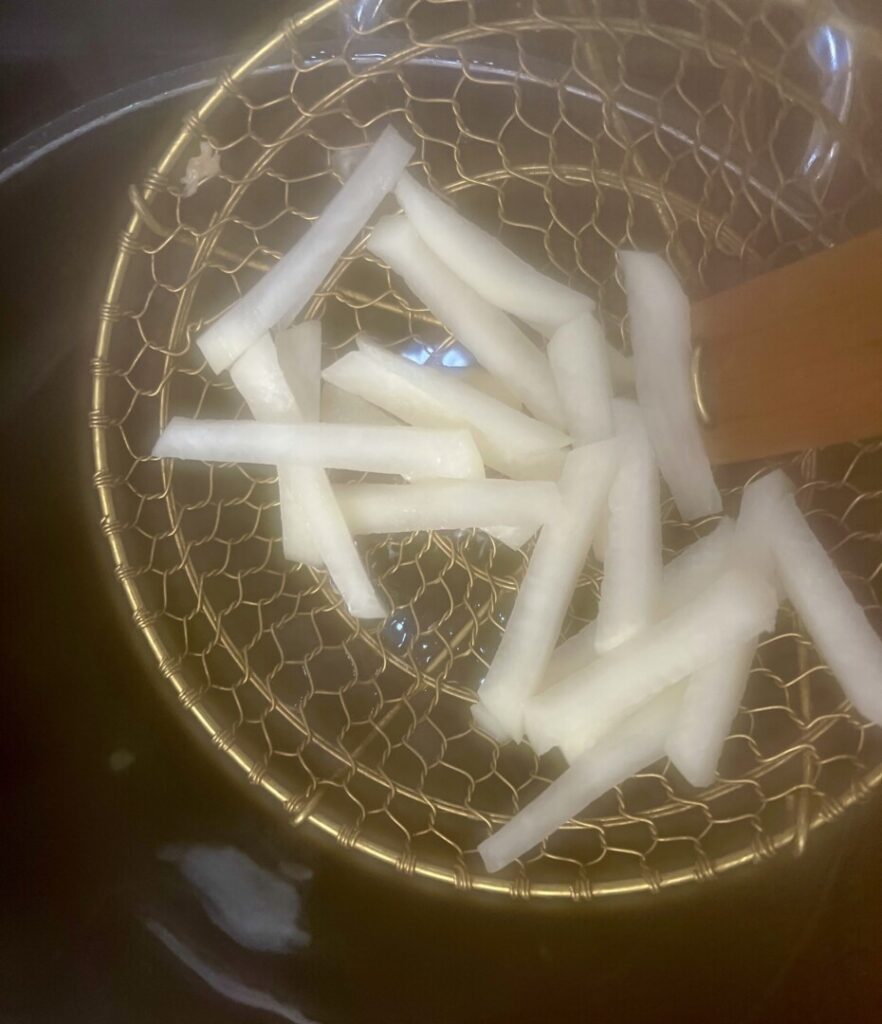
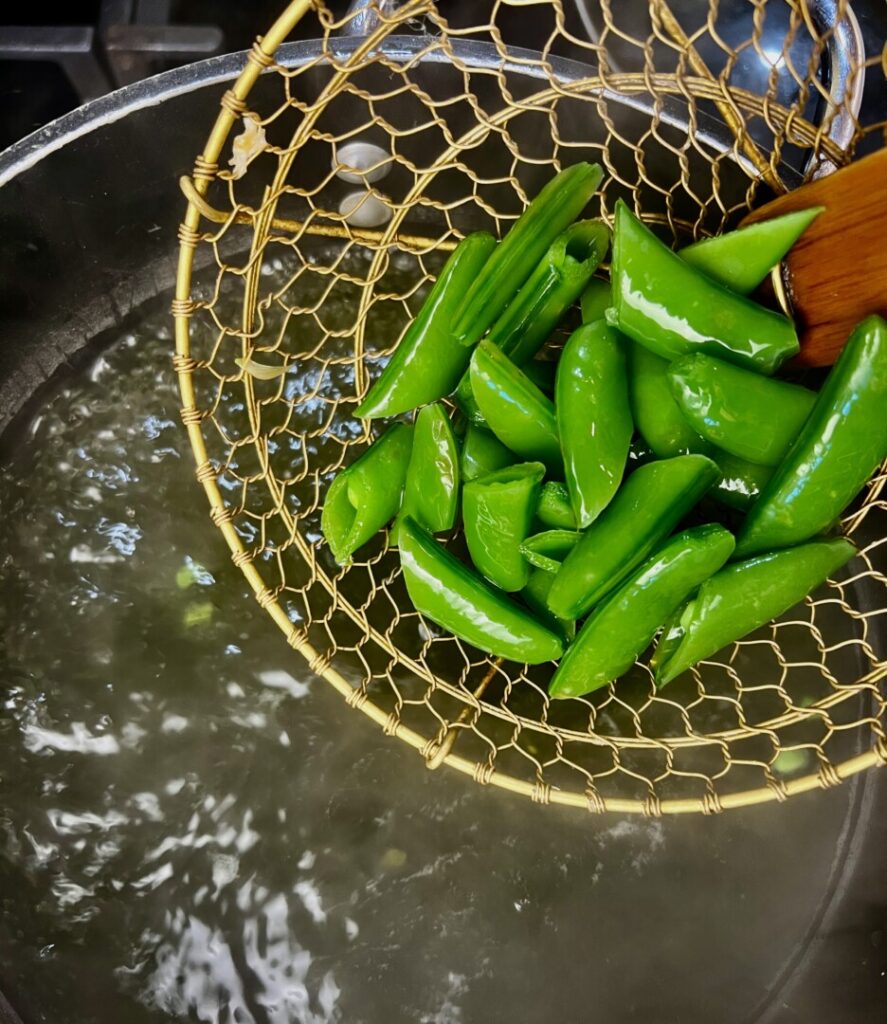
…and then refresh the vegetables together in a bowl of cold water.

Be sure to blot the vegetables thoroughly dry on paper towels.
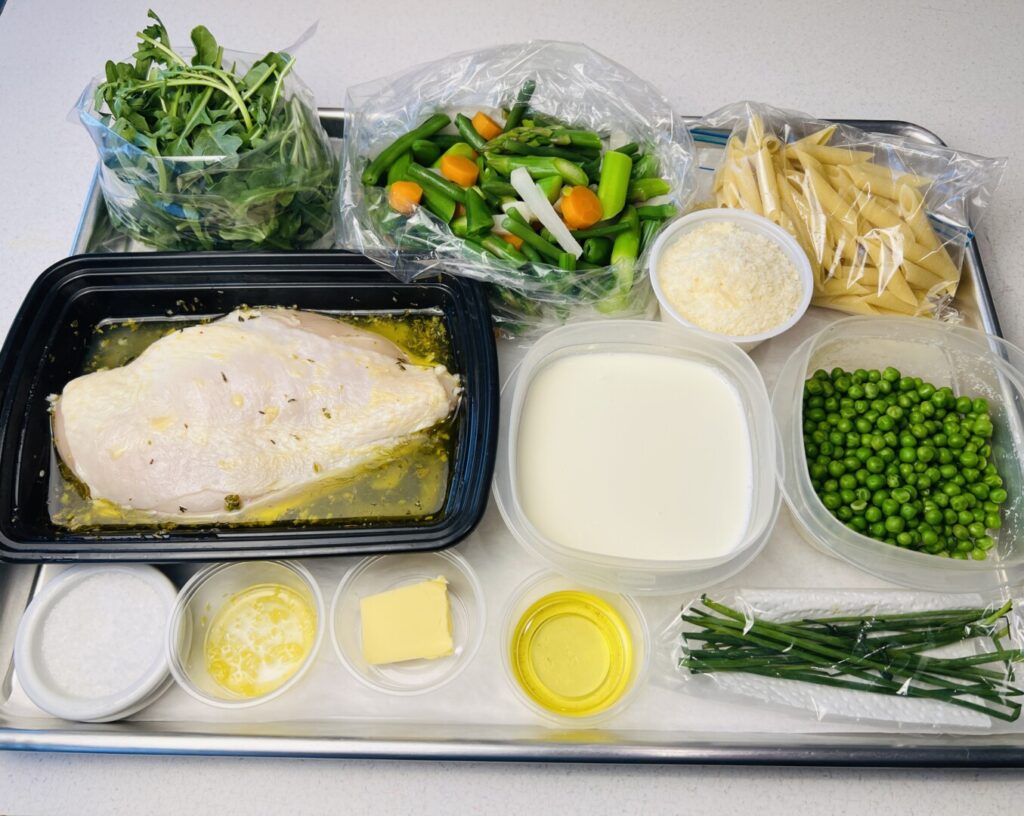
At this point all that remains is to grate the Parmigiano cheese and assemble the remaining ingredients. Here’s your mise tray:
It’s dinnertime—let’s COOK!
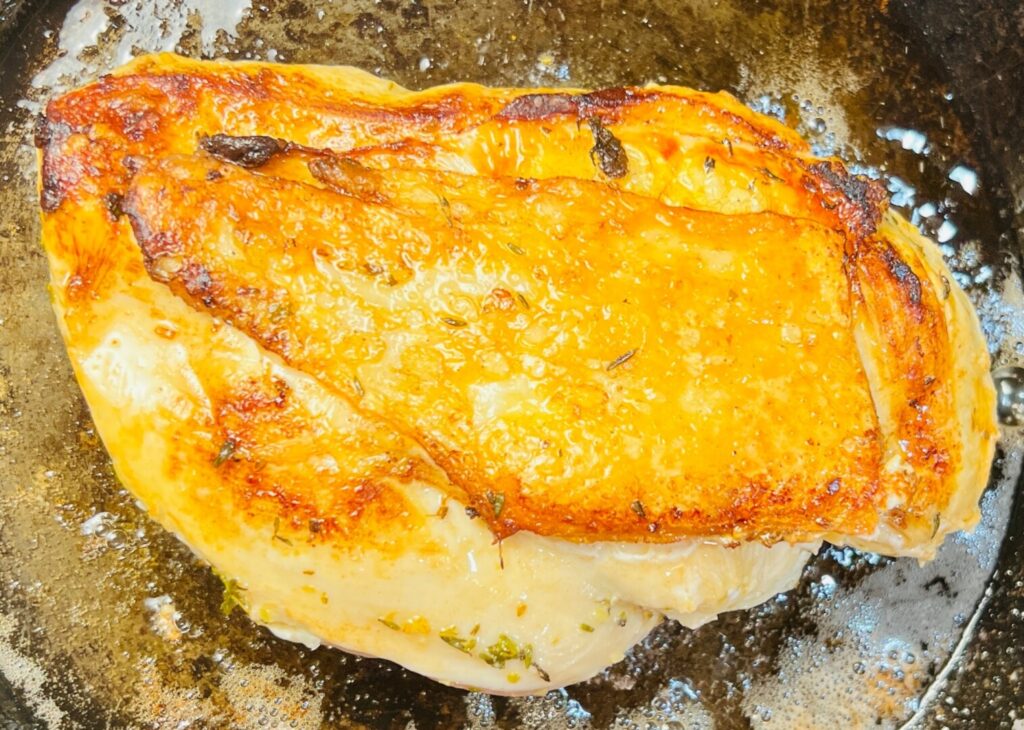
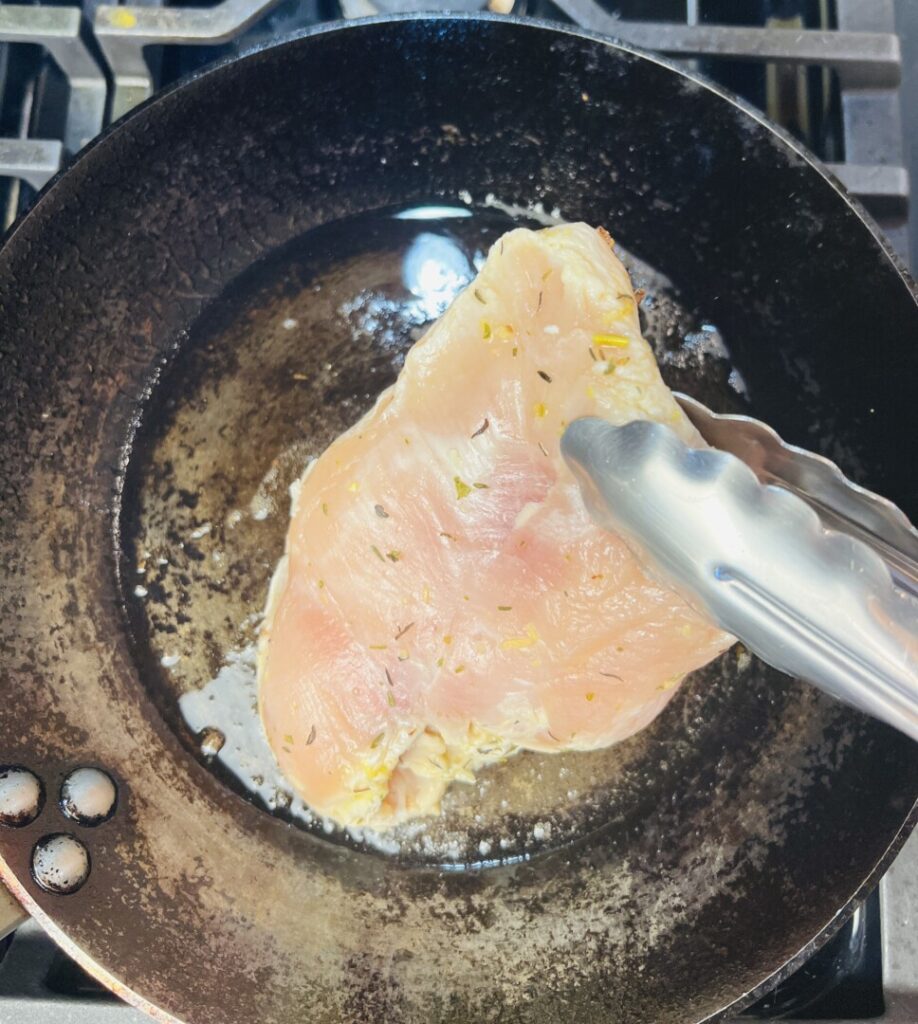
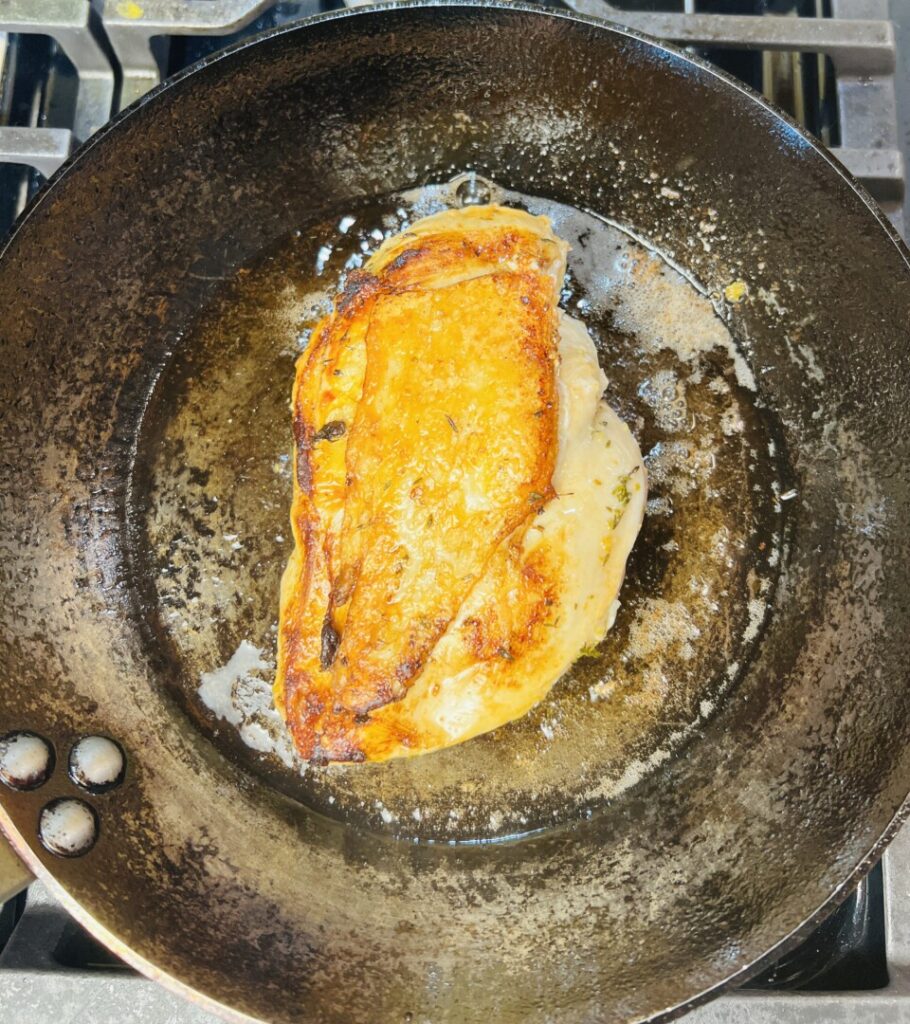
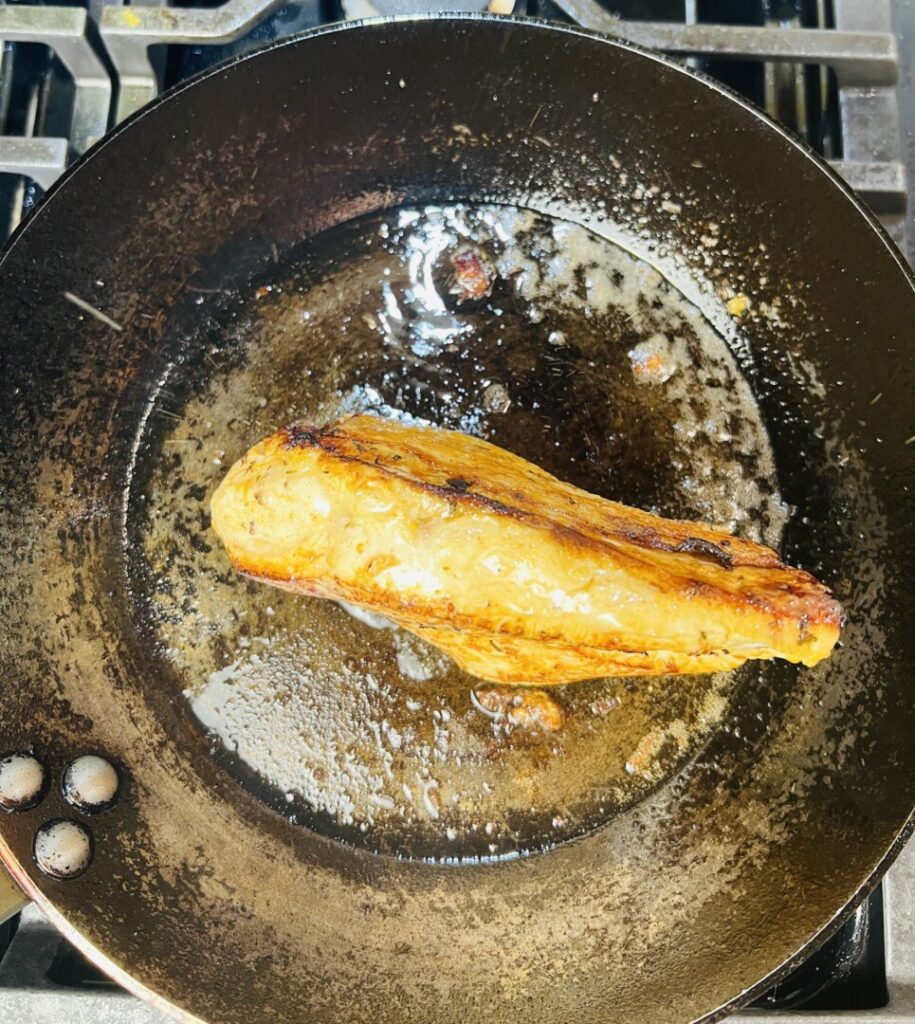
Pan-roasting is the ideal cooking method for relatively small, thick cuts of meat and poultry. The rationale for pan-roasting is simple: Because of the item’s small size, if cooked only in the oven—no matter how high the heat—the interior will cook to the desired internal temperature before the exterior will achieve our desired golden-brown color and crispy crust. So, we first brown the exterior by sautéing it. Start cooking the chicken breast skin-side-down until golden, then turn over to lightly brown the bottom. Large, thick chicken breasts benefit from a brief sauté on the thick side, as well.
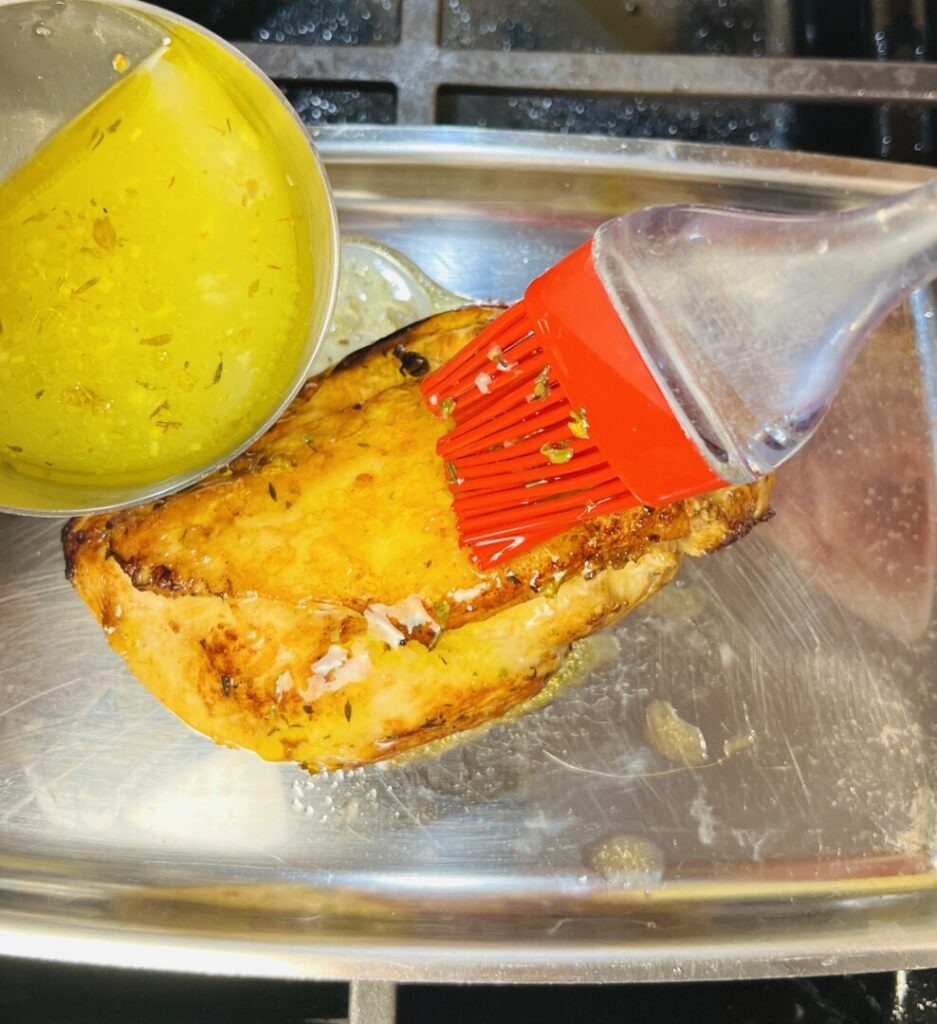
For best flavor and to enhance the texture of the skin, baste the chicken breast with the reserved marinade before, and once or twice during, roasting.
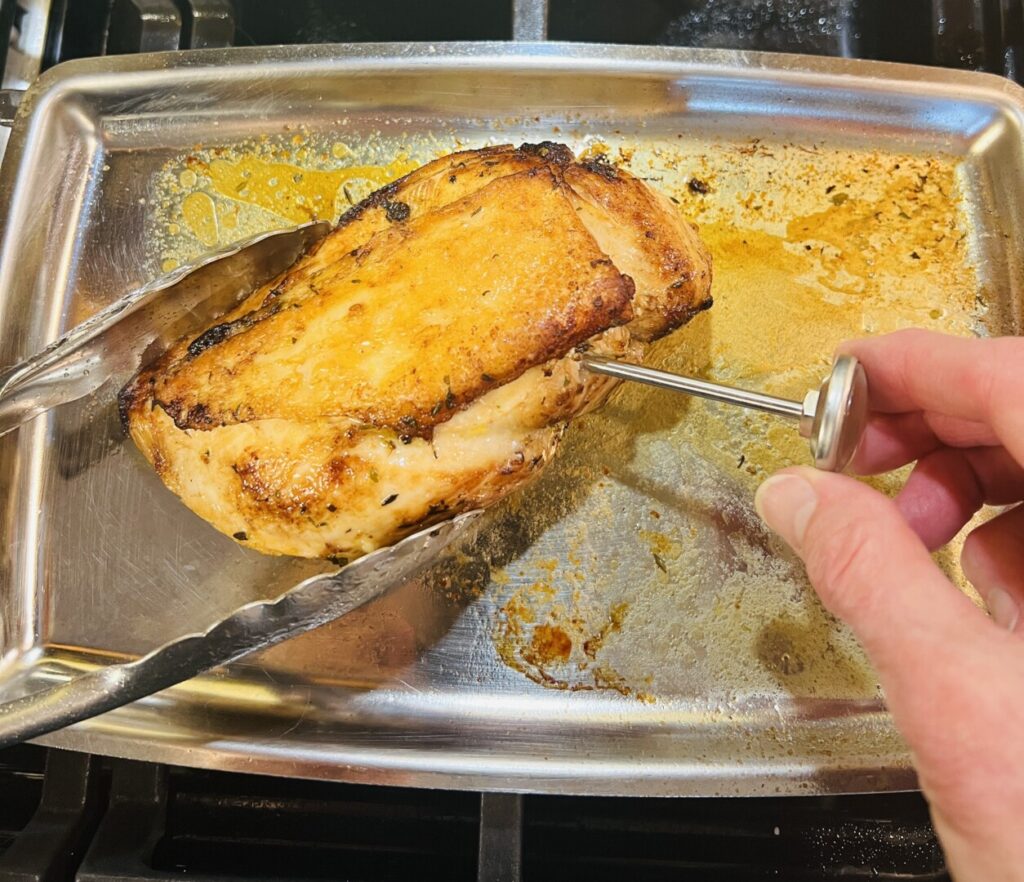
The chicken breast is done roasting when the internal temperature reaches 160°F. Once out of the oven, carryover cooking will raise the temperature to the required 165°F. Hold it on the back of the stove until you’re ready to plate. As the oven’s heat penetrated the interior of a roast, it forced the meat’s juices into the center. Resting the chicken breast before slicing it allows the juices to permeate back into the meat so that every bite is juicy.
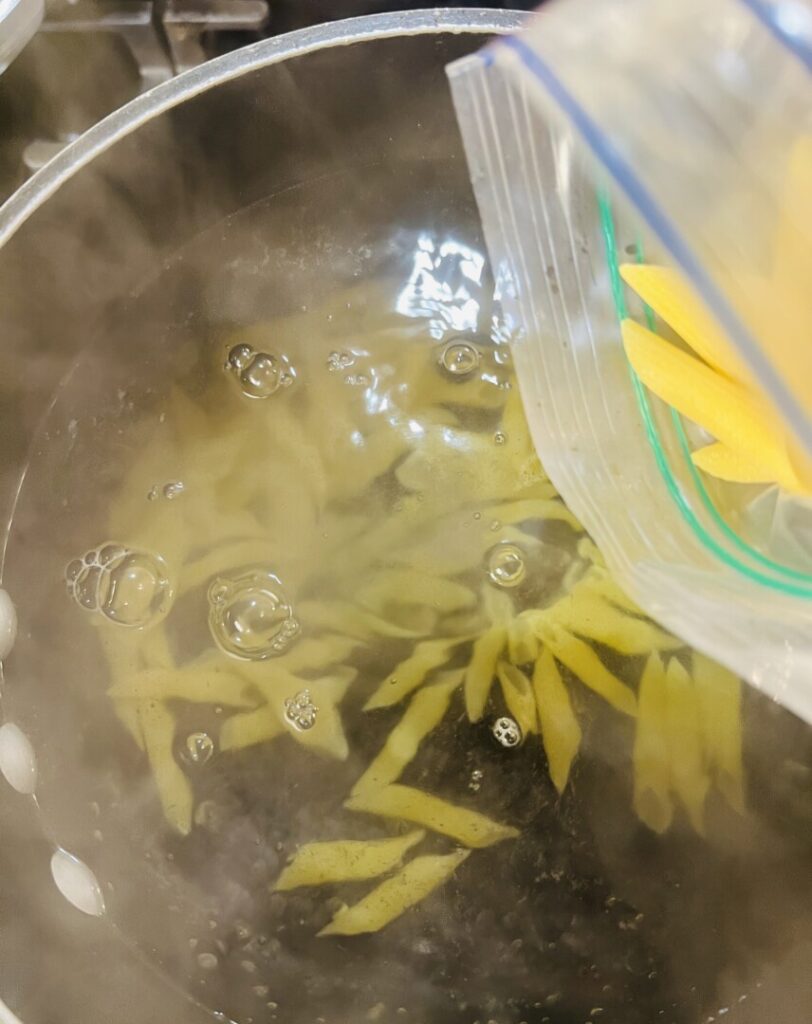
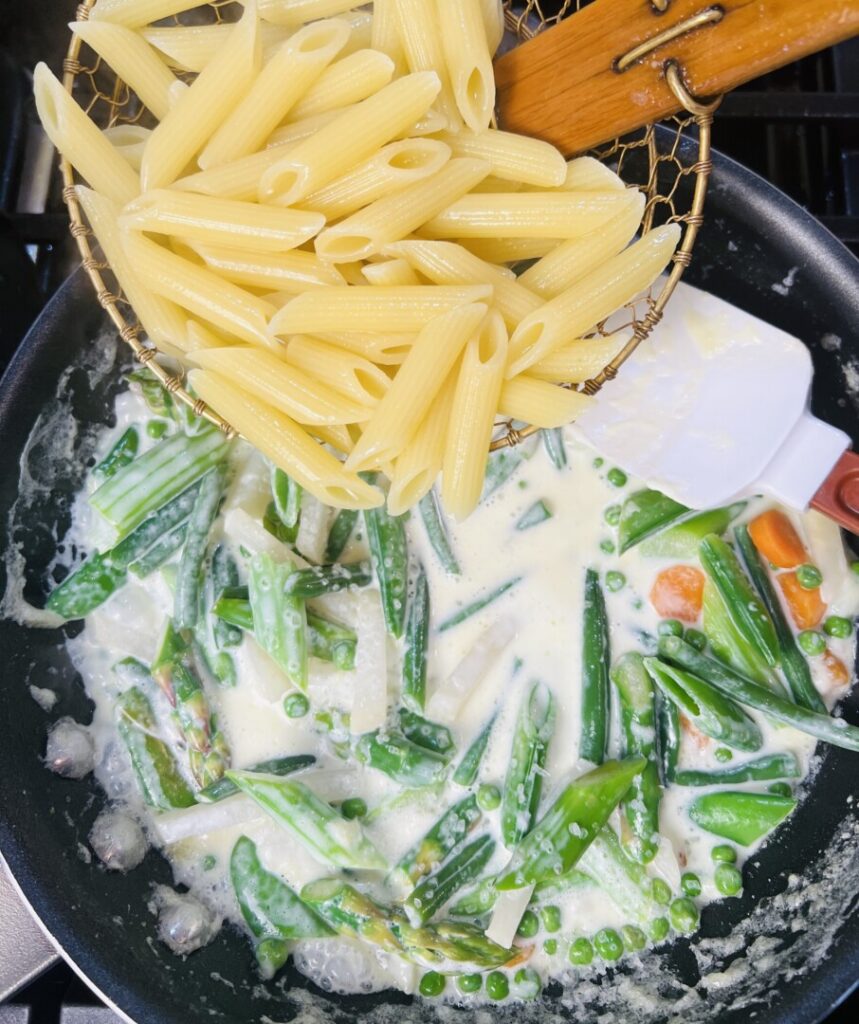
Boil the penne in a large amount of generously-salted water. Stir frequently to prevent it from sticking together or sticking to the bottom of the pan. Cook the penne just to al dente texture, keeping in mind that it will cook a bit further in the sauce.
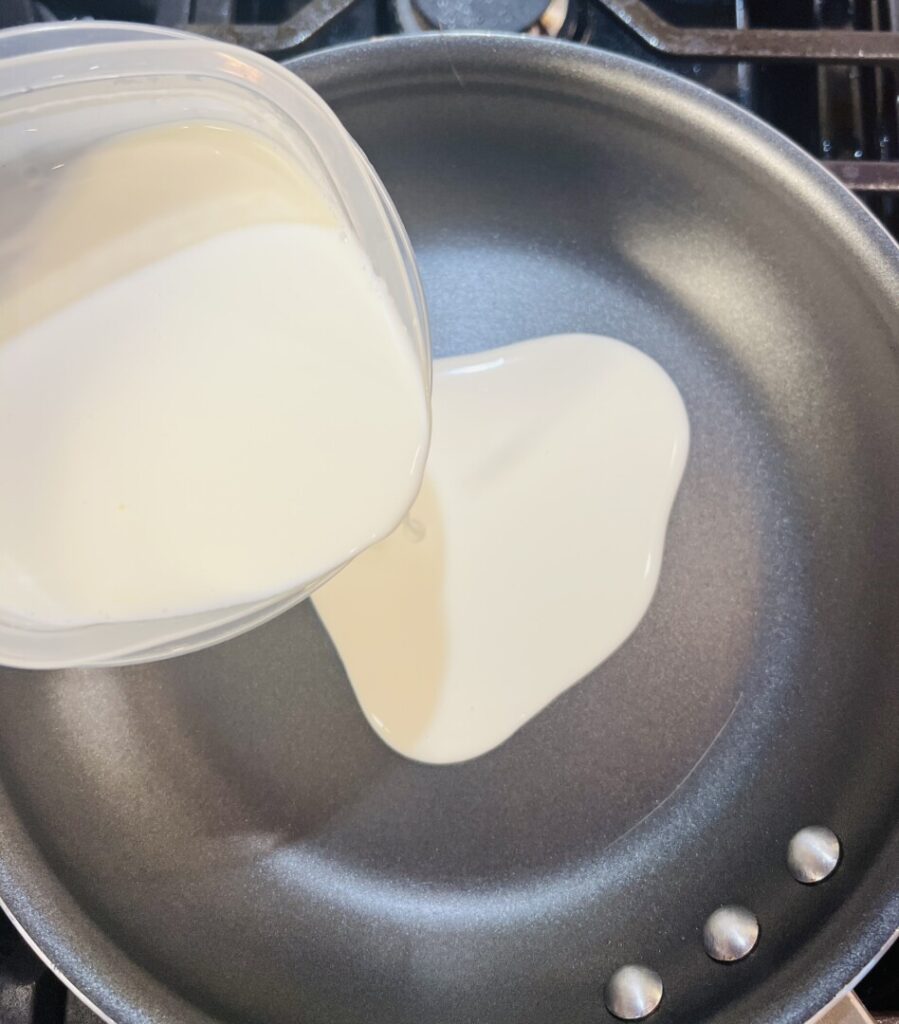
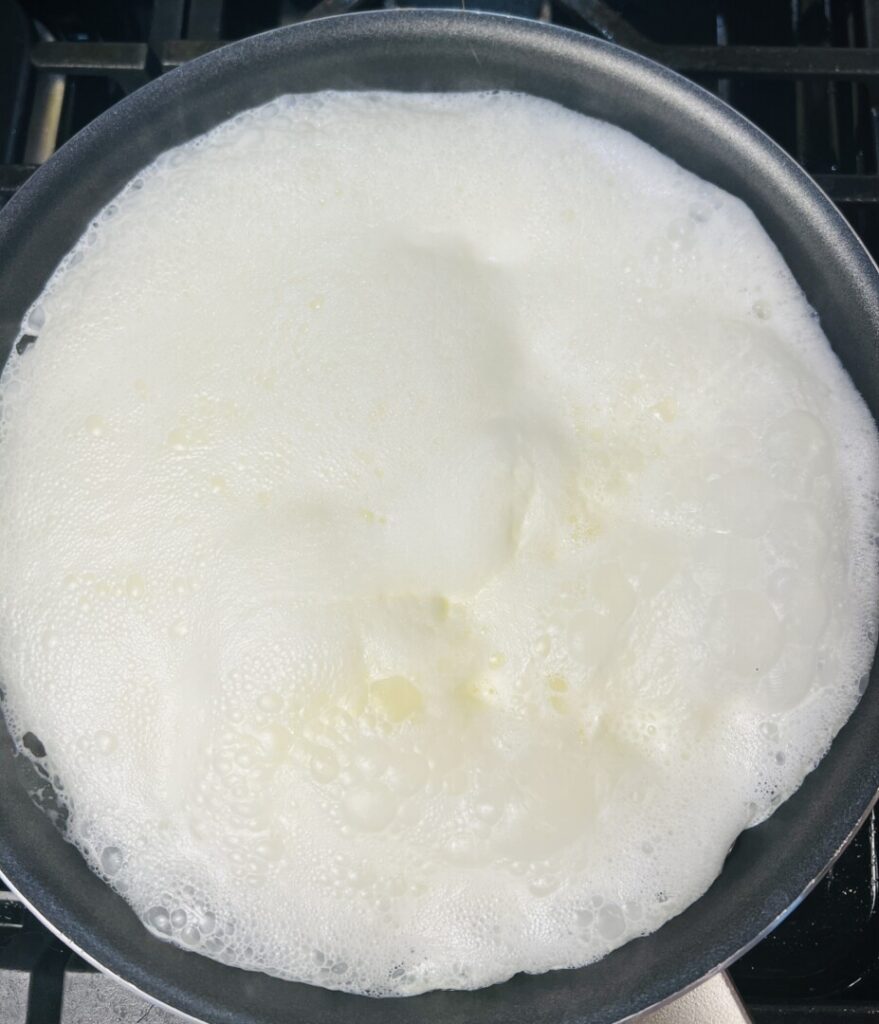
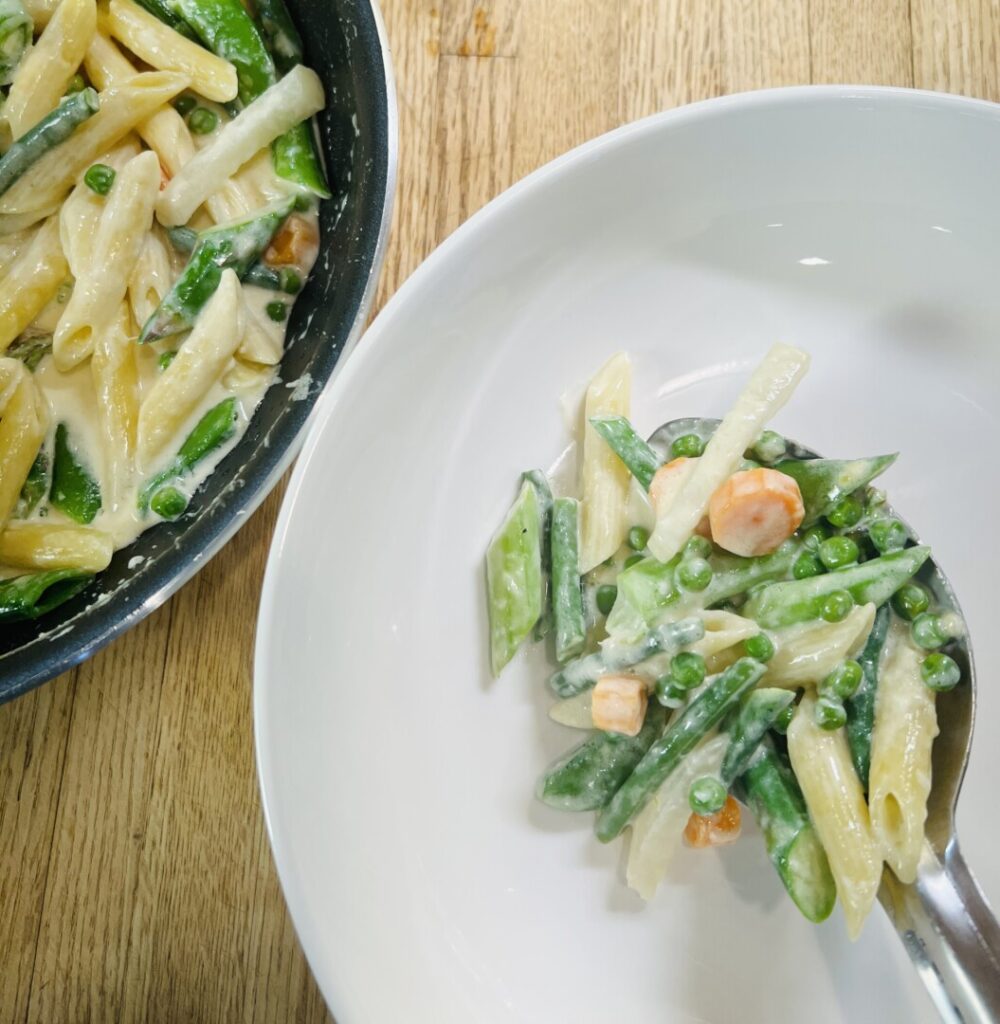
Our recipe for Penne Primavera features a classic cream reduction sauce. Because heavy cream contains a high proportion of milk fat it can boil without curdling and, when enough water boils away, it will thicken into a nappé consistency (thick enough to coat a spoon but thin enough to flow on the plate). The addition of grated Parmigiano cheese functions to further thicken it. In Italian cuisine, pasta in such a sauce is called alla panna. North Americans are accustomed to calling this preparation “Alfredo” sauce, after a mid-20th century Roman restaurateur who purportedly invented it. But in Italy, pasta alla panna has been made for centuries.
Once the cream is reduced to about half its original volume, you’ll add the vegetables and pasta. Use a “spider” strainer to lift the pasta out of the cooking water and into the sauce. When you do, some of the pasta water will accompany the pasta—this is necessary.
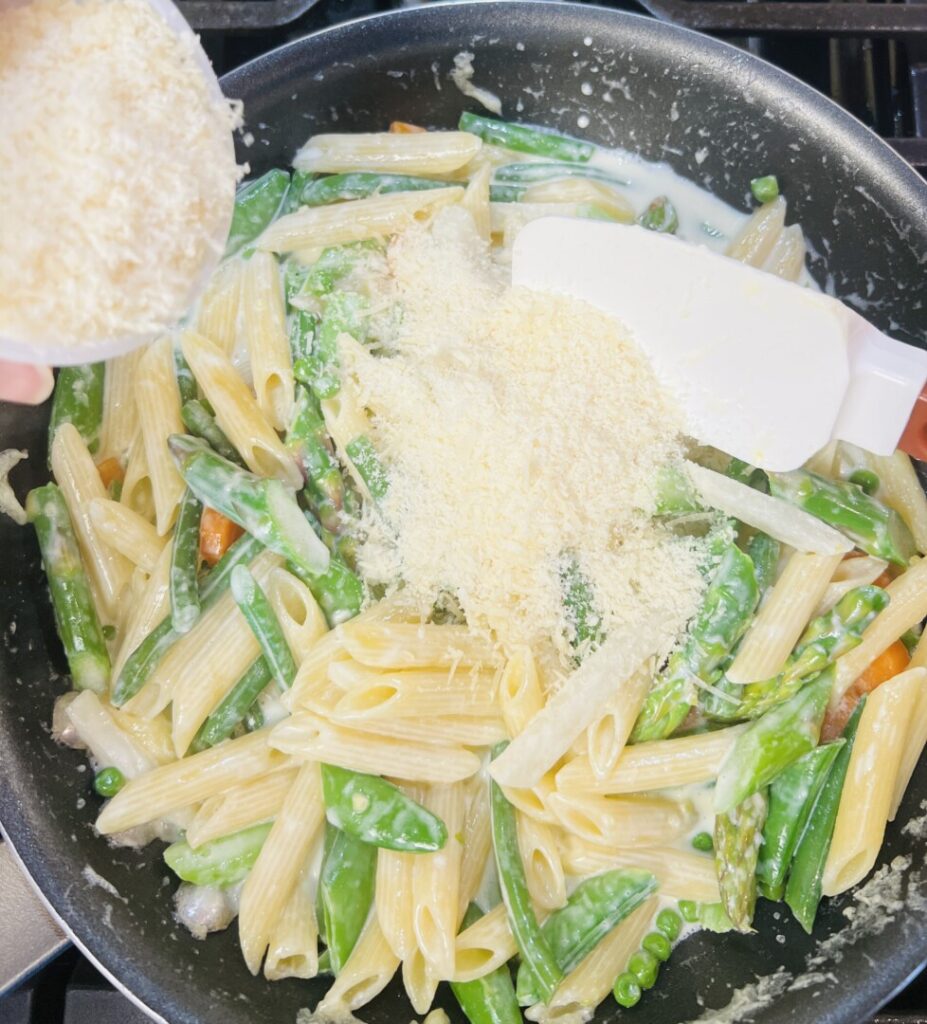
Adding the cheese is the inflection point in making this dish. Before the cheese is added you can reheat the sauce or even thicken it by boiling. But after the cheese goes in, you have to be very careful about heat. When a sauce containing cheese is heated upward of 150°F, the proteins in the cheese begin to coagulate into lumps and separate out from the sauce’s liquid and fat components. The sauce will look curdled and have an unpleasant, grainy mouthfeel. Once the cheese goes into the sauce it’s a risk to reheat it.
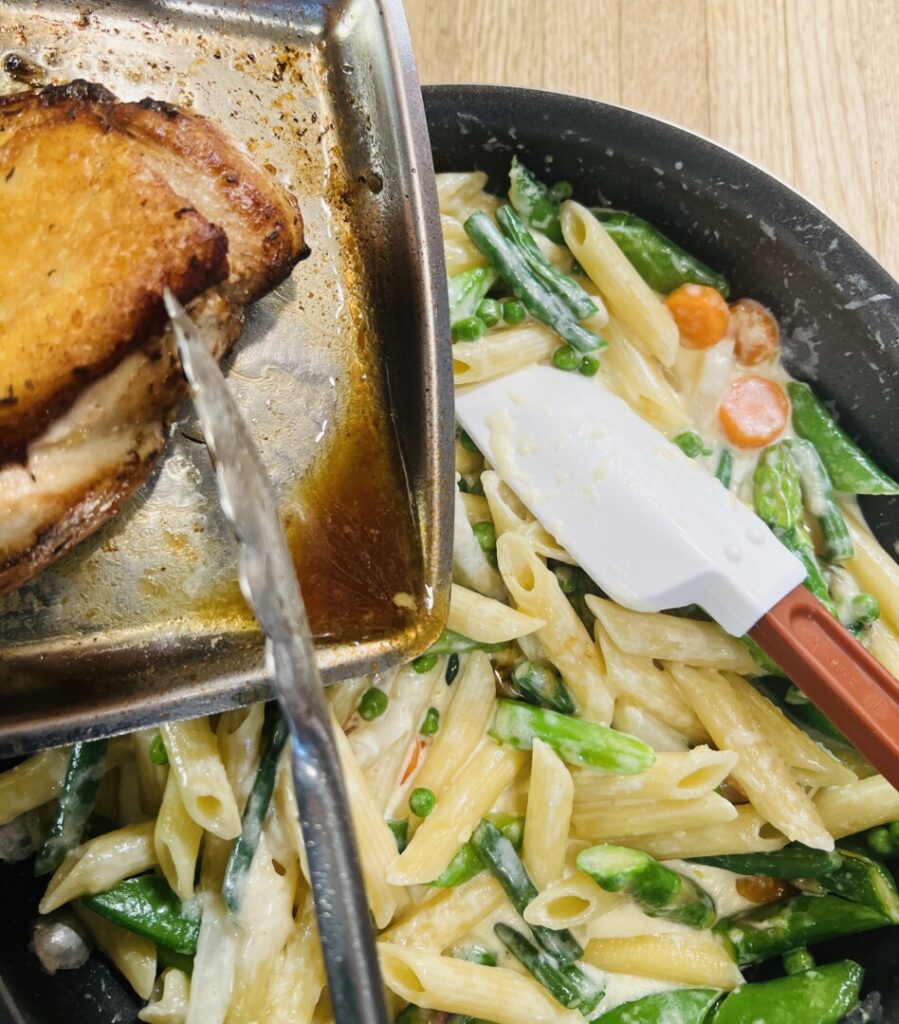
Chefs never throw away flavor! Although classic primavera is a vegetarian dish, if you’re serving it with chicken anyway, let’s add the tasty jus from the chicken roasting pan into the sauce.
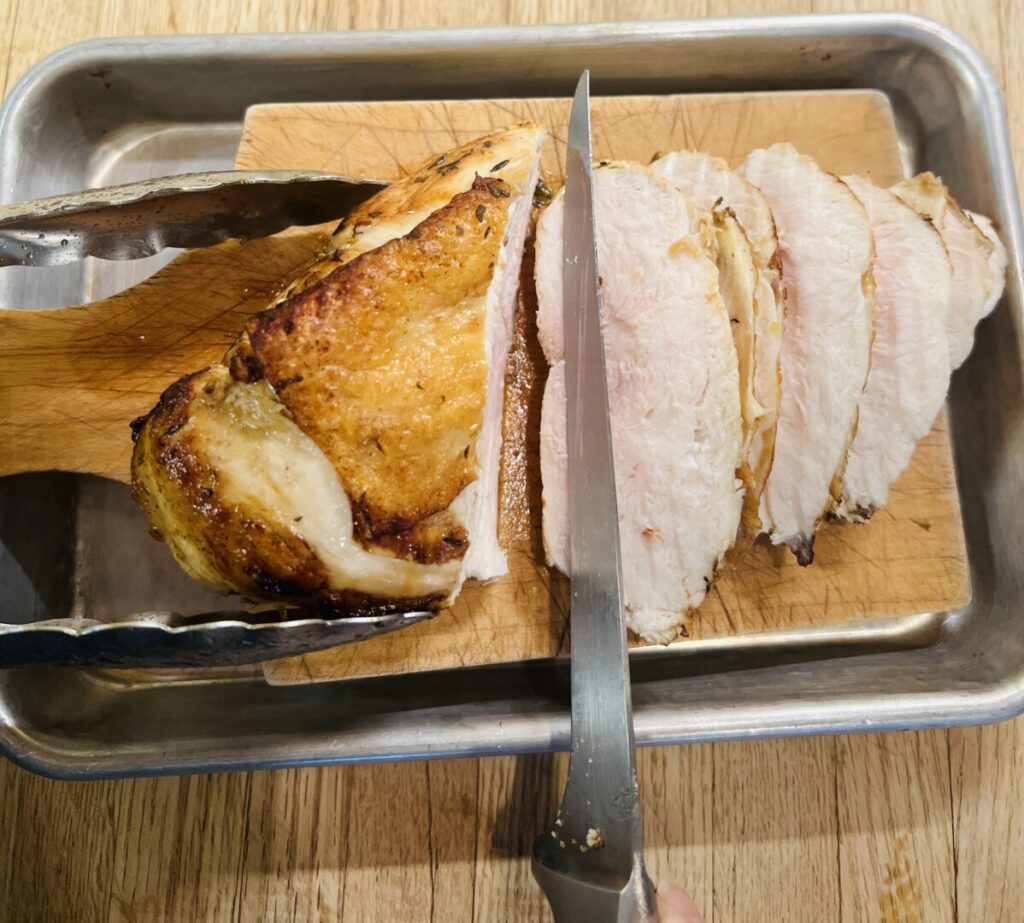
Just before plating, you’ll carve the chicken breast. Resting the chicken helped retain most of the flavorful juices within the meat. Nonetheless, some remaining juices may emerge during carving. Before you begin slicing the chicken breast, position a small cutting board in a sheet tray so that the tray will catch any juices.
Look at the underside of the chicken breast to determine the direction of the meat’s grain. Then, cut across the grain into slices a little less than 1/4-inch thick. Keep the slices lined up close together to facilitate plating.
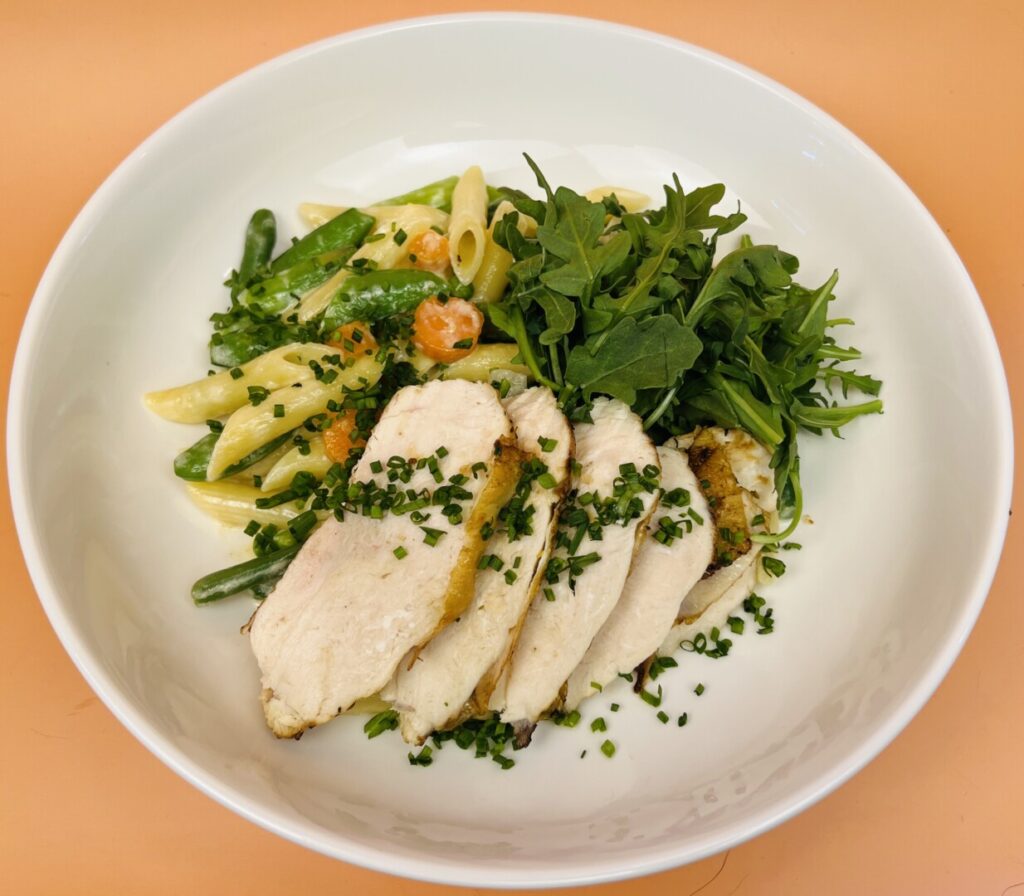
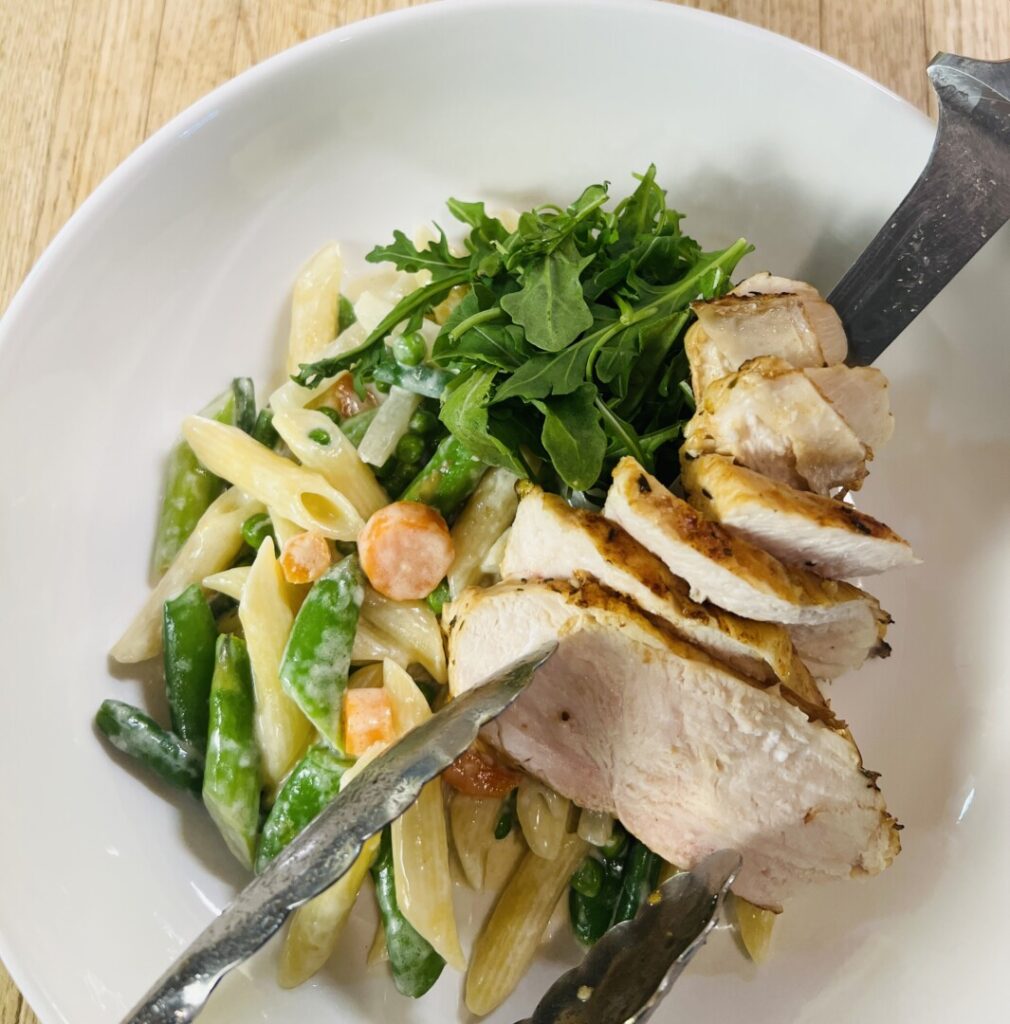
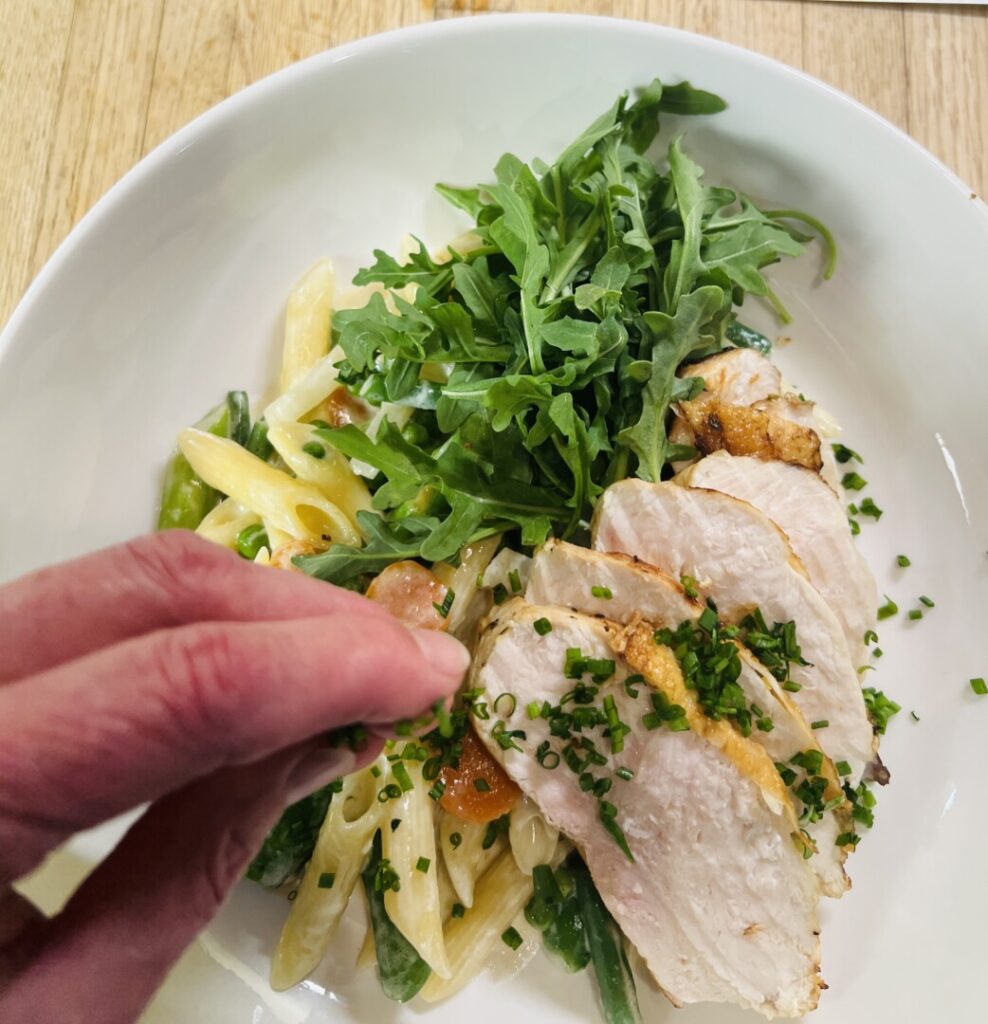
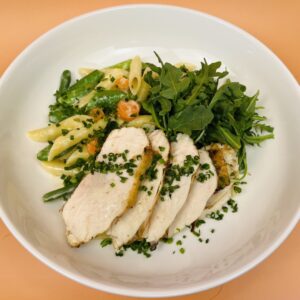
Now you’re ready to plate. First, mound the penne on the left front of a warm pasta bowl, and plant a bouquet of baby arugula at the back. The arugula adds a cool, crisp mouthfeel element and a subtle bitterness that pleasantly contrasts with the creamy sweetness of the pasta sauce. It also adds the dimension of height to your presentation. Use a chef’s professional technique to plate the chicken: Slide your knife blade under the lined-up slices, steady the slices with your tongs, lift, and transfer the slices to the plate. Fan the slices attractively against the arugula and on the pasta. Finally, sprinkle a line of chives across the plate.
Penne Primavera with Pan-Roasted Lemon Chicken Breast
Ingredients
step 1 ingredients
- 1/2 lemon
- 1 garlic clove
- 1/4 c white wine
- 1/4 tsp kosher salt
- 1/8 tsp dried oregano
- 1/8 tsp dried thyme
- 1/4 c extra-virgin olive oil
step 2 ingredients
- 1 (1 1/2 lb) bone-in, skin-on chicken breast half (or 1 [6-oz] boneless, skinless chicken breast per person)
step 4 ingredients
- 6 oz asparagus, preferably thick stalks
- 2 oz sugar snap peas
- 1 young carrot (the type with leafy tops intact)
- 2 oz green beans
- 1/2 small turnip
- 6 oz fresh peas in the pod (or 1/4 c frozen peas per person)
step 6 ingredients
- 2 oz Parmigiano-Reggiano cheese
step 8 ingredients
- 1 Tbsp pure olive oil (not extra-virgin)
- 1 tsp butter
step 9 ingredients
- 1/2 oz chives (or the green part of a scallion)
step 10 ingredients
- 1 Tbsp kosher salt
- 5 oz penne pasta, preferably made in Italy
step 11 ingredients
- 1 1/2 c heavy cream
- to taste kosher salt
step 14 ingredients
- 1 1/2 oz baby arugula (or other microgreens)
Instructions
PREP: Mise the recipe ahead of time.
1. Make the marinade and lemon seasoning for the penne:
- Use a swivel peeler to remove 2 strips of yellow zest from half the lemon. Mince the zest. Place half of the minced zest in a container large enough to hold the chicken breasts. Place the remaining minced zest in a small container for seasoning the penne.
- Squeeze the juice from the lemon. Place 1/2 tsp juice into the small container with the lemon zest, and place the remaining juice in the chicken container.
- Peel the garlic and use a garlic press to crush it into the chicken container.
- Add the wine, step 1 salt, oregano, thyme, and extra-virgin olive oil to the chicken container and stir to combine.
2. Fabricate the chicken:
- If using a bone-in, skin-on chicken breast, remove the bones. Remove the tender and save it for another use. Trim away any connective tissue and fat. Reserve the bones for stock-making, or discard.
- OR—If using boneless, skinless chicken breasts, trim away any connective tissue and fat.
3. Marinate the chicken:
- Place the boneless skin-on breast in the marinade and turn it to coat evenly. Refrigerate for at least 2 hours or for up to 24 hours. After 24 hours, remove from the marinade and blot dry before further holding. Reserve the marinade.
- OR— Place the boneless, skinless breasts in the marinade, turn to coat, and refrigerate for 1 hour or for no longer than 3 hours. Remove from the marinade and blot dry before further holding. Reserve the marinade.
4. Fabricate the primavera vegetables:
- Snap the tough ends off of the asparagus stalks. If the asparagus is medium-thick to thick, use a swivel peeler to peel the lower ends of the stalks. Cut into 1-inch diagonals.
- Trim off the stem ends of the snap peas and pull off any strings from both sides. Cut larger snap peas in half on the diagonal.
- Peel the carrot and cut it into rounds a little less than ¼ inch thick.
- Trim the ends from the green beans and cut into 1-inch diagonals.
- Peel the turnip and cut into small batonnets (¼ x ¼ x 1 ½ inch).
- Shell the peas. (If using frozen peas, simply thaw them on a paper towel, do not cook.)
5. Blanch and refresh the primavera vegetables:
- Bring at least 1 gal water to the boil. Have ready a “spider” strainer and a bowl of cold water in the sink.
- Working with each type of vegetable separately, immerse the vegetables into the boiling water just long enough for them to cook crisp-tender. (Test by tasting a piece of each type.) Use the strainer to transfer each batch of vegetables into to the cold water, running a thin stream of tap water into the bowl to maintain the cold temperature.
- Drain the vegetables and blot dry on paper towels.
- If prepping ahead, place the vegetables in a plastic bag with a folded paper towel in the bottom.
6. If necessary, fine-grate the Parmigiano-Reggiano.
HOLD: Refrigerate all ingredients up to 4 days.
COOK! Finish and plate your dinner.
7. Bring at least a gallon of water to the boil. Have ready a “spider” strainer and a ladle.
8. Pan-roast the chicken:
- Preheat an oven to 425°F.
- Blot the chicken dry on paper towels.
- Place a sauté pan over medium heat until hot. Add the oil and butter, and then add the chicken breast skin side-down (or convex presentation side-down). Sauté about 5 minutes until the skin (or bottom-side) becomes golden brown. (Sauté boneless breasts only about 2 minutes.)
- Turn over the chicken and sauté about 1 minute longer.
- If the chicken breast is very thick, turn it thickest side-down and sauté about 1 minute longer until golden brown on the bottom.
- Transfer the chicken to a sizzle pan or baking dish and baste it with some of the marinade. Roast the skin-on boneless breast about 8 minutes, basting once more with some of the reserved marinade.
- insert an instant-read thermometer in the thickest part of the breast; when almost cooked through the internal temperature should reach 160°F; the temperature will increase to 165°F through carryover cooking as it rests. Boneless breasts need only a minute or two in the oven to finish cooking.
9. Cut the chives crosswise into very thin rounds.
10. Boil the penne:
- Add the step 10 salt to the boiling water.
- Drop the penne into the boiling water, stir to separate it, and return to the boil.
- Cook, stirring often, about 7 minutes until just under al dente in texture.
11. Start the sauce:
- Add the cream to a nonstick sauté pan and bring to the boil. Reduce to about half its original volume.
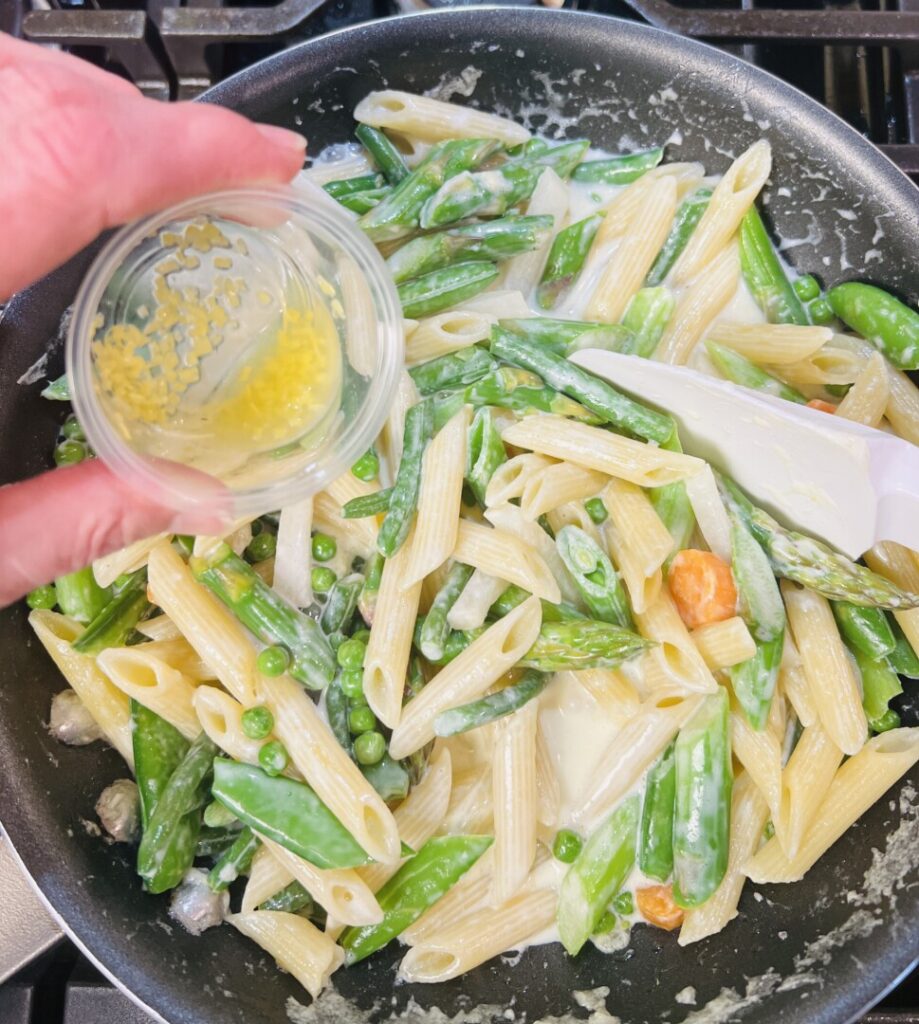
- Add the lemon juice and zest, then add the primavera vegetables and some salt.
12. Finish the penne:
- Use the “spider” strainer to transfer the penne into the sauté pan with the cream and vegetables. (Some of the hot pasta cooking water will come along with the penne; this is necessary.) Keep the pasta water at the simmer.
- Bring the sauce, pasta, and vegetables to the simmer and cook over medium heat, stirring often, for about 1 minute until the vegetables are hot and the cream has thickened into a thin sauce.
- Turn off the heat and fold in the cheese. The sauce should thicken around the vegetables. Once the cheese is in the sauce, don’t return the pan to heat.
- Taste to evaluate the seasoning; add more salt if needed.
- Cover the pan and hold in a warm place until ready to plate.
13. Slice the chicken:
- Place a small cutting board onto a sheet tray. Transfer the chicken breast(s) to the cutting board and cut them across the grain on the diagonal into slices, while maintaining the original shape of the chicken breast(s). Retain the juices.
14. Plate:
- Evaluate the consistency of the penne sauce. If it’s too “tight” (thick and not flowing), use the ladle and a plastic spatula to fold in a little more hot pasta-cooking water.
- Use a large spoon to mound the penne slightly left of center into warmed pasta bowls.
- Mound some of the arugula on the penne at the top right of each plate.
- Slide a knife under each portion of the sliced chicken breast, keeping the shape intact, transfer it to the right front of each pasta bowl, and fan it out, partially leaning on the arugula.
- Make bouquets of the remaining arugula and plant them upright to create height on the plate.
- Sprinkle a line of chives across each plate.